Wednesday, August 24, 2022

Sneak Peek: Winter Wreaths, Holiday Greetings & Joyful Holiday Paper

Hello and welcome to day 3 of our Sneak Peek Week!  This week I am showcasing cards using our newest Fall & Holiday collections which will be available to purchase on Friday, August 26th.

Today I am sharing ideas using our new Winter Wreaths StampsHoliday Greetings Stamps and Joyful Holiday Paper. I hope you'll grab a cup of coffee and join me!  :)

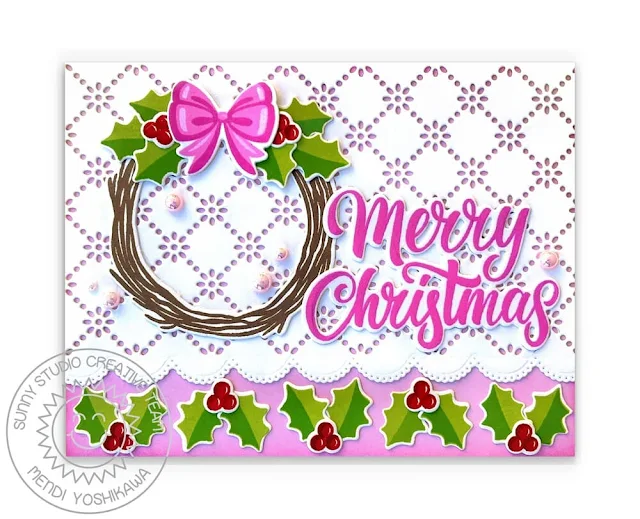
Card No. 1: For my first card I paired the holly and berries from our new Holiday Greetings Stamps with the bow and vine style wreath from our new Winter Wreath Stamps. This stamp set comes with two different wreath base options and then a number of elements to decorate your wreath with. In this case I kept my wreath very simple and added interest with my background and the pops of red and pink colors.

For my background I used the inside portion of our Frilly Frames Eyelet Lace Dies which I ran through my die-cutting machine twice (overlapping the two cuts slightly) to cover my entire 5.5" wide card panel. I then cut the scalloped edge using the border die from our Slimline Pennant Dies. For my sentiment I used one of the four greetings from the new Holiday Greetings Stamps. These are similar in style to our popular Season's Greetings Stamps, but have been scaled down to work for smaller spaces and I must say I am head over heals in love! Lastly I added some pale pink pearls from our Iridescent Pearls assortment.Sunny Studio Pink Scalloped Christmas Card (using Winter Wreaths & Holiday Greetings Stamps, Frilly Frames Eyelet Lace & Slimline Pennant Dies)
Card No. 2: As a little background, I have been wanting to create a holiday wreath set for a number of years now, but I kept becoming intimidated that my vision wouldn't be able to execute within the confines of a 4x6 set, but I will say I'm so glad I finally got past my fears as I'm really happy with how the set turned out, even if this one fir bough wreath image did take me take me forever and a day to design!

I will admit it can be a little bit tricky to line up the stamped image with the coordinating die given all the rotating options so my suggestion for mass producing 
would be to make a little mark on the back of the die with a sharpie indicating the top (once you've figured out which direction is the top and then to put a little dot outside of the confines of the stamped image on your cardstock after stamping it so you can always line it up quickly (or some variation of this concept depending on what works best for you). 

I also want to point out that the poinsettia and pinecone images in the Winter Wreath set may qualify as the world's smallest layering stamps, however I made a huge effort to simply them to make them easy to line up so they really aren't too difficult to use if you are already accustomed to working with layering stamps (and you have decent eyesight). For lining them up, I found it easiest to start with the darkest ink color and work my way towards the image with the lightest ink. Once I had the images set up in the corners of my two MISTI tools however, I did end up stamping them from lightest to darkest to prevent my inks from bleeding. If you only have one stamp positioning tool at your disposal, Jennifer McGuire also has an excellent tutorial about how to create "bumpers" for your tool HERE.

For this card I started by inking on a light amount of Twisted Citron Distress ink for my background, making it lighter towards the center. I then repeatedly stamped the little tree branch images from our Classy Christmas Stamps around the outside edge as a frame of sorts. To decorate my wreath, I used the pine cones, poinsettias and berries. I finished my card with the Season's Greetings sentiment from the Holiday Greetings Stamps and a few scattered Crystal Clear Confetti for a touch of sparkle.Sunny Studio Blog: Season's Greetings Card (using Winter Wreaths, Holiday Greetings & Classy Christmas Clear Stamps)

Card No. 3: Up next is a Winter Wreath Card using the fir bough style wreath on a 4" x 7" door I fashioned from cardstock and red craft foam used to provide extra dimension for the raised door panels. While I love all the colors of the rainbow, red is my signature color and I have always longed for a red door, but sadly it just hasn't fit the style of the homes we've had so far. Here's hoping it works out for our next home (knock on wood). To create a doorknob, I die-cut a small circle from metallic gold specialty paper using the holly berry die from our Winter Greenery Dies. Sunny Studio Red Door Holly & Berries Holiday Christmas Card (using Winter Wreaths & Festive Greetings Stamps)

To tie the gold doorknob in with the rest of my card, I then heat embossed my "Christmas Cheer" greeting from our Festive Greetings Stamps using Gold Embossing Powder. I stamped my greeting on the same color of red cardstock and then fussy cut it out to help it blend better with the background of my door and not have it distract from the wreath.

Sunny Studio Red Door Holly & Berries Holiday Christmas Card (using Winter Wreaths & Festive Greetings Stamps)

Card No. 4: Next up is a slimline style card where I lined up three of the vine style wreaths, alternating the bows and decorative pieces between the top and bottom to add interest to my card. To create my speckled background I inked up a piece of white cardstock using Broken China and the new Uncharted Mariner Distress Ink. I then spritzed it both with water and flicked on some watered down Uncharted Mariner Distress Ink Reinker using an old toothbrush. When it was dry, I then trimmed down the panel to allow a thin white border of my card base to peek out and added stitching to all four sides by using the single stitching die from our Slimline Basic Border Dies. I completed my card by heat embossing the "merry & bright" greeting from our Festive Greetings Stamps and adding a few scattered pearls from our Iridescent Pearls assortment.Sunny Studio Merry & Bright Slimline Christmas Card (using Winter Wreaths & Festive Greetings Stamps, Slimline Basic Border Dies)

Card No. 5: I wanted to make sure to create a card today showing that just because this set is called Winter Wreaths doesn't mean you are limited to only Christmas themes. For this card I paired the vine wreath, pine cones and bow from the Winter Wreaths Stamps with the pumpkin and leaves from our Crisp Autumn Stamps. I tried my best to tie the colors in with the beautiful striped patterned paper from our Critter Country Paper pack and added a scalloped edge to my white panel using one of the border dies from our Slimline Pennant Dies. Finally I stamped my oversized "thankful for you" sentiment using a greeting from our Elegant Leaves Stamps with Versafine Clair Pinecone Ink.Sunny Studio Fall Wreath Card (using Winter Wreaths & Crisp Autumn Stamps, Slimline Pennant Dies & Critter Country Paper)

Card No 6: Next up is a card with a bit of a vintage feel using the fir bough wreath and bow from Winter Wreaths with the "happy holidays" sentiment from our new Holiday Greetings Stamps which I heat embossed with Rangers Vintage Pearl Embossing Powder. I decorated the wreath using our Pink Ombre Pearls and Purple Ombre Pearls which I think resemble  retro ornament baubles and used Multi Matte Medium liquid adhesive to adhere them. For the base of my card, I cut an aqua scalloped frame to match my bow using our Frilly Frames Eyelet Lace Dies. This was a last minute card I squeezed in for today's post, but it ended up being one of my favorites. Those pearls really steal the show!

Sunny Studio Christmas Wreath Baubles Card (using Winter Wreaths, Holiday Greetings Stamps & Frilly Frames Eyelet Lace Dies)

Cards No. 7 & 8:
 For my last set of cards I paired the wonderful new poinsettia patterned papers from our new Joyful Holiday Paper pack with our Pristine Poinsettia Dies, Winter Greenery Dies and the Merry Christmas greetings from our new Holiday Greeting Stamps.
Sunny Studio Blog: Poinsettia Christmas Card Set (using Holiday Greetings Stamps, Pristine Poinsettia, Winter Greenery & Scalloped Oval Mat 2 Dies and Joyful Holiday 6x6 Paper)

To frame each poinsettia and greeting, I cut our Scalloped Oval Mat 2 Dies (cut from white) with our Scalloped Oval Mat 1 Dies (cut from green). I also cut my Winter Greenery using a subtle tone on tone polka-dot print from our Polka-dot Parade Paper pack.
Sunny Studio Blog: Blue Poinsettia Christmas Card (using Holiday Greetings Stamps, Pristine Poinsettia, Winter Greenery & Scalloped Oval Mat 2 Dies and Joyful Holiday 6x6 Paper)

I love that just by changing the background color from blue to pink, the cards have a completely different feel. I can't decide which one I like best. Which color is your favorite?
Sunny Studio Blog: Pink Poinsettia Christmas Card (using Holiday Greetings Stamps, Pristine Poinsettia, Winter Greenery & Scalloped Oval Mat 2 Dies and Joyful Holiday 6x6 Paper)

I finished each poinsettia flower by adding a grouping of jewels to the center using our Ruby Red Jewels for my pink card and our Red Garnet Jewels for my blue card using Ranger Multi Matte Medium. The two different color of jewels worked out nicely since I had used slightly different colored cardstock scraps I had on hand for each card.

Sunny Studio Blog: Pink Poinsettia Christmas Card (using Holiday Greetings Stamps, Pristine Poinsettia, Winter Greenery & Scalloped Oval Mat 2 Dies and Joyful Holiday 6x6 Paper)

That wraps up today's sneak peeks. I'm so happy you spent part of your day with me today. I read all your comments and they mean so much!  I'd love to give a $25 gift code to one lucky winner using the rafflecopter below. 

We will be having daily contests and a big 7th birthday Blog Hop this Friday with more giveaways at every stop on the hop. All contests will run through Friday, September 2nd at Midnight PST with winners announced here on Sunday, September 4th. :)

a Rafflecopter giveaway Here's a closer look at the our new Winter Wreaths StampsHoliday Greetings Stamps and Joyful Holiday Paper used today (which will be available to purchase starting on August 26th):

Sunny Studio Stamps: Winter Wreaths 4x6 Clear Photopolymer Christmas Holiday Stamp Set Sunny Studio Stamps: Winter Wreaths Christmas Holiday Metal Cutting Dies

Sunny Studio Stamps: Holiday Greeings 4x6 Clear Photopolymer Christmas Holiday Sentiment Stamp Set Sunny Studio Stamps: Holiday Greeings Christmas Holiday Phrase Metal Cutting Dies

Sunny Studio Stamps: Joyful Holiday 24-sheets 6x6 Double-Sided Christmas Patterned Paper Pad Set

Other Sunny Studio Supplies Used:

Crisp Autumn Stamps
Crisp Autumn Stamps
Shop at:
Sunny Studio
Crisp Autumn Dies
Crisp Autumn Dies
Shop at:
Sunny Studio
Tsukineko Jumbo Dauber
Shop at:
Sunny Studio
Festive Greetings Stamps
Shop at:
Sunny Studio

Elegant Leaves Stamps
Shop at:
Sunny Studio
Frilly Frames-Eyelet Lace
Shop at:
Sunny Studio
Slimline Basic Borders
Shop at:
Sunny Studio
Classy Christmas Stamps
Shop at:
Sunny Studio
Slimline Pennant Dies
Shop at:
Sunny Studio
Scalloped Oval Mat 1 Dies
Shop at:
Sunny Studio
Scalloped Oval Mat 2 Dies
Shop at:
Sunny Studio
Pristine Poinsettia Dies
Shop at:
Sunny Studio
Winter Greenery DIes
Shop at:
Sunny Studio
Critter Country Paper
Shop at:
Sunny Studio
Red Garnet Jewels
Red Garnet Jewels
Shop at:
Sunny Studio
Ruby Red Jewels
Ruby Red Jewels
Shop at:
Sunny Studio
Iridescent Pearls
Iridescent Pearls
Shop at:
Sunny Studio
Versafine Clair Ink- Pinecone
Shop at:
Sunny Studio
Hero Arts White Detail
Shop at:
Sunny Studio
Gold Embossing Powder
Shop at:
Sunny Studio
Crystal Clear Confetti
Shop at:
Sunny Studio
VersaMark Watermark Ink
Shop at:
Sunny Studio
PinkFresh Fairy Dust Ink
Shop at:
Sunny Studio
Cottontail Embossing Powder Tool
Shop at:
Sunny Studio
Pink Ombre Pearls
Pink Ombre Pearls
Shop at:
Sunny Studio
Purple Ombre Pearls
Purple Ombre Pearls
Shop at:
Sunny Studio
Multi Medium Matte
Multi Medium Matte
Shop at:
Sunny Studio
Domed Ink Blending Foam
Shop at:
Sunny Studio
Polka-dot Parade 6x6 Paper
Shop at:
Sunny Studio

Tuesday, August 23, 2022

Sneak Peek: Too Cute To Spook, Pumpkin Patch and Mini Mat & Tag Dies

Hello and welcome to day 2 of our Sneak Peek Week!  Each morning this week I am showcasing cards using our newest Fall & Holiday collections which will be available to purchase on Friday, August 26th.

Today I am sharing ideas using our new Too Cute To Spook StampsPumpkin Patch Dies and a new series of four sets of Mini Mat & Tag Dies. Let's dive in! 

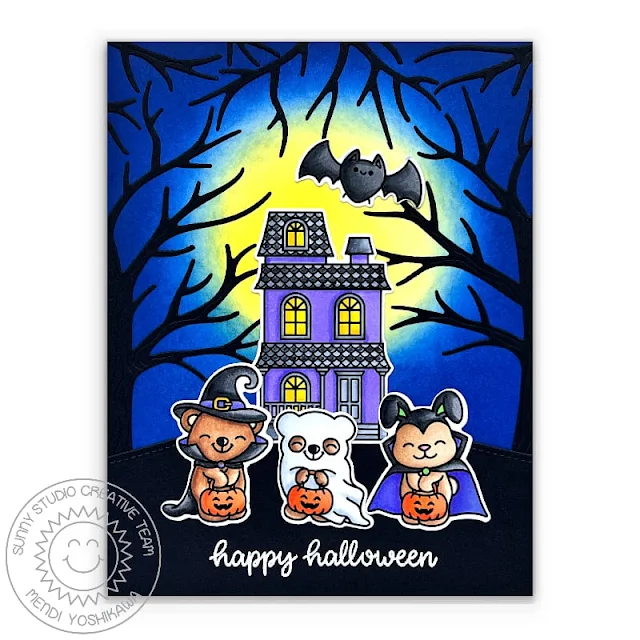
Card No. 1: My first card of the day features the costumed critters, bat and haunted manor from our new Too Cute To Spook Stamps as well as our new Autumn Tree die. I must take a moment to say I love how versatile this tree die is! I simply cut one tree in half and placed a portion on each side of my scene and then cut the branches off a second tree to layer around the top of my card to give it a more spooky Halloween feel.

For my background I started by inking a moon using Squeezed Lemonade distress ink onto white cardstock and then inked in Mermaid Lagoon and Prize Ribbon distress inks to my outside edges, trying my best to not mix the yellow and blue colors together. For the base of my scene, I added a stitched hillside cut from black cardstock using our Slimline Nature Border Dies. Lastly I heat embossed the "Happy Halloween" greeting from our Happy Thoughts Stamps using Versamark Ink with Hero Arts White Detail Embossing Powder.
Sunny Studio: Halloween Critters with Haunted House & Spooky Tree Card (using Too Cute To Spook & Happy Thought Stamps and Autumn Tree Die)

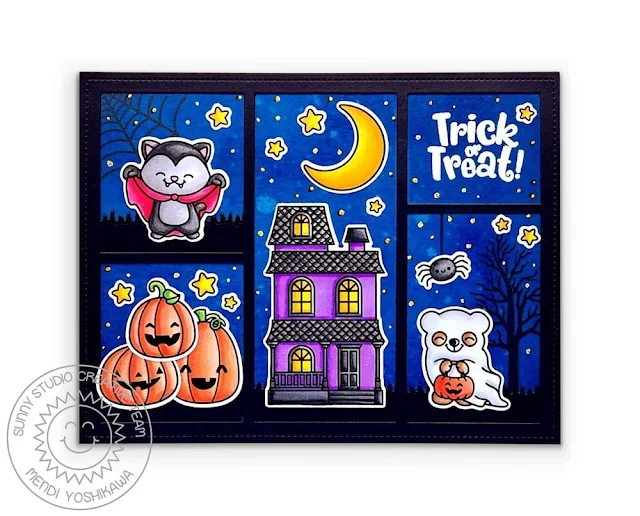
Card No. 2:  For my next card showcasing our new Too Cute To Spook Stamps I pulled out our Comic Strip Everyday Dies which I used to cut my frame from black cardstock. I started by inking a white cardstock panel for my evening sky using Mermaid Lagoon and Prize Ribbon distress ink which I splattered with water in an effort to lift some of the ink. When it was fully dry I stamped the spider web and spooky tree from the set using Versafine Onyx Black Ink. I then cut grass borders using a die from the same Comic Strip set and adhered them to the back of my comic strip frame before adding my sky panel to the back as well. Once my frame was in place I was able to heat emboss my sentiment and add all the cute elements from the Too Cute To Spook set and the moon & stars from our Scaredy Cat Stamps. Lastly I added some "stars" in the distance using my Sharpie Extra Fine Point Paint Pen and then colored over them with a yellow Copic marker when they were dry .
Sunny Studio: Halloween Critters with Haunted House Card (using Too Cute To Spook, Scaredy Cat Stamps & Comic Strip Everyday Die)

Card No. 3: Next up is a card utilizing our new Mini Mat & Tag 2 Dies featuring the new smaller scalloped mat size. These new Mini Mat dies compliment our larger Frilly Frames Dies and the gift tags that come with each mini mat mix and match with our Build-A-Tag 1 Dies and Build-a-Tag 2 Dies. When I was designing these I was very careful to make sure all new tag shapes and elements don't duplicate the other sets to give you unlimited options. For this card I punched small circles from hot pink, purple, orange and green cardstock which I then adhered to the back of my scalloped mat to give the appearance of colorful polka-dots along the edge.

For my card base I trimmed it to a slightly smaller size before adhering the stitched scalloped frame from our Fancy Frames Rectangle Dies. I then die-cut the black striped patterned paper from our Sleek Stripes Paper pack using our Stitched Rectangle Dies to layer over the top. I love how these Mini Mats give me a little more border to show off cute patterned papers in the background and also give me the option to frame smaller scenes. For my scene I added grass using our Picket Fence Die and then used the images and sentiments from our new Too Cute To Spook Stamps. I just adore these little guys!Sunny Studio: Halloween Critters Scalloped Card (using Too Cute To Spook Stamps, Mini Mat & Tag 2 & Fancy Frames Rectangles Die)

Card No. 4: For this card I paired the scalloped frame from our Mini Mat & Tag 3 Dies with the larger complimentary frame from our Frilly Frames Lattice Dies, adding an orange checked print between them from our Critter Country Paper pack. For my scene I used the kitty in the pumpkin from our Scaredy Cat Stamps which I paired with the smaller pumpkins, spider web, spider and greeting from our new Too Cute To Spook Stamps. This card came together rather quickly, but I love the results!
Sunny Studio: Halloween Cat in Pumpkin with Spider Web Scalloped Card (using Too Cute To Spook, Scaredy Cat Stamps, Mini Mat & Tag 3 & Frilly Frames Lattice Die)

Card No. 5:  I thought it would be fun for one of my Too Cute To Spook cards today to have my costumed critters trick-or-treating in a neighborhood so I pulled out our Happy Home Stamps (which I must admit makes me extra happy to be using a set from our very first release on a week when we will be celebrating our company's 7th birthday). I mixed both the trees from Too Cute To Spook and the smaller tree from our new Fall Scenes Stamps to tuck behind my houses, inking the tree backgrounds with the same Mermaid Lagoon &  Uncharted Mariner Distress Ink I used for my card background. I also included a mix of pumpkins from both our Too Cute To Spook and Fall Scenes Stamps, adding the larger pumpkins to the bottom to give the appearance they are closer.Sunny Studio: Critters Trick or Treating in Neighborhood Halloween Card (using Too Cute To Spook, Fall Scenes & Happy Home Stamps)

Card No. 6: For my last Too Cute To Spook project today I have a set of Halloween Gift Tags perfect for tying onto little treat bags for kids in the neighborhood or office friends. For these tags I used the base tag from our Mini Mat & Tag 3 Dies cut from our Polka-dot Parade Paper with the tag topper & star enforcer from our Mini Mat & Tag 4 Dies cut from our Classic Sunburst Paper. I kept my tags fairly simple using a greeting from the Too Cute Spook stamps and a single costumed critter to make them easier to mass produce.Sunny Studio Halloween Critter Gift Tags (using Too Cute To Spook Stamps, Mini Mat & Tag 2 and 3 Dies, Polka-dot Parade & Classic Sunburst Paper)

Card No. 7: Switching gears a bit, I have a number of fall cards to share using our new Pumpkin Patch Dies. This is a large die set that comes with all the layers and elements you need to create three unique pumpkins. It also comes with a number of vine options, a pumpkin leaf, a couple fall leaves to compliment your scenes and four optional jack-o'-lantern faces. These dies were designed to be grouped by color / layer to help you keep the layers straight so if you are using colored cardstock they are a dream to use. By having them grouped together there are less pieces to juggle and keep track of, plus it makes saving paper so much easier too.

For this slimline card I started by inking up a piece of blue cardstock with prize ribbon distress ink along the edges and then die-cut the scalloped edge using our Slimline Scalloped Frame Dies. I did the same with a piece of green cardstock which I die-cut a second time along the top using the grassy edge from our Slimline Nature Border Dies. For my pumpkins I started with white cardstock which I inked up with a variety of different distress inks. For my greeting I heat embossed a sentiment from our Autumn Greetings Stamps and added the small mice from our Merry Mice Stamps. Lastly I added some stars and sparkles to my sky using my Sharpie Extra Fine Point Paint Pen. When I was all done I was feeling a real Cinderella vibe which I love, but funny enough it wasn't planned ahead of time.

Sunny Studio: Mouse with Pumpkins Fall Card (using Merry Mice Stamps, Pumpkin Patch Dies, Slimline Nature Border Dies & Slimline Scalloped Frame Dies)

Card No. 8: For my next card I used our new Pumpkin Patch Dies to create jack o'lanterns using many of the small fall leaves that come with the set. I inked up the pumpkin layers themselves with Carved Pumkpin distress ink and the faces with Mustard Seed distress ink. For my grass I used a small green polka-dot print from our new Critter Country Paper pack which I then die-cut with the grassy border from our Picket Fence Die.

To add a little interest to my background and to help frame my sentiment. I used our new Mini Mat & Tag 4 Dies cut from a grid print paper from our Gingham Jewel Tones Paper pack and then layered it with a slightly larger piece of white cardstock and a matching blue checked print from our Critter Country Paper. Lastly I tucked in a little wood fence using those same picket fence dies die-cut from kraft cardstock which I had inked up using Vintage Photo distress ink.
Sunny Studio: Jack O'Lantern Pumpkins Halloween Card (using Too Cute To Spook Stamps, Critter Country Paper, Pumpkin Patch Dies, Picket Fence Dies and Mini Mat & Tag 4 Dies)

Card No. 9:  Each of our Pumpkin Patch Dies have four individual layers to give them a three dimensional look. There's the bottom layer for the stem and then the three top layers for the pumpkin itself. For this card I cut two of the pumpkin layers from the orange polka-dot patterned paper from our Critter Country Paper pack, alternating the layers to give them a paper-pieced look.

For my background I used a matching pumpkin print from our Critter Country Paper pad, which I then layered with a piece of white cardstock cut using our Stitched Rectangle Dies and a scalloped frame cut from the green checked print from Critter Country Paper using our Mini Mat & Tag 1 Dies. For my greeting I heat embossed the word "fall" using our Kinsley Alphabet Stamps and paired it with our Greetings Word Die cut from white cardstock. Lastly I topped two of the pumpkins with a bow tied from hemp cording for a bit of a rustic feel.
Sunny Studio: Fall Paper-pieced Pumpkins Autumn Card (using Critter Country Paper, Pumpkin Patch, Greetings Word Die, Stitched Rectangle and Mini Mat & Tag 1 Dies)

That wraps up today's sneak peeks. I'm so happy you spent part of your day with me today. I read all your comments and they mean so much!  I'd love to give a $25 gift code to one lucky winner using the rafflecopter below. 

We will be having daily contests and a big 7th birthday Blog Hop this Friday with more giveaways at every stop on the hop. All contests will run through Friday, September 2nd at Midnight PST with winners announced here on Sunday, September 4th. :)

a Rafflecopter giveaway Here's a closer look at the our new Too Cute To Spook Stamps, Pumpkin Patch Dies and a new series of Mini Mat & Tag Dies used today (which will be available to purchase starting on August 26th):

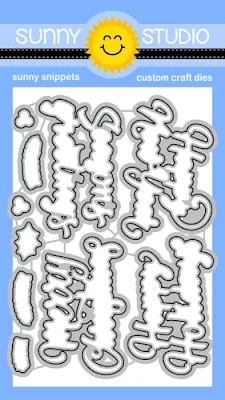
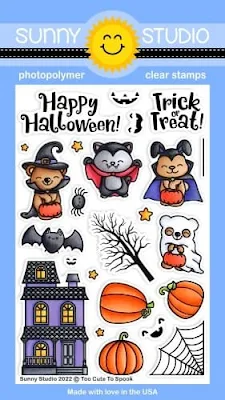
Sunny Studio Stamps Blog: Introducing New Too Cute To Spook Halloween 4x6 Clear Photopolymer Stamp SetSunny Studio Stamps Blog: Introducing New Too Cute To Spook Halloween Metal Cutting Dies

Sunny Studio Stamps Blog: Introducing New Mini Mat & Tag 1 Scalloped Mix & Match Metal Cutting DiesSunny Studio Stamps Blog: Introducing New Mini Mat & Tag 2 Scalloped Mix & Match Metal Cutting Dies

 Sunny Studio Stamps Blog: Introducing New Mini Mat & Tag 3 Scalloped Mix & Match Metal Cutting DiesSunny Studio Stamps Blog: Introducing New Mini Mat & Tag 4 Scalloped Ric-Rac Zig-Zag Mix & Match Metal Cutting Dies 

Sunny Studio Stamps Blog: Introducing New Pumpkin Patch Halloween Jack O' Lantern Fall Metal Cutting Dies

Other Sunny Studio Supplies Used:

Happy Home Dies
Happy Home Dies
Shop at:
Sunny Studio
Happy Home Stamps
Happy Home Stamps
Shop at:
Sunny Studio
Picket Fence Border Dies
Shop at:
Sunny Studio
Stitched Rectangle Dies
Shop at:
Sunny Studio

Tsukineko Jumbo Dauber
Shop at:
Sunny Studio
Versafine Onyx Black Ink
Shop at:
Sunny Studio
Fancy Frames- Rectangles
Shop at:
Sunny Studio
Comic Strip Everyday Dies
Shop at:
Sunny Studio
Greetings Word Die
Greetings Word Die
Shop at:
Sunny Studio
Happy Thoughts Stamps
Shop at:
Sunny Studio
Frilly Frames Lattice Dies
Shop at:
Sunny Studio
Merry Mice Stamps
Merry Mice Stamps
Shop at:
Sunny Studio
Merry Mice Dies
Merry Mice Dies
Shop at:
Sunny Studio
Kinsley Alphabet Stamps
Shop at:
Sunny Studio
Slimline Nature Borders
Shop at:
Sunny Studio
Slimline Scalloped Frame
Shop at:
Sunny Studio
Scaredy Cat Stamps
Scaredy Cat Stamps
Shop at:
Sunny Studio
Scaredy Cat Dies
Scaredy Cat Dies
Shop at:
Sunny Studio
Sleek Stripes Paper
Sleek Stripes Paper
Shop at:
Sunny Studio
Fall Scenes Stamps
Fall Scenes Stamps
Shop at:
Sunny Studio
Fall Scenes Dies
Fall Scenes Dies
Shop at:
Sunny Studio
Autumn Tree Die
Autumn Tree Die
Shop at:
Sunny Studio
Critter Country Paper
Shop at:
Sunny Studio
Hero Arts Morning Glory Ink
Hero Arts Intense Black Ink
Shop at:
Sunny Studio
Memento Tuxedo Black Ink Pad
Shop at:
Sunny Studio
Gingham Jewel Tones 6x6 Paper
Shop at:
Sunny Studio
Hero Arts White Detail
Shop at:
Sunny Studio
VersaMark Watermark Ink
Shop at:
Sunny Studio
Polka-dot Parade 6x6 Paper
Shop at:
Sunny Studio
Classic Sunburst Paper
Shop at:
Sunny Studio