Friday, February 15, 2019

Staggered Circle Dies Cards with Rachel and Lexa

Hello everyone!  It's Rachel here and today I am sharing a project that features the new Staggered Circle Die.

Sunny Studio Stamps: Staggered Circle Dies Oceans Of Joy Magical Mermaids Birthday Card by Rachel Alvarado

I decided to go with an underwater-themed card and used the cutout circles as shaker windows. To start, I first trimmed a piece of white card stock to 4.25" x 5.5" and then cut out the stitched windows with the Staggered Circle Die. I then blended a separate piece of smooth white card stock with some Distress Inks (Cracked Pistachio, Peacock Feathers, and Chipped Sapphire) to go behind my top panel.

Sunny Studio Stamps: Staggered Circle Dies Oceans Of Joy Magical Mermaids Birthday Card by Rachel Alvarado

I used images from both the Oceans of Joy and Magical Mermaids stamp sets and colored them with Copic Sketch Markers and used the Oceans of Joy and Magical Mermaids die sets to cut them out. I adhered them to the ink blended panel after lining up the windows and deciding where I wanted to place them.

Sunny Studio Stamps: Staggered Circle Dies Oceans Of Joy Magical Mermaids Birthday Card by Rachel Alvarado

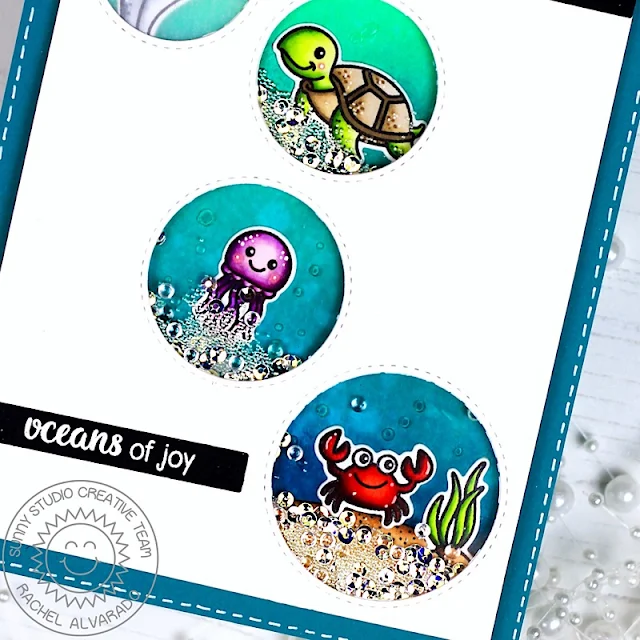
I then glued a piece of acetate over each of the windows (except for the top left one) and added some clear 3mm sequins and white seed beads for my embellishments. I used some 3D Foam Adhesive Tape to give my shaker elements room to move.

Sunny Studio Stamps: Staggered Circle Dies Oceans Of Joy Magical Mermaids Birthday Card by Rachel Alvarado

I cut a piece of Velum Paper with one of the Wavy Border Dies and glued it within my top circle to make my dolphin look like he's popping out of the water. Lastly, I heat embossed my sentiment with Fine Detail White Embossing Powder onto black card stock and added it to the front of my card.

Thanks for stopping by today! I hope you all have a lovely weekend!

------------------------------------------------------

Hi everyone! Lexa here today with a card featuring Staggered Circle Dies. This time I use the circles to highlight sentiments, it's even more stand out with the bright colors. Let's get started!

Sunny Studio Stamps: Staggered Circle Dies Barnyard Buddies Birthday Card by Lexa Levana

I stamped the whole herd from Barnyard Buddies Stamps with Versafine black ink and then watercolor them with Distress Markers. After I finished with the coloring I use the coordinating dies to cut each pieces and get ready to arrange them on my card. I use Staggered Circle Dies on a piece of 4.25"x5.5" white cardstock.

Sunny Studio Stamps: Staggered Circle Dies Barnyard Buddies Birthday Card by Lexa Levana

I color the negatives with red, orange and yellow use Distress Inks (Barn Door, Wild Honey, Squeezed Lemonade) and then stamp the sentiments from the same stamp set. I blend Tumbled Glass and Salty Ocean for the sky, as for the grass I use Mowed Lawn Distress Inks. A red gingham patterned paper for accent on the bottom part of my card and some red twines too. 

Thank you so much for stopping by today. I hope you enjoy today's blog post and have an amazing day!

Sunny Studio Supplies Used:

Magical Mermaid Dies
Shop at:
Sunny Studio
Magical Mermaid Stamps
Shop at:
Sunny Studio
Oceans of Joy Dies
Oceans of Joy Dies
Shop at:
Sunny Studio
Oceans of Joy Stamps
Shop at:
Sunny Studio
Wavy Border Dies
Wavy Border Dies
Shop at:
Sunny Studio
Barnyard Buddies Dies
Shop at:
Sunny Studio
Barnyard Buddies Stamps
Shop at:
Sunny Studio
Staggered Circles Die
Shop at:
Sunny Studio

Thursday, February 14, 2019

Miss Moo Cards with Anja and Vanessa

Hi everyone, Anja here with a circle shaped card using the adorable Miss Moo Stamps. To build my little scene, I combined the sweet cow with the mountains from the Alpaca Holiday set and the clouds from the Comic Strip Everyday Dies.

Sunny Studio Stamps: Miss Moo Comic Strip Everyday Dies Fancy Frames Circle Dies Cow Are You Punny Card by Anja Bytyqi

First, I created a round card base from light grey cardstock using a 4 3/16 inch circle die. For the scene background, I die cut two circles from patterned paper (purple: Spring Sunburst 6x6 Paper; teal: Gingham Pastels 6x6 Paper).

Sunny Studio Stamps: Miss Moo Comic Strip Everyday Dies Fancy Frames Circle Dies Cow Are You Punny Card by Anja Bytyqi

I stamped the images in Memento Tuxedo Black Ink and colored them with Copic Markers. I adhered the mountain row right over the edge where the two patterned papers meet.
To frame my scene, I die cut one of the Fancy Frames Circle Dies from white cardstock. I doubled up the frames for a little dimension. I stamped the sentiment in VersaMark Ink on a strip of black cardstock and white heat embossed it. I adhered the cow and sentiment with foam tape and added a tiny die cut heart to the middle cloud.

Thank you so much for stopping by! Hope you're having a fabulous day!

--------------------------------------------------

Hello friends!! Vanessa here today with a card using the cute little Miss Moo stamp set. Who could resist this adorable cow?

Sunny Studio Stamps: Miss Moo Comic Strip Everyday Dies Frilly Frames Dies Cow Are You Punny Card by Vanessa Menhorn

I die-cut the Frilly Frames Polka-Dot from the Gingham Pastels Paper and adhered it to the card base.  Then I trimmed a panel from white cardstock, masked off a circle and inked it with green and blue ink, using a cloud stencil and a grass stencil made from the Comic Strip Everyday Dies grass edge.

Sunny Studio Stamps: Miss Moo Comic Strip Everyday Dies Frilly Frames Dies Cow Are You Punny Card by Vanessa Menhorn

After I had adhered the panel to the card, I stamped the cow image, colored it with Copics, die-cut it with the matching die and adhered it with foam tape. I die-cut the clouds, lightly inked them and adhered them to the sky area. Finally, I stamped and heat-embossed the sentiment onto a strip of black cardstock, trimmed it and adhered it.

I hope you like today's card! Thanks for visiting!

Sunny Studio Supplies Used:

Fancy Frames-Circle Dies
Shop at:
Sunny Studio
Comic Strip Everyday Dies
Shop at:
Sunny Studio
Alpaca Holiday Stamps
Shop at:
Sunny Studio
Alpaca Holiday Dies
Alpaca Holiday Dies
Shop at:
Sunny Studio
Gingham Pastels 6x6 Paper
Shop at:
Sunny Studio
Spring Sunburst 6x6 Paper
Shop at:
Sunny Studio
Miss Moo Stamps
Miss Moo Stamps
Shop at:
Sunny Studio
Miss Moo Dies
Miss Moo Dies
Shop at:
Sunny Studio
Frilly Frames Polka-Dot
Shop at:
Sunny Studio

Wednesday, February 13, 2019

Botanical Backdrop Cards with Mona and Franci

Hi crafty friends! It's Mona here, today I am showing you a bright and colorful floral card what I made with the Botanical Backdrop Die. By the way, this die is a must have guys, it's really versatile!

Sunny Studio Stamps: Botanical Backdrop Die Floral Greetings Best Wishes Card by Mona Toth

This time I started the card making with ink blending. I searched for a darker blue cardstock from my stash and blended the corners with Black Soot and Chipped Sapphire Distress Oxide Inks. When it was done, I heat embossed the sentiment to the center of my card with white embossing powder.

Sunny Studio Stamps: Botanical Backdrop Die Floral Greetings Best Wishes Card by Mona Toth

The next step was the die-cutting. I picked three bright colored cardstock from my stash and I made many die-cut flowers with the Botanical Backdrop Die.

Sunny Studio Stamps: Botanical Backdrop Die Floral Greetings Best Wishes Card by Mona Toth

I added highlights and details with Signo Uniball white pen on the colored cardstock and put the parts together.

Sunny Studio Stamps: Botanical Backdrop Die Floral Greetings Best Wishes Card by Mona Toth

In the end I styled my card and adhered the flowers to my card base. Thank you very much for reading through my post, I hope that you have enjoyed it and I have inspired you! If you like my creations let's be friends on Instagram. :)

-------------------------------------------------------

Hi everyone! Franci here with you today with a spring card showcasing the new Botanical Backdrop set.


Sunny Studio Stamps: Botanical Backdrop Die Floral Everyday Greetings Thank You Card by Franci Vignoli

I used lots of different papers from the latest collection to die cut all the elements of the Botanical set: the Spring Sunburst paper, the Flirty Flowers paper and the Dots & Stripes Pastels paper.

Sunny Studio Stamps: Botanical Backdrop Die Floral Everyday Greetings Thank You Card by Franci Vignoli

I assembled all my flowers and glued them down together with liquid glue. I also die cut the main leaves piece and I glued it down to a creamy card base I found in my stash, that has some shiny dots here and there.

Sunny Studio Stamps: Botanical Backdrop Die Floral Everyday Greetings Thank You Card by Franci Vignoli

I adhered down my flowers with foam tape and added some details with a white gel pen.
I stamped my sentiment from the Everyday Greetings set in the center and finally added some sparkling clear sequins.

This die set is so versatile and pretty, with all these flowers! Hope you like my card and thank you so much for stopping by today :)

Sunny Studio Supplies Used:

Spring Sunburst 6x6 Paper
Shop at:
Sunny Studio
Flirty Flowers 6x6 Paper
Shop at:
Sunny Studio
Dots & Stripes Pastels 6x6 Paper
Shop at:
Sunny Studio
Botanical Backdrop Die
Shop at:
Sunny Studio
Everyday Greetings Stamps
Shop at:
Sunny Studio

Tuesday, February 12, 2019

Everything's Rosy Cards with Angelica and Juliana

Hi friends, Angelica here with a Thank You card featuring leaves from Everything's Rosy stamp set. I love how detailed these leaves are! 

Sunny Studio Stamps: Everything's Rosy Fancy Frames Circles Everyday Greetings Thank You Card by Angelica Conrad

I started with a 5.25x4 piece of white card stock. I chose three green inks to use for the layered stamps, lightest to darkest: Altenew's Frayed Leaf and Forest Glades, and Taylored Expressions Peapod ink. I stamped the lightest layer first to make sure the leaves wouldn't touch each other. 

Sunny Studio Stamps: Everything's Rosy Fancy Frames Circles Everyday Greetings Thank You Card by Angelica Conrad

Next I used the middle size Fancy Frames Circle Die to die-cut a window. I also die-cut 2 more circles out of matching green card stock and white card stock. I flipped the stamped card front over and taped the first die cut circle back into place. I added foam tape to the back before flipping the paper back over. I glued on the card stock circles, making sure the scallops matched up perfectly. 

Sunny Studio Stamps: Everything's Rosy Fancy Frames Circles Everyday Greetings Thank You Card by Angelica Conrad

I stamped "Thank You" from the Everyday Greetings stamp set onto white card stock, stacking the words so the sentiment fit in the circle window. I attached the card front on to the sentiment, making sure the words were centered. My last step was adding the card front to an A2 size card base.

Thanks so much for stopping by!

--------------------------------------------------

Hello friends! It's Juliana Michaels here and today I'm sharing a hello card featuring the gorgeous layering stamp set called Everything's Rosy Stamp Set. I combined it with some other of my favorite stamps and dies to create this card.

Sunny Studio Stamps: Everything's Rosy Frilly Frames Lattice Vintage Jar Hello Card by Juliana Michaels

To get started, I die cut a piece of white cardstock using only the outside frame from the Frilly Frames Lattice Die. I then used the center part to emboss the design into the paper. I recommend following the directions for your specific die cutting machine to achieve this. I used Therm O Web Purple Tape to hold the die in place while I did the embossing. I then applied some Distress Oxide Ink in Peeled Paint to bring out the design. To complete the card front, I adhered this to a piece of blue patterned paper from the Flirty Flowers 6x6 Paper Pad.

Next, I stamped the images from the Everything's Rosy Stamp Set onto white cardstock using Scrapbook.com's Premium Hybrid Ink Pads. These ink pads are perfect for use with layering stamps.

Sunny Studio Stamps: Everything's Rosy Frilly Frames Lattice Vintage Jar Hello Card by Juliana Michaels

I then stamped the jar from the Vintage Jar Stamp Set. Once all of the stamping was finished, I die cut them using the Everything's Rosy Die Set and Vintage Jar Die Set. Before I assembled the flowers and leaves to create the bouquet, I stamped some stems from the Daffodil Dreams Stamp Set directly onto the jar.

Here is a list of the colors I used for the roses:  Lantern Light Yellow 1, Rubber Ducky Yellow 2, Daffodil Yellow 3, Honeycomb Yellow 4 and Sugar Cookie Tan 1.  For the leaves  and stems I used: Pear Green 1, Guacamole Green 2 and Olive Green 4. Finally, for the jar, I used Glass Slipper Sky 1 and Sky Blue Sky 2.

Sunny Studio Stamps: Everything's Rosy Frilly Frames Lattice Vintage Jar Hello Card by Juliana Michaels

Another thing I did before assembling the bouquet was to create a tag to tie around the jar. I die cut a tag using the circle tag die from the Build A Tag No. 1 Die Set. I then stamped “hello” onto it using the Chubby Bunnies Stamp Set. Once the tag was done, I tied it around the jar die cut with a piece of jute twine.

To complete the card, I then created the bouquet. I used double sided foam squares to give the flowers and leaves some dimension.

Thanks so much for stopping by today! I hope you were inspired by the hello card I created using the Everything's Rosy Stamp Set.

Sunny Studio Supplies Used:

Daffodil Dreams Stamps
Shop at:
Sunny Studio
Vintage Jar Dies
Vintage Jar Dies
Shop at:
Sunny Studio
Vintage Jar Stamps
Vintage Jar Stamps
Shop at:
Sunny Studio
Fancy Frames-Circle Dies
Shop at:
Sunny Studio
Build-A-Tag #1 Dies
Build-A-Tag #1 Dies
Shop at:
Sunny Studio
Flirty Flowers 6x6 Paper
Shop at:
Sunny Studio
Chubby Bunny Stamps
Chubby Bunny Stamps
Shop at:
Sunny Studio
Everything's Rosy Stamps
Shop at:
Sunny Studio
Everything's Rosy Dies
Shop at:
Sunny Studio
Frilly Frames Lattice Dies
Shop at:
Sunny Studio
Everyday Greetings Stamps
Shop at:
Sunny Studio