Wednesday, February 13, 2019

Botanical Backdrop Cards with Mona and Franci

Hi crafty friends! It's Mona here, today I am showing you a bright and colorful floral card what I made with the Botanical Backdrop Die. By the way, this die is a must have guys, it's really versatile!

Sunny Studio Stamps: Botanical Backdrop Die Floral Greetings Best Wishes Card by Mona Toth

This time I started the card making with ink blending. I searched for a darker blue cardstock from my stash and blended the corners with Black Soot and Chipped Sapphire Distress Oxide Inks. When it was done, I heat embossed the sentiment to the center of my card with white embossing powder.

Sunny Studio Stamps: Botanical Backdrop Die Floral Greetings Best Wishes Card by Mona Toth

The next step was the die-cutting. I picked three bright colored cardstock from my stash and I made many die-cut flowers with the Botanical Backdrop Die.

Sunny Studio Stamps: Botanical Backdrop Die Floral Greetings Best Wishes Card by Mona Toth

I added highlights and details with Signo Uniball white pen on the colored cardstock and put the parts together.

Sunny Studio Stamps: Botanical Backdrop Die Floral Greetings Best Wishes Card by Mona Toth

In the end I styled my card and adhered the flowers to my card base. Thank you very much for reading through my post, I hope that you have enjoyed it and I have inspired you! If you like my creations let's be friends on Instagram. :)

-------------------------------------------------------

Hi everyone! Franci here with you today with a spring card showcasing the new Botanical Backdrop set.


Sunny Studio Stamps: Botanical Backdrop Die Floral Everyday Greetings Thank You Card by Franci Vignoli

I used lots of different papers from the latest collection to die cut all the elements of the Botanical set: the Spring Sunburst paper, the Flirty Flowers paper and the Dots & Stripes Pastels paper.

Sunny Studio Stamps: Botanical Backdrop Die Floral Everyday Greetings Thank You Card by Franci Vignoli

I assembled all my flowers and glued them down together with liquid glue. I also die cut the main leaves piece and I glued it down to a creamy card base I found in my stash, that has some shiny dots here and there.

Sunny Studio Stamps: Botanical Backdrop Die Floral Everyday Greetings Thank You Card by Franci Vignoli

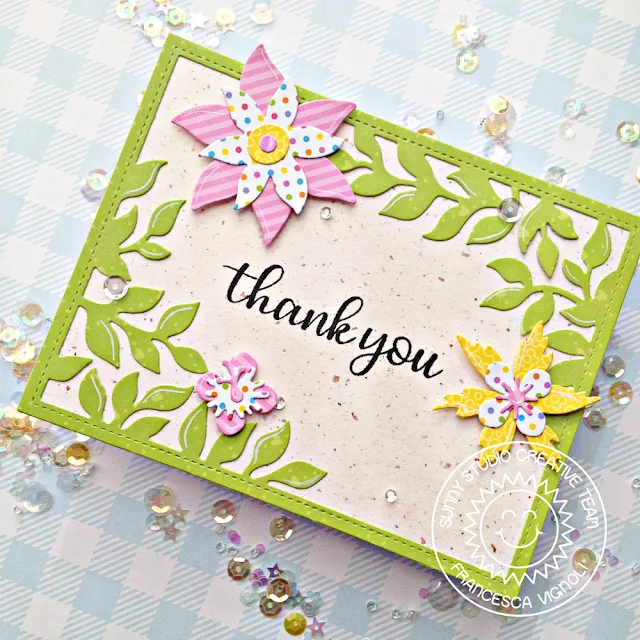
I adhered down my flowers with foam tape and added some details with a white gel pen.
I stamped my sentiment from the Everyday Greetings set in the center and finally added some sparkling clear sequins.

This die set is so versatile and pretty, with all these flowers! Hope you like my card and thank you so much for stopping by today :)

Sunny Studio Supplies Used:

Spring Sunburst 6x6 Paper
Shop at:
Sunny Studio
Flirty Flowers 6x6 Paper
Shop at:
Sunny Studio
Dots & Stripes Pastels 6x6 Paper
Shop at:
Sunny Studio
Botanical Backdrop Die
Shop at:
Sunny Studio
Everyday Greetings Stamps
Shop at:
Sunny Studio

Tuesday, February 12, 2019

Everything's Rosy Cards with Angelica and Juliana

Hi friends, Angelica here with a Thank You card featuring leaves from Everything's Rosy stamp set. I love how detailed these leaves are! 

Sunny Studio Stamps: Everything's Rosy Fancy Frames Circles Everyday Greetings Thank You Card by Angelica Conrad

I started with a 5.25x4 piece of white card stock. I chose three green inks to use for the layered stamps, lightest to darkest: Altenew's Frayed Leaf and Forest Glades, and Taylored Expressions Peapod ink. I stamped the lightest layer first to make sure the leaves wouldn't touch each other. 

Sunny Studio Stamps: Everything's Rosy Fancy Frames Circles Everyday Greetings Thank You Card by Angelica Conrad

Next I used the middle size Fancy Frames Circle Die to die-cut a window. I also die-cut 2 more circles out of matching green card stock and white card stock. I flipped the stamped card front over and taped the first die cut circle back into place. I added foam tape to the back before flipping the paper back over. I glued on the card stock circles, making sure the scallops matched up perfectly. 

Sunny Studio Stamps: Everything's Rosy Fancy Frames Circles Everyday Greetings Thank You Card by Angelica Conrad

I stamped "Thank You" from the Everyday Greetings stamp set onto white card stock, stacking the words so the sentiment fit in the circle window. I attached the card front on to the sentiment, making sure the words were centered. My last step was adding the card front to an A2 size card base.

Thanks so much for stopping by!

--------------------------------------------------

Hello friends! It's Juliana Michaels here and today I'm sharing a hello card featuring the gorgeous layering stamp set called Everything's Rosy Stamp Set. I combined it with some other of my favorite stamps and dies to create this card.

Sunny Studio Stamps: Everything's Rosy Frilly Frames Lattice Vintage Jar Hello Card by Juliana Michaels

To get started, I die cut a piece of white cardstock using only the outside frame from the Frilly Frames Lattice Die. I then used the center part to emboss the design into the paper. I recommend following the directions for your specific die cutting machine to achieve this. I used Therm O Web Purple Tape to hold the die in place while I did the embossing. I then applied some Distress Oxide Ink in Peeled Paint to bring out the design. To complete the card front, I adhered this to a piece of blue patterned paper from the Flirty Flowers 6x6 Paper Pad.

Next, I stamped the images from the Everything's Rosy Stamp Set onto white cardstock using Scrapbook.com's Premium Hybrid Ink Pads. These ink pads are perfect for use with layering stamps.

Sunny Studio Stamps: Everything's Rosy Frilly Frames Lattice Vintage Jar Hello Card by Juliana Michaels

I then stamped the jar from the Vintage Jar Stamp Set. Once all of the stamping was finished, I die cut them using the Everything's Rosy Die Set and Vintage Jar Die Set. Before I assembled the flowers and leaves to create the bouquet, I stamped some stems from the Daffodil Dreams Stamp Set directly onto the jar.

Here is a list of the colors I used for the roses:  Lantern Light Yellow 1, Rubber Ducky Yellow 2, Daffodil Yellow 3, Honeycomb Yellow 4 and Sugar Cookie Tan 1.  For the leaves  and stems I used: Pear Green 1, Guacamole Green 2 and Olive Green 4. Finally, for the jar, I used Glass Slipper Sky 1 and Sky Blue Sky 2.

Sunny Studio Stamps: Everything's Rosy Frilly Frames Lattice Vintage Jar Hello Card by Juliana Michaels

Another thing I did before assembling the bouquet was to create a tag to tie around the jar. I die cut a tag using the circle tag die from the Build A Tag No. 1 Die Set. I then stamped “hello” onto it using the Chubby Bunnies Stamp Set. Once the tag was done, I tied it around the jar die cut with a piece of jute twine.

To complete the card, I then created the bouquet. I used double sided foam squares to give the flowers and leaves some dimension.

Thanks so much for stopping by today! I hope you were inspired by the hello card I created using the Everything's Rosy Stamp Set.

Sunny Studio Supplies Used:

Daffodil Dreams Stamps
Shop at:
Sunny Studio
Vintage Jar Dies
Vintage Jar Dies
Shop at:
Sunny Studio
Vintage Jar Stamps
Vintage Jar Stamps
Shop at:
Sunny Studio
Fancy Frames-Circle Dies
Shop at:
Sunny Studio
Build-A-Tag #1 Dies
Build-A-Tag #1 Dies
Shop at:
Sunny Studio
Flirty Flowers 6x6 Paper
Shop at:
Sunny Studio
Chubby Bunny Stamps
Chubby Bunny Stamps
Shop at:
Sunny Studio
Everything's Rosy Stamps
Shop at:
Sunny Studio
Everything's Rosy Dies
Shop at:
Sunny Studio
Frilly Frames Lattice Dies
Shop at:
Sunny Studio
Everyday Greetings Stamps
Shop at:
Sunny Studio

Monday, February 11, 2019

Make A Wish Cards with Leanne and Eloise

Hi friends, Leanne here! I’m sharing a birthday card today featuring some fun patterned paper layers and the sweet cake image from Make a Wish

Sunny Studio Stamps: Make A Wish Stiched Oval Die Stitched Scallop Dies Happy Birthday Card by Leanne West

I wanted this card to be very feminine so I started by picking out a four different pink and purple colors of the stripe pattern from Dots & Stripes Pastels paper pack. I used one of the Stitched Scallop dies to create the decorative edge. I added a piece of ribbon and secured the ends to the back of the layered panel.

I then added the completed layered panel to an A2 card base. I cut out an oval with a die from the Stitched Oval dies to be the base for a birthday vignette in the center of my card. I stamped and Copic colored the cake and tiny stars from Make a Wish. I used the Make a Wish dies to cut them out. 

Sunny Studio Stamps: Make A Wish Stiched Oval Die Stitched Scallop Dies Happy Birthday Card by Leanne West

I used the Birthday Balloons to stamp three balloons. I stamped the balloon strings directly onto the oval and then added the images with adhesive foam squares. I left a space above the cake to stamp a sentiment which is also from Make a Wish. This very feminine birthday card would not be complete without a little bling and sparkle so I added some iridescent gems and glitter accents to the balloons and cake.  

---------------------------------------------------------

Hello friends, Eloise here and today I’ll be sharing a card using the Make A Wish stamp set. This set is super amazing, as it’s a small stamp set, the price point is great and it includes just enough images to make a card on its own, or it can easily pair with any stamp set it make a birthday themed card, it’s a great stamp to keep on hand at all times.

Sunny Studio Stamps: Make A Wish Sunburst Embossing Folder Happy Birthday Card by Eloise Blue

To start my card today I stamped out my images from Make A Wish and then also pulled in some balloons from Oceans of Joy. I coloured them in with Copic Markers and cut them out using the coordinating dies. For the strings of the balloons, I cut them out with my scissors since they don’t have a die. 

(Copic Markers Used: BV02, BV04, BV08 / RV13, RV25, RV19 / YR20, YR21, YR23 / Y11, Y18, YR15 / YG01, YG03, YG17 / C0, 0 / BG11, BG13, BG49 / Y11, Y13, Y17 / Y38, YR15, YR04)

Sunny Studio Stamps: Make A Wish Sunburst Embossing Folder Happy Birthday Card by Eloise Blue

While I had my die cutting machine out, I ran through the Sunburst Embossing Folder with some white cardstock. I then laid out all my images and stamped the sentiment ‘Make A Wish’ into the middle piece with black ink and stamped some stars around as well.

Sunny Studio Stamps: Make A Wish Sunburst Embossing Folder Happy Birthday Card by Eloise Blue

I then added foam tape onto all the backs of the images and adhered them into place where I had temporarily placed them before. I adhered the entire panel onto a card base and the card was complete.

Thanks so much for stopping by today and I’ll see you next time. 

Sunny Studio Supplies Used:

Oceans of Joy Dies
Oceans of Joy Dies
Shop at:
Sunny Studio
Oceans of Joy Stamps
Shop at:
Sunny Studio
Stitched Scallop Dies
Shop at:
Sunny Studio
Birthday Balloon Stamps
Shop at:
Sunny Studio
Birthday Balloon Die
Shop at:
Sunny Studio
Stitched Oval Dies
Stitched Oval Dies
Shop at:
Sunny Studio
Dots & Stripes Pastels 6x6 Paper
Shop at:
Sunny Studio
Sunburst Embossing
Sunburst Embossing
Shop at:
Sunny Studio
Make A Wish Stamps
Make A Wish Stamps
Shop at:
Sunny Studio
Make A Wish Dies
Make A Wish Dies
Shop at:
Sunny Studio

Saturday, February 9, 2019

Guest Designer Spotlight: Love Monkey Cards with Karin Akesdotter

Hi Everyone! I'm Karin Ã…kesdotter from Peppermint Patty’s Papercraft and I am so excited to be collaborating with Sunny Studio this month and am here today to share some cards I've made with Sunny’s wonderful Spring Release. Focus today is on the adorable Love Monkey set.

Sunny Studio Stamps: Love Monkey Frilly Frames Polka Dots Love Themed Cards with Karin Akesdotter

For the first card, I simply stamped my images and die cut them with the coordinating dies. I created a sky background before adding my sentiment and flowers. 

Sunny Studio Stamps: Love Monkey Frilly Frames Polka Dots Love Themed Cards with Karin Akesdotter

I am in LOVE with the beautiful Frilly Frames Polka Dots dies and used it here to make a romantic frame for my Love Monkey window card. All my images are colored with Copic markers.

Sunny Studio Stamps: Love Monkey Frilly Frames Polka Dots Love Themed Cards with Karin Akesdotter

Inspired by Jennifer McGuire's post about tunnel cards HERE I created this dimensional Valentine's card. LOVE the surprise element of these type of cards and the sweet Love Monkeys are just perfect for it!!!!

Sunny Studio Supplies Used: 

Love Monkey Stamps
Love Monkey Stamps
Shop at:
Sunny Studio
Love Monkey Dies
Love Monkey Dies
Shop at:
Sunny Studio
Frilly Frames Polka-Dot
Shop at:
Sunny Studio