Tuesday, October 17, 2017

Silver Bells and Gleeful Reindeer Happiest Of Holidays Card with Franci

Hi there! Franci here with you today with a festive card, featuring the new Silver Bells die and the Gleeful Reindeer stamp set. Here's what I created.

Sunny Studio Stamps: Silver Bells and Gleeful Reindeer Happiest Of Holidays Card by Francesca Vignoli  

It's a little winter scene, with the light coming from the beautiful golden bell at the top of the card. I think these reindeer are so adorable and cute in this little festive scene! First I die cut the bell from gold paper and I love this light style with nothing behind. You can actually die cut a little circle to give your bell even more dimension if you'd like. Then I added some gold twine and glued a little red ribbon on top.

Sunny Studio Stamps: Silver Bells and Gleeful Reindeer Happiest Of Holidays Card by Francesca Vignoli  

I masked off 3/4" at the bottom of the card base, and then sponged some Spiced Marmalade distress ink from the top and some Evergreen Bough distress ink from the bottom with a light hand. I let my background dry and then I splattered some white watercolor to create little white dots. 

I stamped all my images and colored them with Copics, adding some details with a white gel pen. I die cut all of my stamped images with the coordinating Gleeful Reindeer dies. I also added lots of sparkle with the clear Wink of Stella Brush. I arranged my scene to my liking and then glued all the elements down, along with my bell at the top, securing the twine on the back of the card. 

Hope you liked my project and thank you so much for stopping by today! See you next week and be sure to come by tomorrow for more inspiration from the other designers! 

Sunny Studio Supplies Used:

Gleeful Reindeer Dies
Shop at:
Sunny Studio
Gleeful Reindeer Stamps
Shop at:
Sunny Studio
Silver Bells Die
Silver Bells Die
Shop at:
Sunny Studio

Monday, October 16, 2017

Jolly Gingerbread Interactive Opening House Card with Eloise

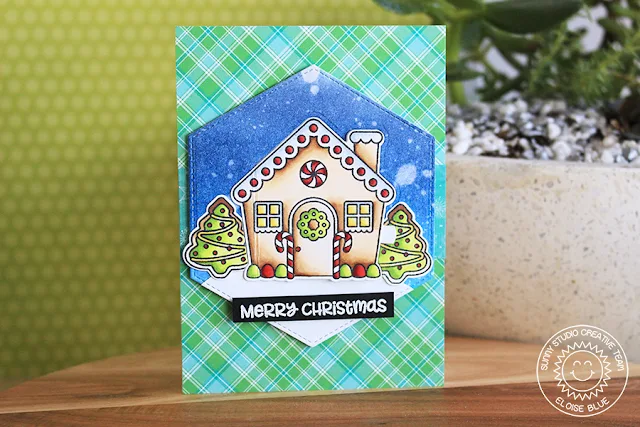
Hi everyone, Eloise here and today I have an interactive card to share with you all using the Jolly Gingerbread stamp set.

Sunny Studio Stamps: Jolly Gingerbread Interactive Opening House Christmas Card by Eloise Blue

To begin my card today, I first stamped, coloured and die cut all my images out. I coloured them with Copic markers in traditional Christmas colours since I really love using traditional colours. I then used a stitched hexagon die to cut out a large hexagon out of some white cardstock and a piece of watercolour paper and then used a smaller hexagon die to cut out some kraft cardstock. I used Distress Inks to colour the larger hexagon piece and then cut a small hill from the other large hexagon and adhered them together. I then took a bricks stencil and some brown Distress Inks and ink blended over the smaller kraft hexagon. Now that all my layers were ready, I could start putting my card together. 

Sunny Studio Stamps: Jolly Gingerbread Interactive Opening House Christmas Card by Eloise Blue

I used the house die from the Jolly Gingerbread Coordinating die set and cut out the house partially from the blue hexagon. I lined up my plates and left a little not covered by the plates on the left hand side. I did this, since I only wanted whatever was under the plates and on the right hand side of the house to cut. I ran this through my Big Shot Machine and then used a craft knife to cut a straight line down. I then repeated this set on the card base also. I created a side fold card and did the same steps. 

I then took my die cut house over to my scoring tool and scored a straight line so that it could be opened like a door on the front of my card. I then used two of the trees that I cut, positioned them over the open house die cut on my hexagon panel and used some washi tape to hold it down over the two trees, then ran it through my die cutting machine. I did this because I wanted them to have the shape of the die cut, so I could squish them up next to the already cut house die in my hexagon panel so it would all lay flush. 

Sunny Studio Stamps: Jolly Gingerbread Interactive Opening House Christmas Card by Eloise Blue

Now time to adhere. I adhered a piece of acetate onto the back on my hexagon panel and then I used some score tape along the scored piece of my house and adhered it down into place. I used runner adhesive to also adhere down my trees on either side - butting them up against the house. I also cut a small strip of cardstock to adhere behind my house, so it could be easily lifted up and it could reveal the inside of the card. Once the front was adhered, I took the bricks hexagon piece, adhered my gingerbread and accessories and adhered it into the inside of my card. 

To finish up I white heat embossed the 'Merry Christmas' and 'from our home to yours' sentiments on black strips of cardstock and adhered them to the outside and inside of the card. 

Thanks so much for stopping by today, I hope you enjoyed the interactive aspect of the card to see the gingerbread inside, it's super fun and cute!

Sunny Studio Supplies Used:

Jolly Gingerbread Stamps
Shop at:
Sunny Studio
Jolly Gingerbread Dies
Shop at:
Sunny Studio

Saturday, October 14, 2017

Guest Designer Spotlight: Winter Christmas Cards with Elise Constable

We're so excited to welcome Elise Constable back to the blog today as our special guest. She has some gorgeous cards that you are going to just love! 

Sunny Studio Stamps: Christmas Chapel and Christmas Home Winter Themed Cards by Elise Constable

For her cards today, Elise ink masked off the horizon line of her scalloped die-cut panel before blending on peacock feathers distress ink for the sky.  

Sunny Studio Stamps: Christmas Chapel and Christmas Home Winter Themed Cards by Elise Constable

She then stamped faint stars in metallic gold pigment ink using the stars from the Christmas Chapel mini set.

Sunny Studio Stamps: Christmas Chapel and Christmas Home Winter Themed Cards by Elise Constable

All of her images were colored with Copic markers and the sentiments were stamped in VersaMark ink using the Festive Greetings set, which were then heat embossed using gold embossing power.

Sunny Studio Stamps: Christmas Chapel and Christmas Home Winter Themed Cards by Elise Constable

As a finishing touch, Elise added Frosted Lace Stickles glitter glue to the snow on the house, church, and trees. 

Sunny Studio Stamps: Christmas Chapel and Christmas Home Winter Themed Cards by Elise Constable

We love this beautiful interchangeable design and think it would be a great design to make assembly line style for everyone on your holiday Christmas card list.  Thank you Elise for returning to share your talents with us!  :)


Sunny Studio Supplies Used:

Christmas Chapel Stamps
Shop at:
Sunny Studio
Christmas Chapel Dies
Shop at:
Sunny Studio
Christmas Home Stamps
Shop at:
Sunny Studio
Christmas Home Dies
Christmas Home Dies
Shop at:
Sunny Studio
Festive Greetings Stamps
Shop at:
Sunny Studio

Friday, October 13, 2017

Petite Poinsettias Tree Branch Background Card with Lexa

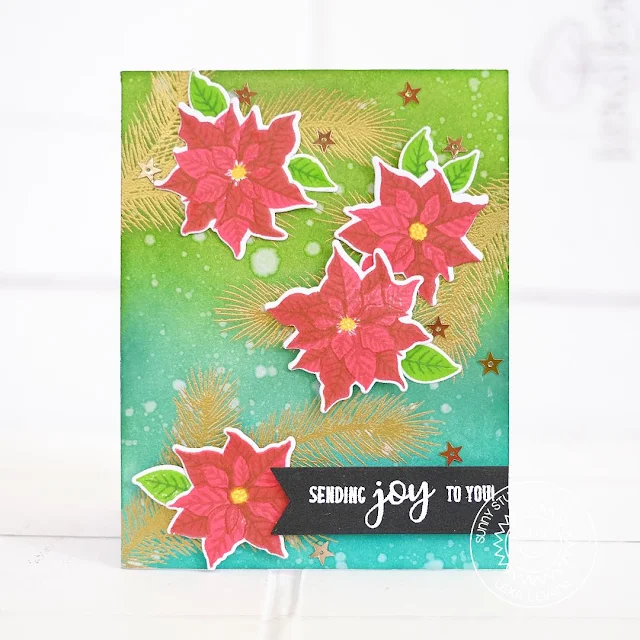
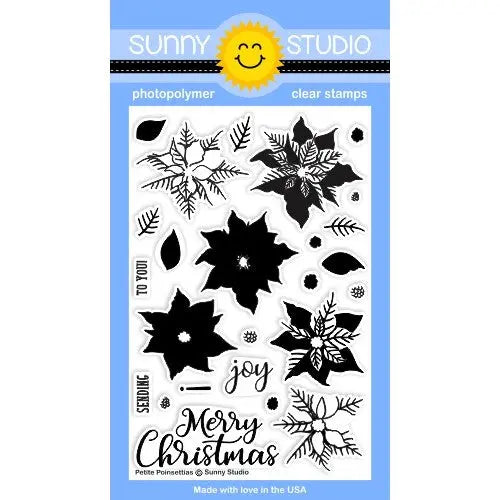
Hello everyone! Lexa here today with a Christmas card featuring the brand new Petite Poisenttias Stamps mixed with the old Holiday Style Stamps.

Sunny Studio Stamps: Petite Poinsettias Tree Branch Background Card by Lexa Levana

I started this card with the background. I gold embossed the tree branch and resist blended some Distress Inks (Mowed Lawn, Evergreen Bough and Peacock Feather) before splashing some water over it for the cool watercolor effect. I just love it. 

Sunny Studio Stamps: Petite Poinsettias Tree Branch Background Card by Lexa Levana

I stamped the poinsettias with two tone red dye ink and brown for the last layer. I got some help from my stamping tool for building layered stamps. They look so pretty. You can create a lot of this style for holiday seasons, they are so easy to work out with. I also add some flat gold stars from Pretty Pink Posh for accent.

Thank you so much for stopping by today. I hope you like today's card and have an amazing day.

Sunny Studio Supplies Used:


Holiday Style Stamps
Shop at:
Sunny Studio
Petite Poinsettias Stamps
Shop at:
Sunny Studio
Petite Poinsettias Dies
Shop at:
Sunny Studio

Thursday, October 12, 2017

Polar Playmates Arctic Winter Birthday Card with Vanessa

Hi everybody! Vanessa here today with a card using Polar Playmates. These arctic cuties are irresistible, don't you agree? Here comes my winter birthday card:

Sunny Studio Stamps: Polar Playmates Arctic Winter Birthday Card by Vanessa Menhorn

I first inked the front of my card with blue inks to create the water and the sky and stamped the sentiment. Now I stamped the island from Island Getaway, trimmed it and adhered it to the right corner. 

Sunny Studio Stamps: Polar Playmates Arctic Winter Birthday Card by Vanessa Menhorn

I wanted the seal to sit on a float, so I just used the ice hole stamp, fussy-cut the image and adhered it the other way round. Then I stamped the images onto white cardstock, colored them with Copics and die-cut them with the matching diesFinally, I adhered the seal, the bow and the fish with foam tape. 

Thank you so much for stopping by! See you next week!

Sunny Studio Supplies Used:

Island Getaway Stamps
Shop at:
Sunny Studio
Polar Playmates Stamps
Shop at:
Sunny Studio
Polar Playmates Dies
Shop at:
Sunny Studio

Wednesday, October 11, 2017

Christmas Home Winter Interactive Card with Francesca

Hi everybody and welcome back to the Sunny Studio blog! Franci here with you today with a winter interactive card, featuring the Christmas Home set. Here's what I created.

Sunny Studio Stamps: Christmas Home Winter Car with Christmas Tree Interactive Card by Francesca Vignoli 

I love the Christmas Home stamp set sooo much! These little houses are so pretty and festive! The decorations are amazing, and there are so many details and little elements to build your perfect winter town/village scene. And you do have to be patient with the coloring, but it's so worth, I promise! Ha!

I decided to create a slider card for today since there's a little car in the set that's bringing a little Christmas tree home. The sentiment "from our house to yours" was the perfect match.

Sunny Studio Stamps: Christmas Home Winter Car with Christmas Tree Interactive Card by Francesca Vignoli 

First I stamped all of the images I planned to use in my scene with Memento tuxedo black ink. I then colored them with Copics and die cut them with the coordinating dies. I die cut two rectangles and colored the first with distress inks (Salty Ocean and Blueprints Sketch) to create my sky, and I created a little snow hill with the second one.

I stamped the "Merry Christmas" sentiment with Versamrk ink and embossed it with a silver power. Always make sure to check that your background is completely dry and use an anti static powder tool when embossing! Then I drew some snowflakes with a white gel pen to create a snow-fall effect.

I also stamped the other part of my sentiment with the same black ink that I used before. I created the slider mechanism and put it all together with double foam adhesive and a dime. You can see in the photos, the little car goes back and forth spreading Christmas Cheer! 

Sunny Studio Stamps: Christmas Home Winter Car with Christmas Tree Interactive Card by Francesca Vignoli 
Once I fixed the snowy hill with the interactive element, I glued down all the other images with liquid glue and foam to create even more depth and dimension on my card. 

Hope you liked my project and thank you so much for stopping by today! See you next week and be sure to come by tomorrow for more inspiration from the other designers! 

Sunny Studio Supplies Used:

Christmas Home Stamps
Shop at:
Sunny Studio
Christmas Home Dies
Christmas Home Dies
Shop at:
Sunny Studio

Tuesday, October 10, 2017

Frosty Flurries Winter Themed Shaker Box Card with Nancy

Hey there Sunny Studio fans! Nancy here today with a closer look at the Frosty Flurries stamp set. I love a good background stamp and this one really delivers! I put it to work on this detailed background for a wintery shaker box.

Sunny Studio Stamps: Frosted Flurries Winter Themed Shaker Box Card by Nancy Damiano

​The watercolored background was created with Distress Oxide Broken China and filled with tiny star and clear sequins. The acetate was stamped all over with the Frosty Flurry stamp and embossed in white. This gives the card an extra layer of fun movement and a really interesting background!

Sunny Studio Stamps: Frosted Flurries Winter Themed Shaker Box Card by Nancy Damiano

Next, a beautiful little house from the Christmas Home stamp set was watercolored with Distress Inks and placed front in center. The tree and lamppost are also from the same stamp set. A simple title from the Jolly Gingerbread stamp set embossed in white completes this fun card!

I hope this inspires you to create a wintery Christmas shaker box of your own! Don't forget to pick up the Frosty Flurries stamp set - it's a good one!

Sunny Studio Supplies Used:

Christmas Home Stamps
Shop at:
Sunny Studio
Christmas Home Dies
Christmas Home Dies
Shop at:
Sunny Studio
Frosty Flurries Stamps
Shop at:
Sunny Studio
Jolly Gingerbread Stamps
Shop at:
Sunny Studio