Showing posts with label Happy Word Die. Show all posts

Wednesday, July 8, 2020

Designers Choice Cards with Tammy and Ana

Hi friends! Tammy here sharing this fun under the sea card. I LOVE underwater themed cards, so I combined some of my favorites, Best Fishes and Sea You Soon to create today's card.

Sunny Studio Stamps: Best Fishes Sea You Soon Stitched Arch Dies Woodland Border Dies Summer Themed Card by Tammy Stark

To begin, I cut a rectangle from the Summer Splash Paper. I then cut out a window using the largest die from the Stitched Arch Dies. Next, I created my background by ink blending Blueprint Sketch, Mermaid Lagoon, Peacock Feathers, and Tumbled Glass Distress Oxide inks. I splattered some water droplets onto my background and blotted up to create some interest to the water. I created the sandy border by cutting a piece of Bristol cardstock with the Woodlands Borders Die, ink blending with Antique Linen and Vintage Photo Distress Oxide inks, and attached to my inked background. Next, I adhered my wave patterned paper over my background, using foam tape for dimension.

I stamped, colored with Copic markers, and cut out the images from the following sets: Best FishesCoordinating Dies, Beach BabiesCoordinating Dies, Sea You SoonCoordinating Dies

Sunny Studio Stamps: Best Fishes Sea You Soon Stitched Arch Dies Woodland Border Dies Summer Themed Card by Tammy Stark

I arranged my under the sea critters onto my card and attached some with foam tape for dimension and stamped the sentiment from Best Fishes along the bottom of my card with black ink. To complete my card, I added some Sparkling Clear Crystals to create some bubbles. Finally, I attached my completed card front to a white A2 card base.

Thanks so much for stopping by...SEA you next time! ;)

---------------------------------------------------------

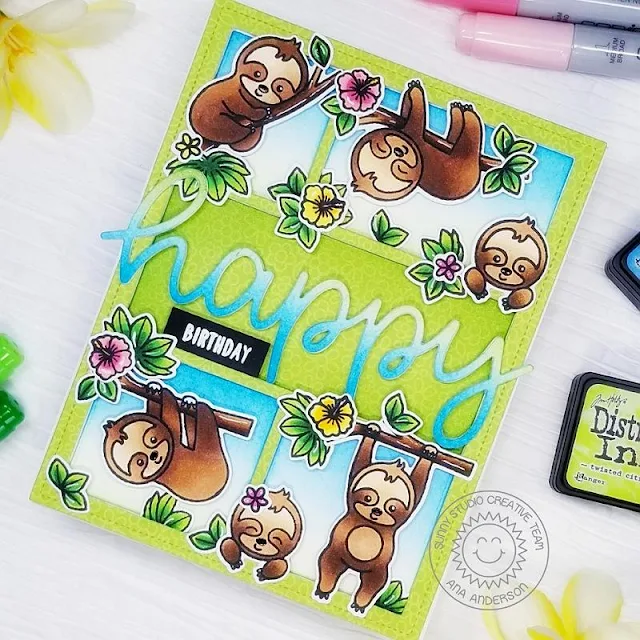
Hello crafty friends! It’s Ana today with a super sweet birthday card featuring Silly Sloths stamps and diesComic Strips Everyday dies as well as Happy word die and Flirty Flowers paper pack.

Sunny Studio Stamps: Silly Sloths Comic Strip Everyday Dies Happy Word Die Birthday Card by Ana Anderson

I started with die cutting green floral paper (from Flirty paper pack) with Comic Strip Everyday dies, then die cut another frame/background from white cardstock. I die cut the word happy 4 times out of white cardstock, layered them, then inked the sentiment and the background with Salty Ocean and Twisted Citron distress inks. I white heat embossed the word birthday on a piece of black cardstock, then trimmed the strip.

I stamped the sloths and foliage with Memento Tuxedo black ink, colored them with Copic markers, cut them with coordinating dies then started assembling the card. I popped the frame with thin strips of foam tape, then inserted inked background pieces.

Sunny Studio Stamps: Silly Sloths Comic Strip Everyday Dies Happy Word Die Birthday Card by Ana Anderson

I added the happy word dies cut to the center and adhered the sloths and foliage with liquid glue and foam tape. To finish the card, I added a few highlights with white gel pen!
I hope you have enjoyed today’s post and that this slothy card put a smile on your face. Have a wonderful day and I’ll see you next week!

Sunny Studio Supplies Used:

Beach Babies Stamps
Beach Babies Stamps
Shop at:
Sunny Studio
Beach Babies Dies
Beach Babies Dies
Shop at:
Sunny Studio
Comic Strip Everyday Dies
Shop at:
Sunny Studio
Happy Word Die
Happy Word Die
Shop at:
Sunny Studio
Woodland Borders Dies
Shop at:
Sunny Studio
Flirty Flowers 6x6 Paper
Shop at:
Sunny Studio
Best Fishes Stamps
Best Fishes Stamps
Shop at:
Sunny Studio
Best Fishes Dies
Best Fishes Dies
Shop at:
Sunny Studio
Silly Sloths Stamps
Silly Sloths Stamps
Shop at:
Sunny Studio
Silly Sloths Dies
Silly Sloths Dies
Shop at:
Sunny Studio
Summer Splash 6x6 Paper
Shop at:
Sunny Studio
Sea You Soon Stamps
Sea You Soon Stamps
Shop at:
Sunny Studio
Sea You Soon Dies
Sea You Soon Dies
Shop at:
Sunny Studio
Stitched Arch Dies
Stitched Arch Dies
Shop at:
Sunny Studio

Thursday, June 25, 2020

Sealiously Sweet Cards with Vanessa and Anja

Hello to you! Vanessa here with an interactive summer card using the adorable Sealiously Sweet set. These cute seals are enjoying a relaxing day at the pool: 

Sunny Studio Stamps: Sealiously Sweet Stitched Semi-Circle Dies Happy Word Die Summer Themed Card by Vanessa Menhorn

I created a square card base from white cardstock and colored the edges with Copic Markers. Then I trimmed a panel of white cardstock slightly smaller than the card base. Using the Stitched Semi-circle Dies, I made a mask for my pool. First, I created the water. For this, I applied lines of masking fluid and inked the semi-circle with blue Distress Oxide Ink. I applied small water droplets and removed the masking fluid when everything was dried. Now I adhered a mask over the pool and inked the rest of my panel with grey Distress Oxide ink. 

Sunny Studio Stamps: Sealiously Sweet Stitched Semi-Circle Dies Happy Word Die Summer Themed Card by Vanessa Menhorn

After I had applied tiny ink droplets, I drew the stones with a colored pencil. I removed the mask and die-cut a small circle from the position where the floating seal was going to sit. Then I stamped my images onto white cardstock, colored everything with Copic Markers and die-cut the elements with the matching dies. To make the seal float and turn around, I adhered a small coin to the back of the image, then a piece of foam tape onto the coin and behind the panel, underneath the circle, another small coin. Now I was ready to put the square panel onto my card base with foam tape.

I added the other images and die-cut the Happy Word Die from white cardstock. After I had colored it with the matching Copics, I adhered it to the card. Finally, I stamped the word "summer" onto a strip of black cardstock, heat-embossed it with white embossing powder and adhered it to the card with foam tape.

Sunny Studio Stamps: Sealiously Sweet Stitched Semi-Circle Dies Happy Word Die Summer Themed Card by Vanessa Menhorn

Now, let's see this card in action!

I'd love to join these cuties, how about you? Wishing you a happy day! Thanks for stopping by!

----------------------------------------------------------

Hi everyone, Anja here and today I have something cute for you! I made a slimline card with the Sealiously Sweet Stamps. Aren't these seals way too adorable?! They are going to have some fun at the pool for sure!

Sunny Studio Stamps: Sealiously Sweet Staggered Circle Dies Summer Themed Card by Anja Bytyqi

My white card base is different in size than a regular slimline card – it measures 7 5/8" × 3 11/16". I cut out a slightly smaller panel from aqua cardstock and used the Staggered Circle Die to create some windows. I trimmed a piece of teal cardstock to go behind the window openings.

I stamped the sentiment in VersaMark Ink and white heat embossed it. For a bit of dimension, I popped up the aqua panel with foam tape.

Sunny Studio Stamps: Sealiously Sweet Staggered Circle Dies Summer Themed Card by Anja Bytyqi

Next, I stamped the seals as well as the accessory stamps in Memento Tuxedo Black Ink and colored them with Copic Markers. I used the coordinating dies to cut everything out. I tucked the seals inside the windows and scattered the other images all over the card to complete my fun summer scene.

Thank you so much for stopping by! Have a sunny day!

Sunny Studio Supplies Used:

Happy Word Die
Happy Word Die
Shop at:
Sunny Studio
Staggered Circles Die
Shop at:
Sunny Studio
Sealiously Sweet Stamps
Shop at:
Sunny Studio
Sealiously Sweet Dies
Shop at:
Sunny Studio
Stitched Semi-Circle Dies
Shop at:
Sunny Studio

Tuesday, December 10, 2019

Santa Claus Lane Cards with Juliana and Angelica

Hello Sunny Studio Friends! It's Juliana here to share a festive Christmas shaker card featuring the Santa Claus Lane Stamp Set.

Sunny Studio Stamps: Santa Claus Lane Layered Snowflake Frame Dies Fancy Frames Dies Merry Christmas Card by Juliana Michaels

I began by stamping and coloring some of the images from the Santa Claus Lane Stamp Set with Copic Markers. I then die cut them with the Santa Claus Lane Dies.

Next, I took the Layered Snowflake Frame Dies and die cut the large snowflake frame from white cardstock and trimmed it into a square. I then die cut the small snowflake frame from white cardstock and trimmed it the same size as the larger frame.

To create the shaker box, I adhered a piece of transparency film/acetate to the back side of the large frame. I then added thin strips of double sided foam tape to create the frame that will hold the sequins and beads.

Sunny Studio Stamps: Santa Claus Lane Layered Snowflake Frame Dies Fancy Frames Dies Merry Christmas Card by Juliana Michaels

For the backing of the shaker box, I cut a piece of white cardstock to just slightly larger than the frame and inked it with Distress Oxide in Blueprint Sketch and Chipped Sapphire. I then lightly spritzed it with some water to activate the ink and dabbed it dry revealing “snowflakes”.  Next, I adhered the small white snowflake frame to the center of this piece to finish off the backing. I then adhered Santa in his sleigh with the toys! To fill the shaker I used a mix of seed beads, sequins and Blue Snowflake Confetti. I usually carefully pour these on top of the image just to get a feel for how much to add.

I then carefully lined up the top of the shaker with the backing and adhered the layers together to complete the shaker card. To finish it all off, I added the sentiment, heat embossed with white embossing powder, onto a red die cut pennant from the Fancy Frames Rectangle Dies.

Thanks so much for stopping by today! I hope you enjoyed learning how to create a festive Christmas shaker card featuring the Santa Claus Lane Stamp Set.

---------------------------------------------------

Hi friends! Angelica here, I have a new Christmas card to share with you today, featuring the Santa Claus Lane stamp set

Sunny Studio Stamps: Santa Claus Lane Frilly Frame Dies Happy Word Die Christmas Card by Angelica Conrad

I stamped and Copic-colored images from the stamp set, then die-cut them with the coordinating dies. I die-cut white card stock with Happy word die three times, stacking and gluing the words together for height. For the background, I blended Blueberry and Blue Corn inks onto a panel of white card stock. I let the ink dry, then white heat-embossed the sentiment words at an angle. 

Sunny Studio Stamps: Santa Claus Lane Frilly Frame Dies Happy Word Die Christmas Card by Angelica Conrad

I splattered shimmer water and watered-down white acrylic paint onto the panel for snow, then trimmed the panel with the Frilly Frames Retro Petals stitched rectangle. I attached the panel to a card base with foam adhesive, and added the chimney, Santa’s sleigh, and die cut word. I finished the card by applying shimmer and shine to the word, using a shimmer brush and Crystal glaze.

I hope I have helped with ideas for the fun Santa Clause Lane Lane stamp set. Thanks so much for stopping by! 

Sunny Studio Supplies Used:

Fancy Frames- Rectangles
Shop at:
Sunny Studio
Happy Word Die
Happy Word Die
Shop at:
Sunny Studio
Frilly Frames Retro Petals Dies
Shop at:
Sunny Studio
Santa Claus Lane Stamps
Shop at:
Sunny Studio
Santa Claus Lane Dies
Shop at:
Sunny Studio
Layered Snowflake Frame
Shop at:
Sunny Studio

Monday, November 25, 2019

Hedgey Holidays Cards with Leanne and Eloise

Hello everyone, Leanne here! I have a fun holiday card to share featuring the cutest little hedgehog from a special mini set called Hedgey Holidays. I used the hedgehog, which is almost perfectly symmetrical, to make this into a spinner card, When the recipient opens the card, the hedgehog spins.  

Sunny Studio Stamps: Hedgey Holidays Circle Snowflake Frame Dies Layered Snowflake Frame Dies Hedgehog Themed Christmas Cards by Leanne West

Spinner cards are very easy to make. You just need to make two of the spinning element to adhere back to back. For this card I started by die cutting a frame for the spinner. I used the Layered Snowflake Frame to cut out the opening in the card front and a separate A2 size panel which has a light sponging of Tumbled Glass Distress Ink around the edges. I Copic colored two hedge hogs and fussy cut them out. I then adhered some clear thread between the two hedgehog images. Using some strong adhesive, I secured the ends of the thread to the card front so the hedgehog is centered within the opening. I then adhered the inked panel over top. I added some snowflakes and holly leaves on both sides of the spinning hedgehog.  

Sunny Studio Stamps: Hedgey Holidays Circle Snowflake Frame Dies Layered Snowflake Frame Dies Hedgehog Themed Christmas Cards by Leanne West

To finish off the front of the card, I added some stamped pines sprigs with berries and a two part greeting. I die cut the large Happy Word from green glitter card stock to layer behind a sentiment strip white heat embossed with hedge holidays. 

I also needed to decorate the inside of the card since a large part of it can be seen through the snowflake frame opening. I made masks by die cutting snowflakes out of Post It Note paper. I placed the snowflake masks in a random arrangement and then gently sponged on some Candied Apple Distress Oxide Ink. I removed the masks and then splattered with thinned red paint. 

------------------------------------------------------------- 

Hi friends, Eloise here and today I’m using the Hedgey Holidays Stamp Set along with Scenic Route to create my Christmas card today.

Sunny Studio Stamps: Hedgey Holidays Scenic Route Hedgehog Themed Christmas Cards by Leanne West

I started off with stamping out my images and colouring them in with Copic Markers. I then cut them all out with the coordinating dies.

(Copic Markers Used: E40, E41, E42, E43, E44, E47, E79 / R00, R30 / R14, R17, R24, R39 / RV11, RV25 / YG03, YG17 / BG11, BG49 / Y13 / B00, B12 / R20, R22)

Sunny Studio Stamps: Hedgey Holidays Scenic Route Hedgehog Themed Christmas Cards by Leanne West

I added foam tape to the backs of the lights and adhered them onto an off-white card base. I then added foam to the back of the hedgehog and adhered that into the centre also. Lastly, I stamped the sentiment ‘Christmas Hedgehugs’ onto the card base.

Thanks so much for stopping by today and I’ll see you all next time. 


All retail purchases of any size will have 10% donated to Convoy of Hope to help with children’s feeding initiatives and disaster response.  

And as always orders will also come with our mini holiday light bulb die (not pictured).


Sunny Studio Supplies Used:

Happy Word Die
Happy Word Die
Shop at:
Sunny Studio
Season's Greetings Stamps
Shop at:
Sunny Studio
Scenic Route Stamps
Scenic Route Stamps
Shop at:
Sunny Studio
Scenic Route Dies
Scenic Route Dies
Shop at:
Sunny Studio
Layered Snowflake Frame
Shop at:
Sunny Studio
Snowflake Circle Frame
Shop at:
Sunny Studio

Thursday, June 13, 2019

Frilly Frames Dies Cards with Anja and Vanessa

Hi everyone, Anja here and today I'm highlighting the new Frilly Frames Chevron Dies. I combined this versatile 2-piece die set with the Fabulous Flamingos Stamps.

Sunny Studio Stamps: Frilly Frames Fabulous Flamingos Fresh & Fruity Tropical Paradise Happy Word Die Summer Themed Cards by Anja Bytyqi and Vanessa Menhorn

It's always fun to try new color combos, so I picked some bright and fresh colors for my summer birthday card. I started off with an A2 card base made from white cardstock. I used both dies together and cut the pinked frame with the chevron pattern from blush pink cardstock. Then I used the chevron die and cut it from three other cardstock colors. I repeatedly inlaid the chevrons into the blush pink die-cut.

Sunny Studio Stamps: Frilly Frames Fabulous Flamingos Fresh & Fruity Tropical Paradise Happy Word Die Summer Themed Cards by Anja Bytyqi and Vanessa Menhorn

Next, I stamped the images in Memento Tuxedo Black Ink and colored them with Copic Markers. I used the coordinating Fabulous Flamingos Dies to cut them out. The sentiment is included in the Party Pups Stamps set and I stamped it in VersaMark Ink on a thin black cardstock strip and white heat embossed it. To finish off my card, I adhered three matching enamel dots.

Thank you so much for stopping by! Wishing you a lovely day!

---------------------------------------------

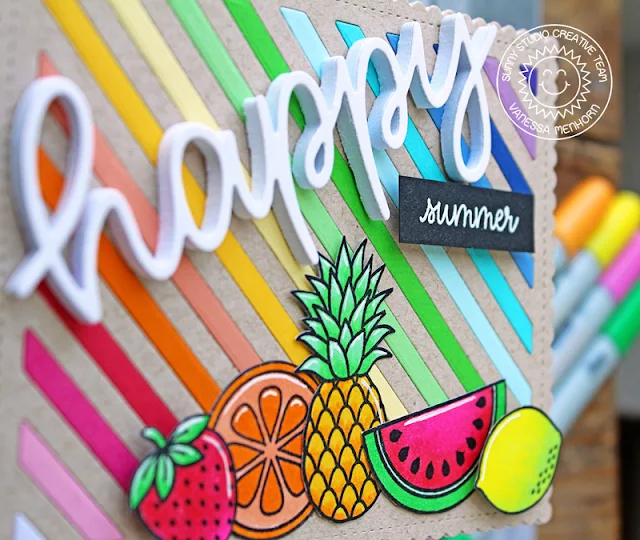
Hello everybody! Vanessa here today with a colorful summer card using the Frilly Frames Stripes DiesIt took me a while to assemble this card, because a lot of die-cutting was involved, but I love the result!

Sunny Studio Stamps: Frilly Frames Fabulous Flamingos Fresh & Fruity Tropical Paradise Happy Word Die Summer Themed Cards by Anja Bytyqi and Vanessa Menhorn

I first die-cut the frame from Kraft cardstock. Then I die-cut it from all the colors I had in my cardstock scrap stash. I assembled the frame and adhered it to the card base. Now I stamped the fruit images from Fresh & Fruity and Tropical Paradise onto white cardstock, colored them with Copics, fussy-cut the elements and adhered them to the card.

Sunny Studio Stamps: Frilly Frames Fabulous Flamingos Fresh & Fruity Tropical Paradise Happy Word Die Summer Themed Cards by Anja Bytyqi and Vanessa Menhorn

Next, I die-cut the Happy Word Die from white cardstock and fun foam and adhered it. I stamped and heat-embossed the "summer" from Fabulous Flamingos onto a strip of black cardstock, trimmed it and adhered it with foam tape.

I hope you like my idea to use up those cardstock scraps! I have plenty of stripes left to create more colorful cards :) Thanks for stopping by! 

Sunny Studio Supplies Used:

Fresh & Fruity Dies
Fresh & Fruity Dies
Shop at:
Sunny Studio
Fresh & Fruity Stamps
Shop at:
Sunny Studio
Tropical Paradise Dies
Shop at:
Sunny Studio
Tropical Paradise Stamps
Shop at:
Sunny Studio
Party Pups Stamps
Party Pups Stamps
Shop at:
Sunny Studio
Happy Word Die
Happy Word Die
Shop at:
Sunny Studio
Frilly Frames Chevron Die
Shop at:
Sunny Studio
Frilly Frames Stripes Die
Shop at:
Sunny Studio
Fabulous Flamingos Stamps
Shop at:
Sunny Studio
Fabulous Flamingos Dies
Shop at:
Sunny Studio