Monday, September 30, 2019

4th Birthday Blog Hop Winners + A Video Sharing the Holiday Release

Thank you so much for helping us celebrate our 4th Birthday and for helping our little company reach this milestone in the first place!  Your sweet comments and amazing support are what keep me going each day.  

I have 18 winners to announce...

Sunny Studio Blog
Roslyn Jin


Nichol Spohr's Blog
LisaR


Sandy Allnock's Blog
Beverly Perdue

Laura Bassen's Blog
Amy Cooley

Kay Miller's Blog
Denise Kitts-Wadlow 

Michelle Short's Blog
Andrea W

Francine Vuillème's Blog
Emma Sleppy

Teri Anderson's Blog
Helen Lee

Rachel Alvarado's Blog
Anita Trippi
Angelica Conrad's Blog
Rachel Russell 

Francesca Vignoli's Blog
Angela Walters 

Leanne West's Blog
Mary Holshouser

Vanessa Menhorn's Blog
Linda Bolhofner  

Eloise Blue's Blog
Laura Corkill 

Ana Anderson's Blog
Christine Kesler

Juliana Michaels' Blog
Ink Stain Roni

Anja Bytyqi's Blog
Cynthia Cole

Candice Fisher's Blog
Beverly Behal

I also finally was able to catch my breath and create a video this weekend sharing all the new products with the cards that were shared last week which you can watch below or at our YouTube channel HERE.


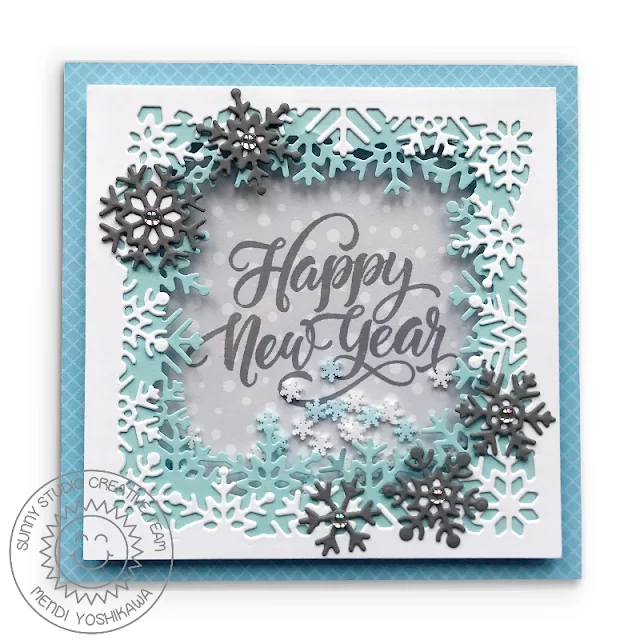
Before I go, it also occurred to me that I somehow failed to share a card I created for Sneak Peek Week so I thought I would finally share it now.  :)

I made this snowflake shaker card using our new Layered Snowflake Frame dies which come with two different sizes of snowflake frames to create a really fun look when they are stacked together. I used our new Subtle Grey Tones Paper for my background and then mounted them on a blue diagonal print from our Gingham Pastels Paper pack.

For my Happy New Year sentiment I used a greeting from our Season's Greetings stamps and then used our blue snowflake confetti for my shaker and the mirror droplets to adorn the center of each grey snowflake.  My finished card measures 4.75" square.  
Sunny Studio Stamps: Snowflake Happy New Year Shaker Card using Layered Snowflake Frame dies & Season's Greetings stamps)

Thanks again for your outpouring of love and encouragement. I have emailed all the winners their $25 prize codes, but if you are listed as a winner and did not receive my email, please contact me at info@sunnystudiostamps.com.

Sunny Studio Supplies Used:

Colorbox Archival Cat's Eye- Seattle Sky
Shop at:
Sunny Studio
Colorbox Archival Dye Ink- Seattle Sky
Shop at:
Sunny Studio
Dots & Stripes Pastels 6x6 Paper
Shop at:
Sunny Studio
Subtle Grey Tones Paper
Shop at:
Sunny Studio
Season's Greetings Stamps
Shop at:
Sunny Studio
Layered Snowflake Frame
Shop at:
Sunny Studio
Mirror Droplets
Mirror Droplets
Shop at:
Sunny Studio
Blue Snowflake Confetti
Shop at:
Sunny Studio

Merry Mice Cards with Leanne and Eloise

Hello everyone, Leanne here! I'm thrilled to back here on blog sharing the first of my projects using the new holiday stamps and dies. The Merry Mice stamp set is certainly one of my favs from the new release. I've created a slimline card to showcase some of the cute little mice images.  

Sunny Studio Stamps: Merry Mice Season's Greetings Scalloped Tag Dies Holiday Card by Leanne West

My slimline card base measures 3.5" wide by 8.5" tall. I added a separate ink blended background panel to the card front. This panel is trimmed smaller than the card base to allow about a quarter inch white border to show. I used Spun Sugar Distress Oxide ink and a blending brush to create the ombre' effect. I picked out three mice images and some accessories for this card. I Copic colored the images and used the coordinating Merry Mice dies to cut them out.  

Sunny Studio Stamps: Merry Mice Season's Greetings Scalloped Tag Dies Holiday Card by Leanne West

I used the Scalloped Tags Circle & Square dies to create little frames for the mice.  I masked off the scalloped edges and blended Pine Needles Oxide Ink onto the center of the tags. I then splattered with thinned white acrylic paint. I added the mice to the tags and then adhered the tags to the background with dimensional foam squares. I left enough space in between the tags to stamp the greeting which is included in the Merry Mice set. 

Sunny Studio Stamps: Merry Mice Season's Greetings Scalloped Tag Dies Holiday Card by Leanne West

I wanted to embellish the card with some pine sprigs and berry images from the Season's Greetings stamp set. They are the perfect accent in the corners and at the sides of the center tag. I tied bows with some baker's twine to the tags and that completed my card.  

-------------------------------------------------

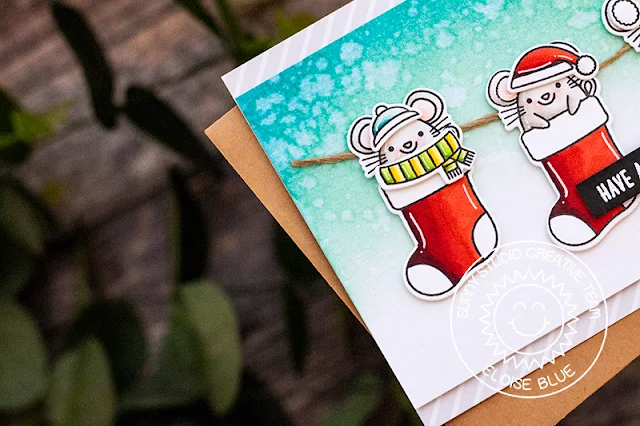
Hi everyone, Eloise here and today I have a card using the new Merry Mice Stamp Set. This set is so super cute, and I love all the different mice and the dress up elements, too. I decided to use the mice in the stocking for my card today.

Sunny Studio Stamps: Merry Mice Punny Holiday Card by Eloise Blue

I started off with stamping out my images from Merry Mice, plus a couple of scarfs and hats too. I coloured them in with Copic Markers and then cut them out. Once they were cut, I added white gel pen details onto the images.

(Copic Markers: R14, R24, R27, R89 / W00, W0, W1, W3 / R000, R00, R30 / BV01, BV02, BV04, BV08 / BG10, BG11, BG13, BG49 / BV01, BV02, BV04, BV08 / YG01, YG03, YG23, YG17 / Y11, Y13, Y15, Y19)


Sunny Studio Stamps: Merry Mice Punny Holiday Card by Eloise Blue

For my background, I used some Peacock Feathers and Cracked Pistachio Distress Inks and ink blended on the top half of a watercolour panel. I faded it off to white and then flicked on some water droplets. I then dried the entire panel with a heat tool.

Sunny Studio Stamps: Merry Mice Punny Holiday Card by Eloise Blue

I added string onto the backs of the mice so they would all be connected, added foam tape onto the back and adhered it onto the background. I added on their accessories, too. For my sentiment, I used the ‘Have A Mice Christmas’ from the same set and white heat embossed it onto a thin strip of black cardstock.

Lastly, I adhered the sentiment into place and adhered my entire panel onto a piece of white and grey striped patterned paper from the Subtle Grey Tones 6x6.

Thanks so much for stopping by today and I’ll see you next week.

Sunny Studio Supplies Used:

Subtle Grey Tones Paper
Shop at:
Sunny Studio
Season's Greetings Stamps
Shop at:
Sunny Studio
Season's Greetings Dies
Shop at:
Sunny Studio
Merry Mice Stamps
Merry Mice Stamps
Shop at:
Sunny Studio
Merry Mice Dies
Merry Mice Dies
Shop at:
Sunny Studio
Scalloped Tags-Circle
Shop at:
Sunny Studio
Scalloped Tags-Square
Shop at:
Sunny Studio