Wednesday, April 12, 2017

Inspiration Week: Introducing Pirate Pals Stamps & Dies

Happy Wednesday!  Only two more days until release day!!! I'm so excited to be unveiling our new Pirate Pals set today.

Back in early January several of us on the Doodlebug design team were trying to guess what Doodlebug's new collection for Spring would be and several guessed Pirates.  It turned out to be Vikings with their darling Dragon Tales collection, but I couldn't get the idea of cute pirates out of my head and I thought they would be the perfect compliment to our more girly Magical Mermaids set shared yesterday.

For my first card I wanted to create a Silhouette of the pirate ship from the set so I started by blending Worn Lipstick and Mustard Seed distress inks on my card panel to form my sunset.  I then stamped the pirate ship over the top and colored it in with a black Copic marker using one of the new fine sketch nibs (oh my goodness I'm in love with it) and covered the bottom portion of my card front with a piece of black cardstock.  To set my little scene I borrowed the palm tree and island from our Island Getaway Stamps which I think are the perfect compliment to this set.  The little crab guy comes from tomorrow's sneak peek.  ;)
Sunny Studio Stamps Pirate Pals Pirate Ship Ahoy Matey Card by Mendi Yoshikawa

Up next is a playful card using one of the pirate guys holding a single red balloon.  I thought it would be fun to cut off the sword and make it look like the pirate was holding the balloon instead.  This would actually work well for both of the sword carrying pirates, but I loved how I could color him to match my red, black and white color scheme.  :)  

For my background I alternated stamping the scull and crossbones stamp with the anchor using VersaMark ink and then heat embossed them with clear powder on my red cardstock.  It gives it a pretty cool velvety appearance in person.
Sunny Studio Stamps Pirate Pals Belated Birthday Card by Mendi Yoshikawa

Up next are three pirates hiding in barrels.  Don't ask me why.  I had this idea in my head from the beginning, but when my 11-year old daughter saw this card she thought it was pretty wacky.  I think perhaps I've ridden Pirates of the Caribbean at Disneyland one too many times with Johnny Depp peaking out from the barrel.  

To ground my scene I borrowed some inspiration from the wonderfully talented Sandy Allnock and loosely sketched in some planks using my Copic Markers and a clear ruler.  I then used some post-it tape as a mask and inked up the bottom half with antique linen and the top half with tumbled glass distress inks, fading them out towards the edges of my card panel.  

And that parrot on his head?  He's covering a boo-boo on my background, but I like to think of it as sort of a happy accident because in the end I like the splash of color he added and how he made my composition a bit more interesting--I only wish I had thought to mirror him so he was facing the other way.  ;)
Sunny Studio Stamps Pirate Pals Birthday Card by Mendi Yoshikawa

My last card is sort of the day version of my first card.  I used the same palm tree and island from our Island Getaway set, this time also incorporating the wave stamps from that set for my ocean.  For my clouds, I used the dies from our Rain or Shine and Sunny Sentiments sets, cutting them from masking material and setting them on my white cardstock background before inking in my sky using Tumbled Glass distress ink. The parrot, treasure chest and coins complete my scene and help tie in my punny sentiment.  
Sunny Studio Stamps Pirate Pals You Are A Treasure Card by Mendi Yoshikawa

I hope you've enjoyed today's cards.  Here's a full look at the new Pirate Pals clear stamps and coordinating dies available for purchase on Friday morning...


Sunny Studio Stamps Pirate Pals 4x6 Photopolymer Clear Stamp Set  Sunny Studio Stamps Pirate Pals Coordinating Dies

Would you like to win a $25 gift code to our online store to spend on some of the new sets?  Use the rafflecopter below to enter to win.  We will be giving away a new gift code each day for a total of five chances to win!  Contest closes on April 15th at Midnight PST.  Winners will be announced on Sunday, April 16th.  :)

a Rafflecopter giveaway Make sure to check back tomorrow when I will be sharing another new set that coordinates well with both our Pirate Pals and Magical Mermaid sets. ;)

Other Sunny Studio Supplies Used:


Tuesday, April 11, 2017

Inspiration Week: Introducing Magical Mermaids & Stitched Scallop Dies

Hello and welcome to day 2 as we countdown to our summer release day on Friday!  I'm super excited to officially introduce you to today's new products with our Magical Mermaids stamps and coordinating dies and a new standalone Stitched Scallop die set.

I had originally planned to go a different direction with our summer release, but a sweet customer at Creativation asked me to try my hand at creating a Mermaid set and while it felt daunting to try and do something with "people" it immediately started the wheels turning in my head.  I hope you enjoy them.  :)

Up first is a card I created using all three Mermaids from the set.  They are super fun to color and personalize with different skin tones and hair colors.  I found myself returning to some of my Pinterest boards repeatedly to figure out the right combination of markers.  ;)  

For my background, I sponged on peacock feathers, salty ocean, and wilted violet distress inks and then used a Stampin' Up Blender pen to remove some of the color. After that, I came back with my White Sharpie Pen and Glossy Accents and created clear glossy bubbles over the top.  I was really pleased with the look and as a bit of a control freak, I liked having a way to play with removing the color that didn't require dropping random bits of water.  ;)

Sunny Studio Stamps Magical Mermaids Swimming By To Say Hi Card by Mendi Yoshikawa

Up next is a card with one of my favorite analogous color schemes--I've always adored the way these colors look together.  I shocked myself, but I finally achieved a watercolor background that I actually liked.  I love how watercolors look, but I really struggle with them (I think it goes back to my perfectionist nature). However, after watching a free class over at Scrapbook.com I was feeling inspired to try some watercoloring again.  ;)

The Turtle and balloons are a preview of another set being shared on Thursday which I paired with the little critter trails from our Backyard Bugs stamps to use as balloon strings.  I added a touch of sparkle to the edge of each balloon using my Stardust Stickles.
Sunny Studio Stamps Magical Mermaids Birthday Card by Mendi Yoshikawa

For my next card, I created a scene with all the little companion images from the set including the seahorse and jellyfish.  Wanna know a secret?  When I fussy cut my images, I hardly ever cut out the insides like the jellyfish here.  I just came back with a coordinating color of Copic marker to give the optical illusion that I did.  Even in person, it's hard to tell that it wasn't cut out.  ;)

Sunny Studio Stamps Magical Mermaids Ocean Scene Card by Mendi Yoshikawa

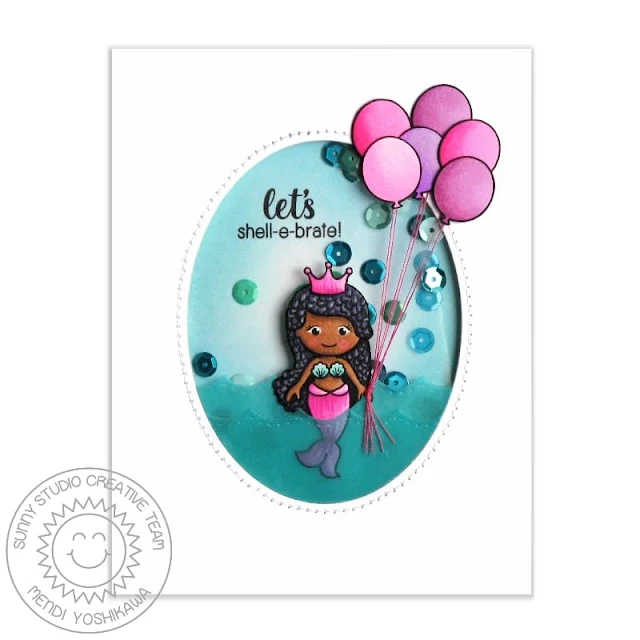
My next card features a fun shaker.  This project shows the other new product being showcased today which is our Stitched Scallop dies.  They are fun in that they are stitched on both sides of the cut line making them perfect for both ocean waves and a scalloped border.  With my shaker the only elements on the inside are the inked up background with the sentiment and sequins.  I then used 3M Spray Mount to adhere my stitched vellum waves over the top (using the same oval die-cut along the bottoms of them). 

For my balloons I taped sewing thread to the back of each balloon and after I had them adhered to my card I pulled the strings into a tight knot which I glued to her hand with some liquid adhesive. 

Sunny Studio Stamps Magical Mermaids Let's Shell-e-brate Birthday Shaker Card by Mendi Yoshikawa

My last card of the day uses a sandy beach border stamp from that same set being showcased on Thursday.  ;)  I inked up my background using Spun Sugar distress ink and then came back with more of that same ink using all the hearts from our Color Me Happy stamps to create a custom background.  It came together really quickly and I love the results!

My ocean waves were designed by cutting a mask using our Wavy Border dies and then inking them up with tumbled glass distress ink.  I finished my scene by sitting the mermaid on a rock from the set along with some scattered seashells.  

It's a bit hard to see, but I gave my card a sweet scalloped edge along the bottom using the new stitched scallop dies.  It was honestly hard figuring out which day to share these dies as I found myself using them on a lot of the cards I made for this release.  They're quickly becoming my new favorite and are so versatile with the two sizes and the ability to use both the negative and positive portions.  :)

Sunny Studio Stamps Magical Mermaids You Mermaid To Be Awesome Card by Mendi Yoshikawa

Here's a look at the new Magical Mermaids clear stamps and coordinating dies & Stitched Scallop Dies available for purchase on Friday morning...


I hope you've enjoyed today's sneak peek.  Would you like to win a $25 gift code to our online store to spend on some of the new sets?  Use the Rafflecopter below to enter to win.  We will be giving away a new gift code each day for a total of five chances to win!  The contest closes on April 15th at Midnight PST.  Winners will be announced on Sunday, April 16th.  :)

a Rafflecopter giveaway Make sure to check back tomorrow when I will be sharing a fun new set for the guys (& gals) in your life.  :)

Other Sunny Studio Supplies Used:


Monday, April 10, 2017

Inspiration Week: Introducing Two Scoops & Perfect Popsicles

I'm so excited to be counting down the days to our summer release coming out on Friday morning with five days of inspiration and prizes!  Today I'm debuting two new stamp layering sets for summer with a 4x6 mix-and-match ice cream set and a 3x4 companion Popsicle set called Two Scoops & Perfect Popsicles.

For my first card I used both sets, along with one of my favorite pink & brown color schemes.  These images are so fun to put together--I felt the same magical feeling I experienced the first time I stamped the bell from our Holiday Style set.  I love how easy it is to create beautiful images--Other stamps of this size would have taken me forever to color if I had tried to do something like this with my Copics and probably wouldn't have looked nearly as good.

Sunny Studio Stamps Perfect Popsicles and Two Scoops Ice Cream Card by Mendi Yoshikawa

For my next card I stamped a rainbow of sherbet cones.  I started by inking up my background with picked raspberry, spiced marmalade, mustard seed, twisted citron & peacock feathers distress inks using my favorite jumbo dauber.  I then stamped my soft serve ice creams in a rainbow of colors to match (I've share my ink combinations below) topped with a little Stardust Stickles.  

To make things go quicker I've found it easiest to stamp my images assembly line style because to me the most time consuming part is lining up the stamps on my Misti Stamping tool.  Once I had a placement that worked for me, I did a couple of each color before cleaning my stamp with a baby wipe and moving onto another color family for that particular layered stamp. 
Sunny Studio Stamps Two Scoops Rainbow Sherbet Ice Cream Card by Mendi Yoshikawa

For the sugar cones I recommend experimenting with different colors of cardstock since the highlights will take on whatever color of paper is beneath it.  I tried white, cream and kraft from the same ink colors and they each had a different look as seen here:


For my next card I created a triple scoop cone using the other layering images in the Two Scoops set.  I love how many different ways these can be mixed and matched.  For this card I stamped my syrup to look like a strawberry topping which I covered with glossy accents and then dropped in some seed beads with my tweezers to look like sprinkles.

I stamped a background to match my cones using the new Tonic Stamp Platform by Tim Holtz.  Today I'm also sharing a photo tutorial on my personal blog showing how I made it which you can see HERE.

Sunny Studio Stamps Two Scoops Triple Scoop Ice Cream Card by Mendi Yoshikawa

Up next I have a rainbow Popsicle card, scraplifting myself with a previous card I shared HERE.  It's nice not having to reinvent the wheel for every project plus I'm always looking for way to incorporate rainbows as much as humanly possible which I guess is pretty obvious with three rainbow cards in a row. ;)

These popsicles come with three layering images for the popsicle itself and two for the popsicle stick.  Honestly they don't look like much to get excited about in the package, but I LOVE how they look when layered together.  Just make sure to not make my mistake and leave plenty of room for the stick when stamping.  I had to piece some of mine together after the fact because I was trying to be economical with my paper the first time around.  Hee-hee.
Sunny Studio Stamps Perfect Popsicles Rainbow Color My World Card by Mendi Yoshikawa

For my last card today I chose to stamp the Popsicles as Fudgsicles!  I then took a 1/8" hole punch and punched a little bite mark out of one of them.  I also gave them a bit of personality by using a face from Fresh & Fruity and bows from A Good Egg .  

And check out that ruffle background!  It's a peek at something that will be shared a bit more tomorrow that I'm super excited about.  ;)
Sunny Studio Stamps Perfect Popsicles Fudgsicle Card by Mendi Yoshikawa


Here's a full look at the new Two Scoops & Perfect Popsicles clear stamps and coordinating dies available for purchase on Friday morning (please note: images are not shown to scale).


I have created a stamping guide to help you in layering the stamps.  When working with dye inks I have found that it is often easier to layer the the images "backwards" by starting with the smallest stamp in your darkest color and working back to the lightest overall image.  It has helped me tremendously in seeing where to line up my images.  To use the guide, the dark black outlines show where the image touches the edges of the previous stamped layer.

You can download or print your own layering guide HERE


I frequently am asked what ink colors I've used.  While I have used a variety of brands in my samples, there's a good chance you can achieve similar results with inks you probably already have in you stash.  I highly recommend stamping your inks out and creating a swatch book to aid you in choosing two or three inks that compliment each other.  These are the ones I happened to use here today from lightest to darkest:

Strawberry Sherbet, Popsicle & Syrup
Colorbox Candy (or Hero Arts Bubble Gum)
Hero Arts Ultra Pink
Simon Says Stamp Doll Pink (or Colorbox Pinkolicious)

Orange Sherbet & Popsicle
Hero Arts Orange Soda
Papertrey Ink Orange Zest
Stampin' Up Tangerine Tango

Banana Yellow Sherbet & Popsicle
Hero Arts Lemon Yellow
Papertrey Ink Summer Sunrise

Lime Green Sherbet & Popsicle
Colorbox Green Apple

Teal Sherbet
Umbrella Crafts Mint (Scrapbook.com)
Stampin' Up Bermuda Bay

Blue Raspberry Popsicle
My Favorite Things Blue Raspberry

Sugar Cone
Papertrey Ink Classic Kraft (or Colorbox Gingersnap)

Original Cone & Popsicle Stick
Memories Soft Sand (or Papertrey Ink Fine Linen)
Papertrey Ink Classic Kraft (or Colorbox Gingersnap)

Cherry Red Popsicle

Grape Popsicle

Fudgsicle & Chocolate Syrup
Hero Arts Artprint Brown

Strawberry Scoop
Colorbox Bubblegum (or Hero Arts Passion Flower)
Colorbox Candy (or Hero Arts Bubble Gum)

Vanilla Scoop
Lawn Fawn Butter
Hero Arts Butter Bar

Mint Scoop
Papertrey Ink Aqua Mist
Stampin' Up Coastal Cabana

Cherry
Papertrey Ink Hibiscus Burst
Stampin' Up Melon Mambo
Stampin' Up Rose Red

We now carry 49 colors of vibrant dye inks by Colorbox in our online store HERE.  I just added 11 additional colors to our line-up this weekend to fill in some gaps in the color wheel.  I love that they are affordable at $4.50 for a full sized pad and because I truly appreciate a good color chart, I've created a new one for you to see how the colors stamp before you buy.  ;)

Phew!  Are you still with me?  I hope you've enjoyed today's sneak peek.  Would you like to win a $25 gift code to our online store to spend on some of the new sets?  Use the rafflecopter below to enter to win.  We will be giving away a new gift code each day for a total of five chances to win!  Contest closes on April 15th at Midnight PST.  Winners will be announced on Sunday, April 16th.  :)

a Rafflecopter giveaway Make sure to check back tomorrow when I will be sharing another new stamp & die set that I'm hoping you'll fall in love with as much as I have. ;)

Other Sunny Studio Supplies Used Today:


Saturday, April 8, 2017

Sunny Saturday Share: Customer Cards

Hey everyone! How are you? I'm so excited to be popping in today with a Sunny Saturday Share. There have been so many amazing cards popping up on Instagram that have made my jaw drop so I couldn't wait to share them with all of you!  :)


Easter Wishes card by Sandy Allnock


Sunny Studio Stamps: Sunny Saturday Shares Card by Sandy Allnock


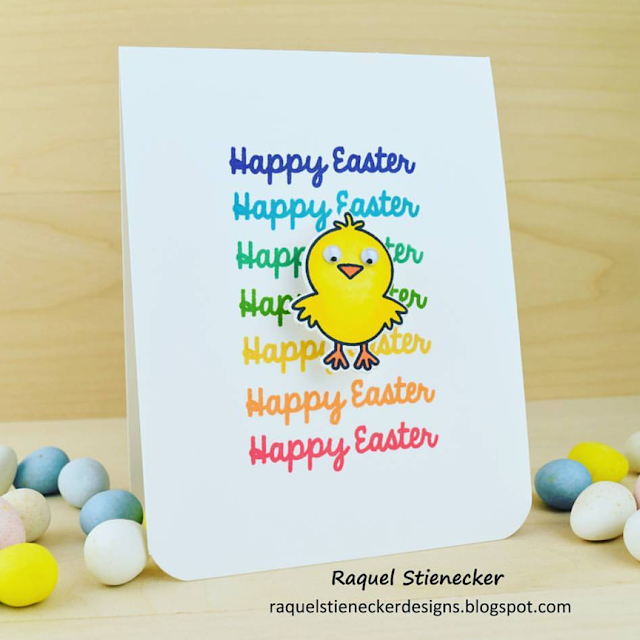
Sunny Studio Stamps: Sunny Saturday Shares Card by Raquel Stienecker


Sunny Studio Stamps: Sunny Saturday Shares Card by Melissa


Sunny Studio Stamps: Sunny Saturday Shares Card by Melissa Miller


Sunny Studio Stamps: Sunny Saturday Shares Card by Ardyth Percy-Robb


Sunny Studio Stamps: Sunny Saturday Shares Card by Lenae


Sunny Studio Stamps: Sunny Saturday Shares Card by Karen Brown


Sunny Studio Stamps: Sunny Saturday Shares Card by Jane Clempson


Sunny Studio Stamps: Sunny Saturday Shares Card by Madisen

Thank you for sharing all these fabulous ideas with us!  I hope you will continue to share your gorgeous projects with us--It always makes my day to see them.  You can tag us on instagram with the hashtag #sunnystudiostamps or share your projects with us in our flickr group or on our facebook page


Sunny Studio Supplies Used: