Showing posts with label Frosty Flurries. Show all posts

Tuesday, November 25, 2025

Holiday Express & Penguin Party Card with Amanda

Hey crafty friends! It’s Amanda here with you today on the Sunny Studio blog and I’m sharing a sweet little holiday card!

Sunny Studio Stamps: Holiday Express & Penguin Party Holiday Card by Amanda Fitterer (featuring Scalloped Oval Mat Dies, Frosty Flurries)

To create the card base, I trimmed a piece of white cardstock to 5.5”x8.25” and then scored and folded it in half. On the edges of the card base, I lightly swiped Catherine Pooler Clay Mask ink to create a pretty pink border. Next, I trimmed a piece of white cardstock to 4”x5.25”. I glued this panel to the card base.

To create that gorgeous lacy frame, I used the Scalloped Oval Mat 3 Dies. I ran a white cardstock panel through the die cutting machine with the largest oval. Then, I ran the frame through with the Diagonal Cover Die to create the little criss cross pattern. To add color to the oval, I ink blended Catherine Pooler Clay Mask and Polished inks. Using the Frosty Flurries Stamps and the Polished ink, I added some pink snow in the background. Then, I put 3D foam strips behind the oval and attached it to my card.

Sunny Studio Stamps: Holiday Express & Penguin Party Holiday Card by Amanda Fitterer (featuring Scalloped Oval Mat Dies, Frosty Flurries)

My images are from the Holiday Express and Penguin Party stamps. I stamped all the images with black ink and then colored them in with Copic markers. I added some white highlights and dots with a white Gelly Roll pen. I also added gold accents with a gold Gelly Roll pen. I cut each image out using their coordinating dies. I put 3D foam squares behind all of the images and added them to the front of the card.

To create my sentiment, I stamped the 2 separate stamps onto a piece of black cardstock with my WOW! embossing pad. I applied white embossing powder to the glue and then melted the powder using my heat tool. I used scissors to cut out each sentiment. I applied white foam tape behind them and added them to my card front. The final touch was to add 3 Metallic Gold Confetti pieces with liquid glue to add a little more shine to the card!

I hope you enjoyed this post and don’t forget to come back tomorrow for even more inspiration!

-------------------------------------------

Plus, check out our Black Friday Sale, which is in progress! Save 15% on Sunny Studio branded products, automatically receive a free "Mouse in Mug" enamel pin with orders of $25 or more, and free USA shipping on retail orders of $50 or more using discount code BLACKFRIDAY. These deals run through December 1st at Midnight PST, but some clearance items are in short supply, so shop early for the best selection. 💛

Save 15% on Sunny Studio branded products, receive a free "Mouse in Mug" pin with orders of $25+, and free USA shipping on retail orders of $50+ using discount code BLACKFRIDAY through 12/1/25

*Limit one discount code per order and one free enamel pin per household.

Sunny Studio Supplies Used:

Holiday Express Stamps
Shop at:
Sunny Studio
Holiday Express Dies
Shop at:
Sunny Studio
Frosty Flurries Stamps
Shop at:
Sunny Studio
Scalloped Oval Mat 3 Dies
Shop at:
Sunny Studio
Penguin Party Stamps
Shop at:
Sunny Studio
Penguin Party Dies
Penguin Party Dies
Shop at:
Sunny Studio

Monday, October 11, 2021

Bear Hugs Cards with Ashley and Mayra

Hello friends! It's Ashley today with a cute little winter card featuring the Bear Hugs set! I've been MIA for a few weeks as I moved into a new house, and it feels so good to create again! These little cuties were the perfect thing to get me back in the groove!
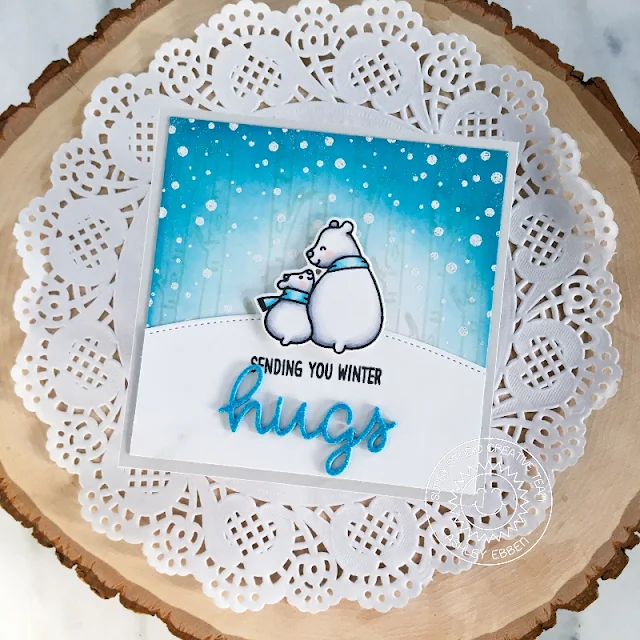
Sunny Studio Stamps: Bear Hugs Frosty Flurries Everyday Card by Mayra Duran-Hernandez

I started by cutting a piece of white cardstock to 3.75" square. I thought a square card would be perfect to frame the bears. I used the birch trees stamp from Bear Hugs with Lawn Fawn Jellyfish ink to create a subtle wooded background. I blended Distress Inks in Tumbled Glass and Broken China in from the outside to add some color, then stamped the Frosty Flurries stamp in Versamark ink and embossed with white for snow. I finished the background with a white snowdrift made from white cardstock and a Slimline Nature Borders die.

Sunny Studio Stamps: Bear Hugs Frosty Flurries Everyday Card by Mayra Duran-Hernandez

I stamped my bear pair on more white cardstock with Lawn Fawn Jet Black ink and colored with Copics. I was so excited to finish up and take photos, that I completely forgot my usual white gel pen highlights! I think they look just as adorable without, but I might have to add them in later. I cut the bears out with the matching die and added them to the card with foam tape. I stamped part of the sentiment from Bear Hugs in Jet Black, then made the rest of the sentiment from the "hugs" die in the Scalloped Oval Mat 3 dies. I die cut the hugs from light blue cardstock twice and light blue glitter cardstock once to create a pretty dimensional word. I added it to my card then put the whole thing on a light grey 4"x4" base to finish.

Thank you so much for stopping by! Have a wonderful day!

----------------------------------------------

Hello and happy Monday everyone. Mayra here, to share this fun card with you today using the cute new Bear Hugs stamp set.   

Sunny Studio Stamps: Bear Hugs Home Sweet Gnome Stitched Circle Dies Everyday Card by Ashley Ebben

I began by coloring the bears from the set, the trees, the leaves from the Fall Kiddos and Bountiful Autumn stamp sets, and the mushroom from the Home Sweet Gnome stamp set. I used Copic markers to color the images. For the brown areas, I used W1, E81, E41, E40, E31, E55, E84, E87, and E89. 

Next, I used the larger of the rectangles from the Stitched Rectangles die set to die cut the base panel, and the top layer for the card using the Gingham Jewel Tone 6 x 6 paper pad. I also used the banner from the set for the sentiment. I added color to the base panel using Distress Oxide inks. I used Prize Ribbon, Blueprint Sketch, and Chipped Sapphire. 

Sunny Studio Stamps: Bear Hugs Home Sweet Gnome Stitched Circle Dies Everyday Card by Ashley Ebben

I then used the Stitched Circle Small dies to die cut the circle into the top layer of the card base. I also used the same circle to die cut the window into the scalloped circle which was die-cut using the Scalloped Circle Mat 1 die set. I then die-cut the grass border using the grass from the Picket Fence die set.

I hope you enjoy the card I created to share with you today. I hope you each have a wonderful and blessed day. 

Sunny Studio Supplies Used:
Picket Fence Border Dies
Shop at:
Sunny Studio
Stitched Rectangle Dies
Shop at:
Sunny Studio
Bear Hugs Stamps
Bear Hugs Stamps
Shop at:
Sunny Studio
Bear Hugs Dies
Bear Hugs Dies
Shop at:
Sunny Studio
Frosty Flurries Stamps
Shop at:
Sunny Studio
Gingham Jewel Tones 6x6 Paper
Shop at:
Sunny Studio
Fall Kiddos Stamps
Fall Kiddos Stamps
Shop at:
Sunny Studio
Fall Kiddos Dies
Fall Kiddos Dies
Shop at:
Sunny Studio
Home Sweet Gnome Stamps
Shop at:
Sunny Studio
Home Sweet Gnome Dies
Shop at:
Sunny Studio
Slimline Nature Borders
Shop at:
Sunny Studio
Bountiful Autumn Stamps
Shop at:
Sunny Studio
Bountiful Autumn Dies
Shop at:
Sunny Studio
Scalloped Circle Mat 1 Dies
Shop at:
Sunny Studio
Stitched Circle Small Dies
Shop at:
Sunny Studio
Scalloped Oval Mat 3 Dies
Shop at:
Sunny Studio

Friday, November 6, 2020

Victorian Christmas Cards with Rachel and Candice

Hello friends! It's Rachel here with a single-layer card featuring the new Victorian Christmas Stamp Set. I combined this set with the Christmas Home Stamp Set to create a fun winter scene.

Sunny Studio Stamps: Victorian Christmas Christmas Home Christmas Card by Rachel Alvarado

To start, I first stamped my images using a masking technique onto a 4.5" X 5.75" piece of Neenah Solar White 110lb Card Stock. I used some Gina K. Designs Magic Masking Sheets to mask my images as I worked so that I could ink blend my background.

For my background, I blended some Tattered Rose, Spun Sugar, Milled Lavender, and Mermaid Lagoon Distress Oxide Inks. I used a #4 round brush to splatter some water on this piece and then quickly blotted it dry with a clean paper towel. I then splattered it again with some diluted opaque white and purple paint for a snowy effect.

Sunny Studio Stamps: Victorian Christmas Christmas Home Christmas Card by Rachel Alvarado

Copic Color Combos Used: Window Trim and Door : BG72, BG75; Reds: R14, R46, R89; Greens: YG01, YG06, YG17; Warm Grays: W00, W0, W2, W4; Roof: W5, W7; Browns: E41, E42, E43; Snow: B0000, B000, B00, B02; Cool Grays: C00, C1

Once finished with that step, I then removed my masking sheets and set my panel aside to dry. Once dry, I trimmed my panel down to 4.25" x 5.5" and then colored my images with Copic Markers.

I hope you enjoyed my card today! Wishing you all a lovely day and happy weekend!

------------------------------------------------------

Hello! Candice here with you today! I love this Victorian Christmas house for making beautiful Christmas tags!

Sunny Studio Stamps: Victorian Christmas Frosty Flurries Stitched Arch Dies Christmas Tags Candice Fisher

I used these Sunny Studio products for my shaker tags:

For the tag base, I first die cut the two medium stitched arch dies taped together to create my frames. I then took the larger of the two and die cut the back from Bristol Smooth cardstock.

I heat embossed the snowfall in white and then inked one with Worn Lipstick and Dried Marigold and the other with Cracked Pistachio and Squeezed Lemonade. To create the shaker, I first put the acetate behind the window and then added double layer of foam tape on the back of the frame. I placed my sequins in the center and attached the frame to the background.

Sunny Studio Stamps: Victorian Christmas Frosty Flurries Stitched Arch Dies Christmas Tags Candice Fisher

Next, I stamped the the Victorian houses, colored them with Copic markers and then used the coordinating dies to cut them out and adhered them to the acetate with strong adhesive. To finish the tags, I cut 2 stitched banners, heat embossed the sentiment with gold and used colored twine to tie them to the tag tops!

I hope you are inspired to make fun Holiday tags for your gifts this year! Thank you for visiting today!

Sunny Studio Supplies Used:
Christmas Home Stamps
Shop at:
Sunny Studio
Christmas Home Dies
Christmas Home Dies
Shop at:
Sunny Studio
Frosty Flurries Stamps
Shop at:
Sunny Studio
Fancy Frames- Rectangles
Shop at:
Sunny Studio
Stitched Arch Dies
Stitched Arch Dies
Shop at:
Sunny Studio
Victorian Christmas Stamps
Shop at:
Sunny Studio
Victorian Christmas Dies
Shop at:
Sunny Studio

Thursday, December 19, 2019

Scalloped Tags Holiday Projects with Anja and Vanessa

Hi everyone, Anja here and today I'm sharing this duo of cute Christmas tags that I created with the Scalloped Tag Square Dies. They come in two sizes and I paired them up with the Gleeful Reindeer Stamps.

Sunny Studio Stamps: Scalloped Tag Dies Gleeful Reindeer Holiday Tag by Anja Bytyqi

For the bigger tag, I cut out a square of patterned paper from the Very Merry 6x6 Paper pack to help building a little winter scene. I stamped the reindeers and gifts in Memento Tuxedo Black Ink and colored them with Copic Markers. 

The smaller tag is a actually a shaker. Therefore, I die cut the scalloped tag twice from petrol cardstock and created a window by using a square die for one of the die-cuts. I backed the window with a piece of acetate and adhered strips of foam tape to the edges. Before adhering the back, I filled the shaker with white and silver sequins as well as aqua flakes.

I stamped the sentiments (the 'Merry Christmas' is included in the Merry Mice set) in VersaMark Ink onto red cardstock banners and white heat embossed them. I used gingham ribbon and natural jute string to finish off my tags.

Thank you so much for stopping by! Have an amazing day!

------------------------------------------------

Hello to you! Vanessa here today using the Scalloped Tag Circle Dies on a new Christmas card.

Sunny Studio Stamps: Scalloped Tag Dies Jolly Gingerbread Foxy Christmas Frosty Flurries Holiday Card by Vanessa Menhorn

First, I covered the front of my card base with red checked patterned paper from the Classic Gingham 6x6 Paper. Now I trimmed a panel of Kraft cardstock slightly smaller than the card and masked off a hill. I inked the panel with white pigment ink, removed the mask and stamped the snow using the Frosty Flurries Stamps.

Then I die-cut the circle tag from the panel and adhered it to the card, raising the tag with foam tape and tying on baker's twine.

Sunny Studio Stamps: Scalloped Tag Dies Jolly Gingerbread Foxy Christmas Frosty Flurries Holiday Card by Vanessa Menhorn

I stamped the cute fox from Foxy Christmas Stamps onto white cardstock, colored it with Copics, die-cut it with the matching die and adhered it to the card with foam tape.
Finally, I stamped and heat-embossed the sentiment from Jolly Gingerbread Stamps onto a strip of green cardstock, trimmed it and adhered it.

This might be my last Christmas card for this year, and it's a pity this time is over so soon - the adorable winter release has been so fun to play with :)

Have a wonderful day and thanks for visiting!

Sunny Studio Supplies Used:

Gleeful Reindeer Dies
Shop at:
Sunny Studio
Gleeful Reindeer Stamps
Shop at:
Sunny Studio
Frosty Flurries Stamps
Shop at:
Sunny Studio
Jolly Gingerbread Stamps
Shop at:
Sunny Studio
Classic Gingham 6x6 Paper
Shop at:
Sunny Studio
Foxy Christmas Stamps
Shop at:
Sunny Studio
Foxy Christmas Dies
Foxy Christmas Dies
Shop at:
Sunny Studio
Very Merry 6x6 Paper
Shop at:
Sunny Studio
Merry Mice Stamps
Merry Mice Stamps
Shop at:
Sunny Studio
Scalloped Tags-Circle
Shop at:
Sunny Studio
Scalloped Tags-Square
Shop at:
Sunny Studio