Hi everyone! Eloise here and today I'm using the fun new Heartfelt Wishes stamp set to create a fun rainbow birthday shaker card.
To begin my card today I first stamped out 9 candles from the Heartfelt Wishes stamp set and coloured them all in with Copic Markers in rainbow order. Once I coloured in my candles 9 different colours, or shade of colours I die cut them out using the Heartfelt Wishes Candle die.
For my shaker portion of the card I cut down a piece of white cardstock and used the Sunny Semi Circles dies to cut out a semi circle from the centre top of my card. I then cut the bottom of it with a knife, to create a semi circle window. I then stamped the sentiment 'May All Your Birthday Wishes Come True' with black ink underneath the window.
I then flipped over my panel, added two layers of foam tape all around and filled the center with a bunch of different Sparkling Clear Sequins from Pretty Pink Posh. I adhered down my panel to a piece of green patterned paper and then onto a card base.
Once everything was adhered down, I added foam tape to the back of all my candles and arranged them on the bottom of my shaker window in rainbow order and that finished up my card.
I hope you enjoyed this simple birthday card today, I love adding rainbow elements onto my card with a repeating image, it's one of my favourite things to do! Thanks so much for stopping by today!
Sunny Studio Supplies Used:
Showing posts with label Sunny Semi Circles. Show all posts
Showing posts with label Sunny Semi Circles. Show all posts
Monday, May 1, 2017
Tuesday, March 21, 2017
Timeless Tulips Vellum Wrapped Tulip Bouquet Card with Emily
I used Fishtail Banners II dies to create a vellum wrap for the bundle of tulips and died it off with some burlap string and a tag created with the Semi Circles dies and Tag Topper Crescent dies.
Thanks so much for stopping by!
Sunny Studio Supplies Used:
Monday, February 20, 2017
Easter Wishes Easter Blessings Card with Eloise
Hi everyone, Eloise here and today I'm sharing a card I made with the Easter Wishes stamp set. This set is super cute, I love all the little critters you get in the stamp set and all the other images too, such a great set to create scenes.
To begin my card I stamped out all my images onto some watercolour paper. I used Versafine Onyx black ink and then clear heat embossed over it. I used my Zig Clean Colour Markers to do my colouring today, they're super fun and easy to use. Once all my colouring was done I dried my images and used all the coordinating Easter Wishes dies to die cut them out.
For my background I used the Sunny Semi Circles dies and die cut a hill into another panel of watercolour cardstock. I then used two green Distress Inks to colour the grass and then with the remaining piece of watercolour paper I used various colours to create a sun-setting sky. I used Mustard Seed, Spiced Marmalade, Ripe Persimmon, Picked Raspberry, Wilted Violet and Dusty Concord, this creates a gorgeous sunset sky! I then flicked a little water onto both pieces to give a little water splotch effect.
Once by background was done I taped the pieces together and stuck together my scene. I used foam tape on all the images to give the card some nice dimension. I popped up the entire panel on fun foam and adhered it to a white card base and the card was complete.
I hope you enjoyed my card today and got inspired. I really love making different backgrounds with Distress Inks, it's super fun! Make sure you check back the rest of the week for more inspiration.
Sunny Studio Supplies Used:
Monday, December 19, 2016
Simple Gleeful Reindeer Gift Tags with Eloise
Hello everyone, Eloise here and today I'm showing three simple tags using the Gleeful Reindeer stamp set along with the Semi Circle Dies, Fishtail Banner Dies (I and II) and the Merry Die as well. I love creating small scenes on tags - so much fun!
For the sentiment I used the Merry die - I love this one and cut it from fun foam and then from silver glitter paper and adhered the two together and then to the bottom of my tags. To finish up my tags I punched a hole and added a silver reinforcer at the tops and then strung through some silver sparkle twine and added a twine bow around the top as well, to make them look a little more finished. I also added some clear wink of stella to my images as well - they have to sparkle, it's Christmas time! :)
Thanks for stopping by today - I hope you got inspired! Check out the rest of the week to see lots of other last minute tag ideas.
- Eloise
- Gleeful Reindeer
- Gleeful Reindeer Dies
- Semi Circles Dies
- Fishtail Banner Dies
- Fishtail Banner II Dies
- Merry Die
To begin my tags I took some blue cardstock and used the Semi Circles dies to cut off the top of my pieces. I then cut them down to size so I could create arched tags. I then took the Fishtail Banners dies and cut off the bottom of the tags making a upside down v shape on the bottom. Then I took some white cardstock pieces and did the same. I used the Fishtail Banners die on the bottom and then used the Fishtail Banners II set to give the little pierced edge to them, looks so fun! I then used my scissors to cut the top of the white piece, to give it a snowy hill look. I then adhered down the white pieces to the blue tags and cut off the excess.
To finish up the background on my tags I took a white gel pen and added some dots to look like snow. I then pulled out the Gleeful Reindeer stamp set and stamped out the reindeers and trees and used my Copic Markers to colour them in. I also used the matching dies to cut them all out. Once they were done I added foam tape and adhered them to my tags.
For the sentiment I used the Merry die - I love this one and cut it from fun foam and then from silver glitter paper and adhered the two together and then to the bottom of my tags. To finish up my tags I punched a hole and added a silver reinforcer at the tops and then strung through some silver sparkle twine and added a twine bow around the top as well, to make them look a little more finished. I also added some clear wink of stella to my images as well - they have to sparkle, it's Christmas time! :)
Thanks for stopping by today - I hope you got inspired! Check out the rest of the week to see lots of other last minute tag ideas.
- Eloise
Sunny Studio Supplies Usesd:
- Gleeful Reindeer
- Gleeful Reindeer Dies
- Semi Circles Dies
- Fishtail Banner Dies
- Fishtail Banner II Dies
- Merry Die
Friday, December 16, 2016
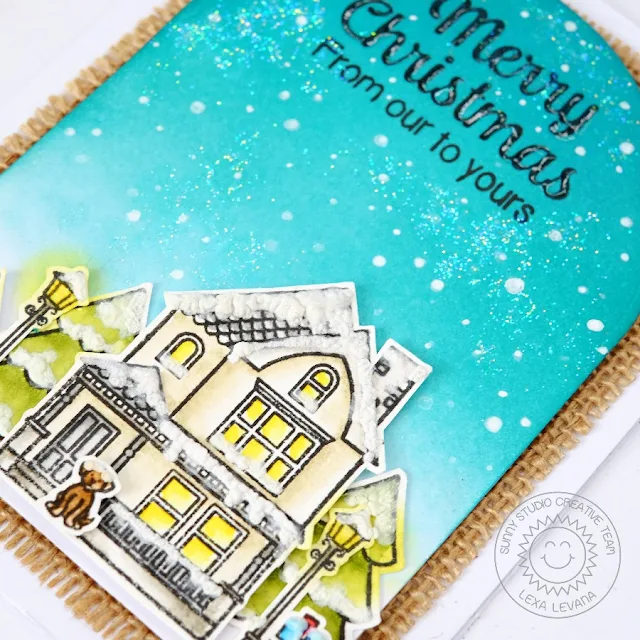
Merry Christmas From Our Home To Yours Card by Lexa
Hello everyone. Lexa here again with another inspiration for a holiday theme card. I mixed non-holiday stamps and paired them with a Christmas sentiment. I must say that I love how it turned. I've never seen real snow in my life (ever), but I imagine it would be pretty to see snow falling on Christmas night.
I don't know if you notice it or not, but I used the panel with the Sunny Semi Circles dies that was a leftover from my last card. Never waste them, I'm pretty much a scrapper. Hehe. I stamped some images from different sets :
- The house and mailbox are from Happy Home
- The trees are from Gleeful Reindeer
- The lights and the dog are from City Streets
I stamped all of them with Versafine black ink and watercolored them with Distress Markers. After I finished with the coloring, I die-cut all of them with the coordinating dies which was a time saver. I blended Peacock Feathers Distress Ink in the background and then added some snow with a white gel pen. I also added some snow on all the images in the scene, letting a snow marker do it's magic. For an extra sparkle I added Stardust Stickles on the night sky. It looks so pretty. I stamped the Merry Christmas from Merry Sentiments stamp followed by "from our to yours" from Happy Home stamp set. As a last step, I added the scenery on a piece of burlap with foam tape. Here's a closer look...
Thank you so much for stopping by. I really hope you like my card. Have an amazing day!
Sunny Studio Supplies Used:
Friday, December 9, 2016
Little Baker Angels Card with Lexa
Hi everyone!
It's Lexa here with these cute little angels as bakers for today. I love how versatile Sunny Studio Stamps are, you can mix all of them to make cards for all year around just like I have done here today. I combined Blissful Baking and Little Angels stamps, and they look so good together.
I started the card with a piece of 4.25" x 5.5" white cardstock and created a window using the second largest arc from Sunny Semi Circles dies and cut the rest with craft knife following the end points on both sides. I stamped all my images with Versafine black ink and watercolored them with Distress Markers. After I finished with the coloring, I die cut all the images with the coordinating dies.
I created a dreamy background with dye inks from various brands. Building up the scene is the most fun part when making a card. I also add some clear sequins for extra sparkle. Here's a closer look at my card..
Thank you so much for stopping by. I hope you like today's card and have a wonderful day!
Monday, November 28, 2016
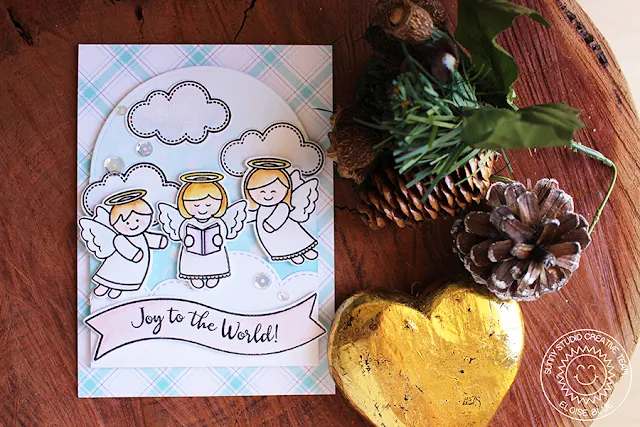
Little Angels Joy To The World Card with Eloise
Hi everyone! Eloise here and today I'm going to be making this soft angels card. Pastel colours are so hard for me, I love bright bold, rainbow colours - but for these angels, I felt they needed to be soft - so I tried my best to do that. I'm using the Little Angels stamp set along with the Semi Circles dies.
To start off my card today I stamped out all my images on some watercolour paper. I decided I would use my zigs today to colour - since I can get a better softer colour with them. So I used various colours and then once I had finished colouring, I used all the coordinating dies to cut them out. I then took another piece of watercolour paper, stamped and white heat embossed some stars from the same set and then ink blended some blue Distress Inks onto it, fading up to white. I then used the Semi Circle dies and die cut off the top of the piece to make it look like an arch.
I then took a piece of white cardstock and die cut a cloud border on it. Then I stuck it flat to the arch piece. Now I could assemble my card. I took the three clouds I cut and coloured and adhered them down flat onto the top portion of the arch panel. I then used foam adhesive behind the angels and stuck them next to each other. I then used liquid adhesive to glue down the book onto the middle angels hands.
I then took the sentiment banner I had prepared earlier - I just curved the sentiment stamp on my block to get it to fit nicely onto the banner and I adhered it down to the bottom of the arch panel. To finish up my card I took some plaid patterned paper and adhered it to my card base. Then took some fun foam and popped up my entire arch panel and adhered it to the middle of my card base. I then took some clear sequins and adhered them randomly onto my scene and added a little wink of stella on the angels and that finished up my card.
I hope you enjoyed my project today! Very different for me, but I think I like it. Thanks for stopping by and I'll catch you next time!
- Eloise
Sunny Studio Supplies Used:
Subscribe to:
Posts (Atom)


