Showing posts with label Rustic Winter. Show all posts

Monday, November 7, 2022

Winter Wreaths Cards with Bobbi and Cathy

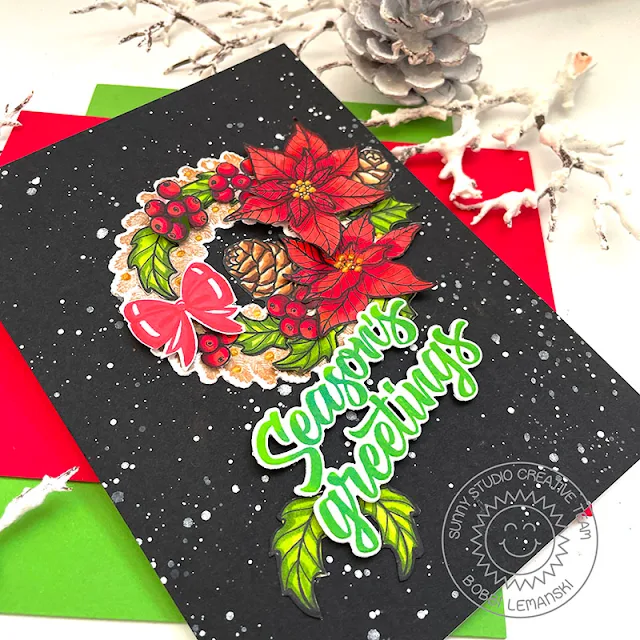
Hello Sunny friends. It’s Bobbi here with a holiday card featuring the Winter Wreaths stamps and dies. I’ve paired this wreath set with the Classy Christmas stamps and dies and the Holiday Greetings stamps and dies. 

Sunny Studio Stamps: Winter Wreaths Holiday Card by Bobbi Lemanski (featuring Classy Christmas, Holiday Greetings)

To make this 5″ X 7″ card, I splattered the card front panel with white paint on black cardstock. While the paint was drying, I stamped the evergreen wreath using a gold metallic ink on white cardstock and die cut the wreath using the coordinating die. I love that the center of the wreath is cut out with the die!

Sunny Studio Stamps: Winter Wreaths Holiday Card by Bobbi Lemanski (featuring Classy Christmas, Holiday Greetings)

I stamped two poinsettias, two pine cones, and a number of holly leaves and berries to decorate the wreath. I also added a bow from the wreath set. I colored the images using the following Copic colors:

Reds for berries and poinsettias: R89, R46, R24, R17, R14
Greens for leaves: YG67, YG63, YG03
Browns: E59, E57, E55, E53, E40


Sunny Studio Stamps: Winter Wreaths Holiday Card by Bobbi Lemanski (featuring Classy Christmas, Holiday Greetings)

The bow was stamped in two colors of red and the sentiment was stamped in green ink.  After cutting the images, I added gold metallic NUVO drops to the poinsettia centers and around the wreath. I also attached the one poinsettia, bow and the “Season’s Greetings” phrase using black foam tabs to make them stand out. I added more Nuvo metallic gold drops to the wreath to finish the card.


Thanks for stopping by today. If you want to see more ideas and inspiration from me, subscribe to my blog, BobbiHartDesign.com. I’ll send you updates on new posts! You can also find me on Instagram as @BobbiHartDesign and on Facebook as BobbiHartDesign. Bobbi Hartmann Lemanski, Bobbi Hart♥ Design, Adding h♥art into every design.


-------------------------------------------------


Hey friends! Cathy here today sharing a serene card for the Holiday season featuring the Winter Wreaths Stamps and coordinating dies. Just inking and die-cutting involved on this one which makes it fairly quick to make during these next few busy months.


Sunny Studio Stamps: Winter Wreaths Holiday Card by Cathy Chapdelaine (featuring Rustic Winter Dies, Holiday Greetings, Forest Tree Stencils)

I started with the background by inking a 4 1/4” x 5 1/2" piece of white cardstock with Tattered Rose Distress ink at the bottom followed by Speckled Egg, Salvaged Patina and Peacock Feathers. I placed a Forest Trees Stencil across the piece and inked it with Pumice Stone Distress ink. I adhered this piece to an A2 card base.


Next, I die-cut the Tropical Trees Backdrop from light gray cardstock and white cardstock. I adhered the gray frame portion to the card base and set the white snow (sand) portion aside. I just love how this die can also be used for winter scenes!


Before I adhered the snow, I die-cut 3 birch trees from white and dark gray cardstock using the Rustic Winter Dies. I adhered one tree to the right side of the card front and trimmed it along the top where it meets the gray frame. I then adhered the snow to the bottom and added the other 2 trees to the left side. I die-cut the deer from the Rustic Winter Dies from dark gray cardstock.


Sunny Studio Stamps: Winter Wreaths Holiday Card by Cathy Chapdelaine (featuring Rustic Winter Dies, Holiday Greetings, Forest Tree Stencils)

I stamped the wreath on white cardstock using Northern Pine Memento ink, the bow using Spun Sugar, Saltwater Taffy and Abandoned Coral Distress inks, the pine boughs using Peeled Paint Distress ink and the pinecones using Brushed Corduroy and Walnut Stain Distress inks. I die-cut all these elements using the coordinating dies.


To finish, I heat embossed the sentiment from the Holiday Greetings Stamps with pink embossing powder on white cardstock and inked over the top with Saltwater Taffy Distress ink. I then die-cut it using the coordinating dies.


I hope you enjoyed and thanks for stopping by today! For more inspiration, please visit my blog www.inkredibleadventures.com and you can also find me on Instagram as @cathy.chapdelaine.


Sunny Studio Supplies Used:

Rustic Winter Dies
Rustic Winter Dies
Shop at:
Sunny Studio
Classy Christmas Stamps
Shop at:
Sunny Studio
Classy Christmas Dies
Shop at:
Sunny Studio
Forest Trees Stencils
Shop at:
Sunny Studio
Tropical Trees Backdrop
Shop at:
Sunny Studio
Holiday Greetings Stamps
Shop at:
Sunny Studio
Holiday Greetings Dies
Shop at:
Sunny Studio
Winter Wreaths Stamps
Shop at:
Sunny Studio
Winter Wreaths Dies
Winter Wreaths Dies
Shop at:
Sunny Studio

Wednesday, October 26, 2022

Mini Mat & Tag Die Focused Cards with Alma and Marie

Hello, my dears. It's Alma and today I'd like to present you my great passion: crafting with tags! I think you can use them in all situations! I was so excited that Sunny Studio Stamps released a Mini-Mat and Tag Dies series this year. So awesome and versatile! I chose the Mini Mat & Tag 1 Dies and used them for a Diagonal Double Pocket card. You can find instructions here

Sunny Studio Stamps: Mini Mat & Tag Die Focused Holiday Card and Tags by Alma Störk (featuring Alpaca Holiday, Fluffy Cloud Border Dies, Scalloped Fence Dies, Rustic Winter Dies)

First of all, I punched out the tags from light blue cardstock. Then I stamped the alpacas from the Alpaca Holiday Stamps set and coloured them with Copics. For the fluffy piles of snow I used the Fluffy Clouds Border Dies. I used design paper from the All is Bright 6x6 Paper pad to decorate the card. Just love the turquoise snowflake paper. 

Sunny Studio Stamps: Mini Mat & Tag Die Focused Holiday Card and Tags by Alma Störk (featuring Alpaca Holiday, Fluffy Cloud Border Dies, Scalloped Fence Dies, Rustic Winter Dies)

For the background design, I punched the birch tree trunks from the Rustic Winter Dies set and punched the Scalloped Fence Dies

Sunny Studio Stamps: Mini Mat & Tag Die Focused Holiday Card and Tags by Alma Störk (featuring Alpaca Holiday, Fluffy Cloud Border Dies, Scalloped Fence Dies, Rustic Winter Dies)

Now stamp all the texts, glue everything together, write nice winter and Christmas thoughts on the tags.... and the winter wish card is ready.

-------------------------------------------

Hello Crafty Friends, Marie here! I am super excited to be back on the blog to share my latest project with you! Tags are one of my favorite things about gift giving! It is a charming little detail that makes giving gifts to friends and loved ones even more personalized and special. Today I am sharing three Christmas Tags created using three of the newly released Mini Mat and Tag Die Sets. I also dressed up my tags using images from the beautiful Classy Christmas Stamp Set

Sunny Studio Stamps: Mini Mat & Tag Die Focused Holiday Card by Marie Marco (featuring Loopy Letters Dies, Classy Christmas)

I started off by die cutting three tags from solid 110lb Neenah Solar White Cardstock. I used the Tag dies from the Mini Mat & Tag 1 DiesMini Mat & Tag 2 Dies and Mini Mat and Tag 3 Dies. After cutting out the tags, I cut all the tag tops from  from Gold cardstock. I also die cut all the tags again using craft paper and Attached them to the backs of all the tags. For the front of my dies, I die cut the Mini Mat & Tag 2 again using craft cardstock and attached it to the front of my tag. For my other 2 tags I used the rectangle die from set 3 to create rounded rectangle centers for my other 2 tags. I splattered watered down acrylic paint to all the craft cardstock fronts. 

Sunny Studio Stamps: Mini Mat & Tag Die Focused Holiday Card by Marie Marco (featuring Loopy Letters Dies, Classy Christmas)

For my Christmas images, I used Distress Ink in the color Antique Linen to stamp them onto watercolor paper. I then used Derwent Inktense water soluble pencils to watercolor  my images in a traditional red and green palette. I then adhered all my gold tag tops to each corresponding tag using Bearly Art Precision Craft Glue. I added some gold trim to 2 of my tags and attached my images. I propped up some of the images using foam tape for some dimension. For my poinsettia tag, I used some Sunny Studio Gold Jewels embellishments, flipping them over to expose the shiny diamond side. 

Sunny Studio Stamps: Mini Mat & Tag Die Focused Holiday Card by Marie Marco (featuring Loopy Letters Dies, Classy Christmas)

On the back of my tags, I used the Loopy Letters Dies to create my "To". For the  finishing touch to my tags, I added some red and white Christmas Twine and Gold Twine to the tops of all my tags. 

There you have it friends! Super easy-to -create gift tags to decorate all your presents this Holiday season! I am super happy with the way my tags turned out! I can't wait to put them on gifts! Thanks so much for joining me today! Until next time, Happy Paper Crafting! 

Sunny Studio Supplies Used:

Scalloped Fence Die
Scalloped Fence Die
Shop at:
Sunny Studio
Alpaca Holiday Stamps
Shop at:
Sunny Studio
Alpaca Holiday Dies
Alpaca Holiday Dies
Shop at:
Sunny Studio
Loopy Letters Dies
Loopy Letters Dies
Shop at:
Sunny Studio
Rustic Winter Dies
Rustic Winter Dies
Shop at:
Sunny Studio
Fluffy Clouds Border Dies
Shop at:
Sunny Studio
Classy Christmas Stamps
Shop at:
Sunny Studio
Classy Christmas Dies
Shop at:
Sunny Studio
All Is Bright Paper
All Is Bright Paper
Shop at:
Sunny Studio
Mini Mat & Tag 1 Dies
Shop at:
Sunny Studio
Mini Mat & Tag 2 Dies
Shop at:
Sunny Studio
Mini Mat & Tag 3 Dies
Shop at:
Sunny Studio

Thursday, October 20, 2022

Snow One Like You Cards with Waleska and Marine

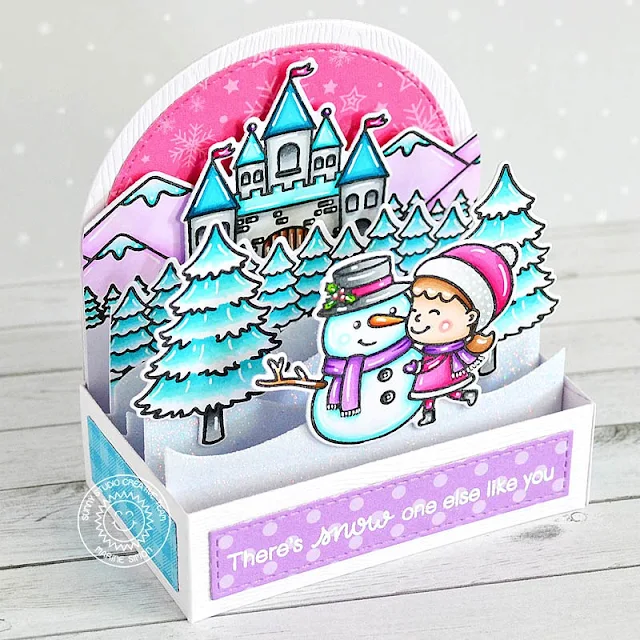
Hello Friends, Waleska here. For today's project, I thought it would be fun to continue with the non-traditional colors for Christmas. The stamp I will be using today is super cute Snow One Like You Stamp this one comes with an adorable girl and snowman with a bunch of little snowflakes.

Sunny Studio Stamps Snowman with Girl in Snowy Woods with Birch Trees Snow One Like You Holiday Christmas Card by Waleska

I started my card coloring the cute girl and snowman. That helped me to decide on the color palette for the rest of the elements. I used copic markers RV00/BV01 for the lilacs and to do some shading I used C1/C2, I also used a white Posca Pen to create a little pattern on the clothes. I inked the background using Oxide inks Spun Sugar and Shaded Lilac, I used masking paper to create a moon in the center of this panel.

I created a snow bank with white cardstock and I also die cut some trees from the Rustic Winter dies I added some shadow details with the C1 and C2 markers. I stamped the sentiment with Versafine Clair Nocturne ink.

Sunny Studio Stamps Snowman with Girl in Snowy Woods with Birch Trees Snow One Like You Holiday Christmas Card by Waleska

I finally adhered my front panel to a pink and white card bases to match the colors used before. Thank you so much for stopping by today! Remember there's snow one else like YOU!

---------------------------------------------

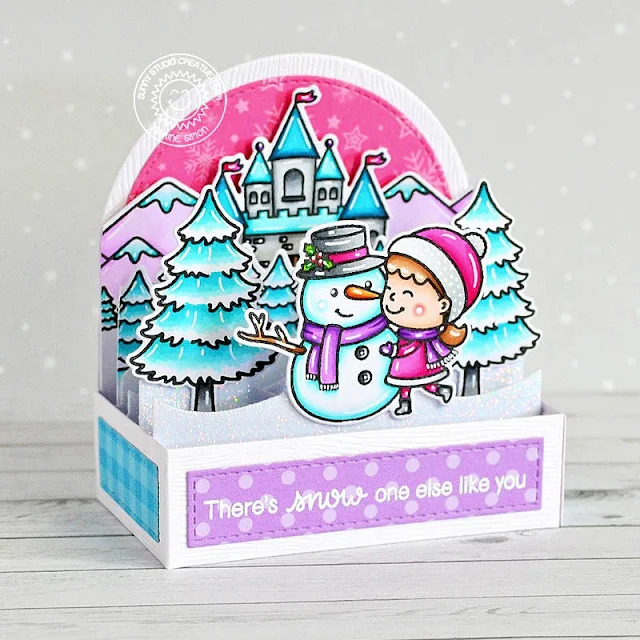
Hello crafty friends, Marine here with you today! This new card features the lovely Snow One Like You stamp set. Those cute characters reminded me of Olaf and Anna from the Disney movie Frozen. So I went with cold tones to really give the card a wintery frozen look.

Sunny Studio Stamps Pop-up Box Snowman Snow One Like You Holiday Christmas Card by Marine Simon

As always I started off by stamping the images using an alcohol marker friendly black ink, I cut them using the coordinating dies and then used my alcohol markers to color everything. And along with Snow One Like You, I picked:

the tree border from Winter Scenes
the mountain border from Country Scenes
the castle from Enchanted
a pine tree from Seasonal Trees

Sunny Studio Stamps Pop-up Box Snowman Snow One Like You Holiday Christmas Card by Marine Simon

Once the coloring was done, I cut and assembled the different elements to build the pop-up card. I cut the main pieces out of white woodgrain cardstock, the snow borders out of white glitter cardstock, and the decorative pieces out of pattern papers from the Dots & Stripes Pastels paper pack + Joyful Holiday paper pack. And on the decorative piece that goes on the front, I white heat embossed my "There's snow one else like you" greeting.

On the back panel, I attached the mountain borders as well as the castle. In front of the castle, I stuck the tree border, and then I attached the pine trees and characters in the foreground using glue dots.

And that's it! I hope you like this enchanted frozen pop-up card. As always you are welcome to check the process video to see how this cute scene came to life. Thank you so much for stopping by, and see you next time!

Sunny Studio Supplies Used:

Rustic Winter Dies
Rustic Winter Dies
Shop at:
Sunny Studio
Dots & Stripes Pastels 6x6 Paper
Shop at:
Sunny Studio
Seasonal Trees Stamps
Shop at:
Sunny Studio
Seaonal Trees Dies
Seaonal Trees Dies
Shop at:
Sunny Studio
Enchanted Stamps
Enchanted Stamps
Shop at:
Sunny Studio
Enchanted Dies
Enchanted Dies
Shop at:
Sunny Studio
Winter Scenes Stamps
Shop at:
Sunny Studio
Winter Scenes Dies
Winter Scenes Dies
Shop at:
Sunny Studio
Country Scenes Stamps
Shop at:
Sunny Studio
Country Scenes Dies
Country Scenes Dies
Shop at:
Sunny Studio
Snow One Like You Stamps
Shop at:
Sunny Studio
Snow One Like You Dies
Shop at:
Sunny Studio
Joyful Holiday Paper
Shop at:
Sunny Studio

Tuesday, November 16, 2021

Christmas Critters Cards with Kavya and Isha

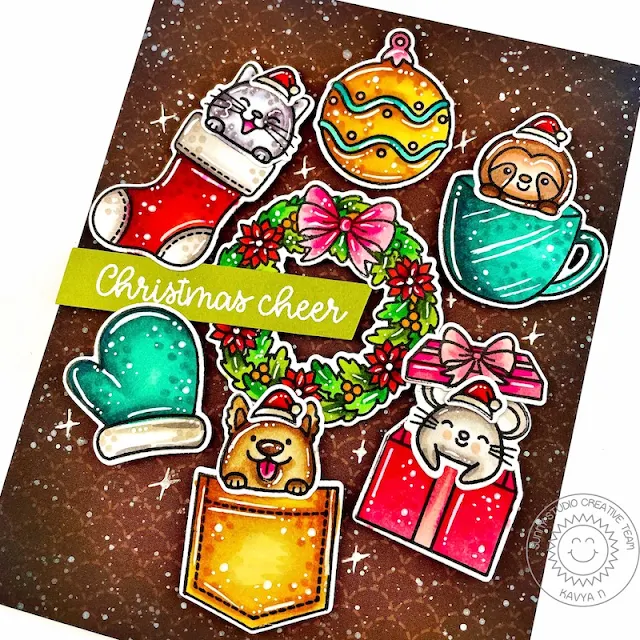
Hi folks, Kavya here. I am back on the blog with another fun project to share with you all! I have been making many Christmas cards this year and I am quite bored of using blues, reds and greens. So, I decided to try out a vintage Christmas palette - Brown, Teal, Yellow, Pink and a bit of red and green. I absolutely love how this turned out. I might try some more unique color combos in the next few weeks! 

Sunny Studio Stamps: Christmas Critters Christmas Card by Kavya

I first started of by ink blending the edges of brown scalloped patterned paper from All is Bright using black and brown dye ink and splattered somewhat paint. I then stamped a bunch of images from Christmas Critters stamp set and colored them using the color combo I mentioned earlier. 

Sunny Studio Stamps: Christmas Critters Christmas Card by Kavya

Then, I added some extra details using a white gel pen including some sparkles! Later, I heat embossed a sentiment from North Pole stamp set to finish off my card!

Wasn’t that simple? I love how this tuned out! Happy Crafting!

---------------------------------------------

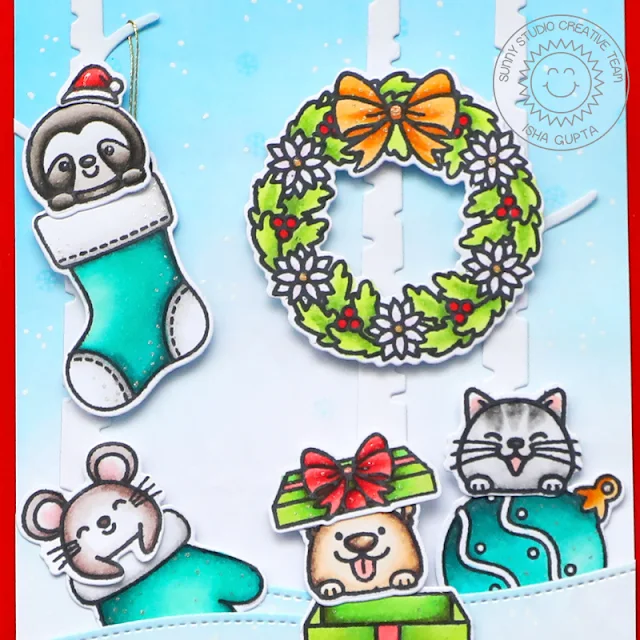
Hello everyone! Isha here with a Christmas card featuring our Christmas Critters stamps and dies. This stamp has so many adorable images, that I wanted to feature them all and hence a scene card.

Sunny Studio Stamps: Christmas Critters Rustic Winter Dies Slimline Dies Christmas Card by Isha Gupta

To start, I sponged tumbled glass and salty ocean distress oxide ink to create the sky to a white layer. I then stamped  the snowflakes from the Christmas Critters stamp set to it. Die-cut the tree trunk from the Rustic Winter dies, adhere to the mat layer. Die-cut snow banks from the Slimline Nature Border dies, sponge tumbled glass ink and adhere to the mat layer. Adhere this to the red card base. 

Sunny Studio Stamps: Christmas Critters Rustic Winter Dies Slimline Dies Christmas Card by Isha Gupta

Stamp the images using memento black ink, color using Copic markers, die-cut using the coordinating dies. Adhere to the card. To finish, add white snow using a gel pen.

Sunny Studio Supplies Used:

Christmas Critters Stamps
Shop at:
Sunny Studio
Christmas Critters DIes
Shop at:
Sunny Studio
Rustic Winter Dies
Rustic Winter Dies
Shop at:
Sunny Studio
Slimline Nature Borders
Shop at:
Sunny Studio
North Pole Stamps
North Pole Stamps
Shop at:
Sunny Studio
North Pole Dies
North Pole Dies
Shop at:
Sunny Studio
All Is Bright Paper
All Is Bright Paper
Shop at:
Sunny Studio

Wednesday, October 6, 2021

Bewitching Cards with Julia and Franci

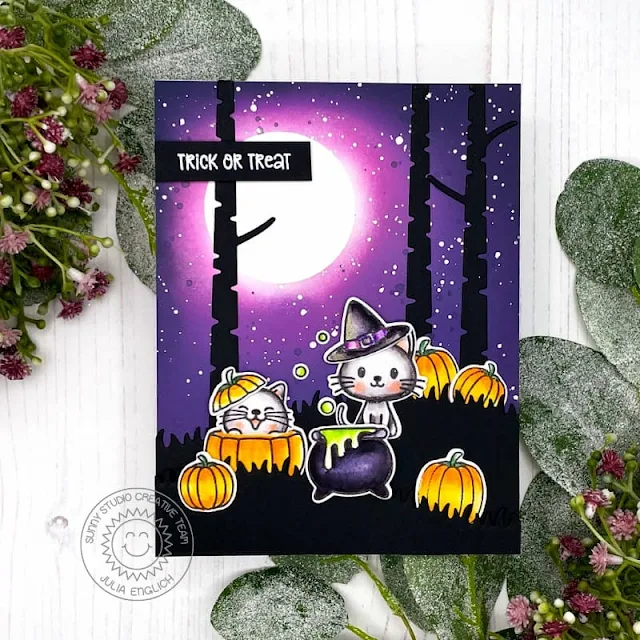
Hello crafty friends! It’s Julia here and I am so excited to share this fun Halloween card with you!

Sunny Studio Stamps: Bewitching Rustic Winter Dies Fall Friends Halloween Card by Julia Englich

First, I stamped the images from BewitchingChristmas Critters, and Fall Friends onto Bristol Smooth Cardstock and colored them in using Zig Clean Color Real Brush Markers.

For my background, I added a circle mask to the top left corner to create a little moon and ink blended the background with Spun Sugar, Picked Raspberry, Wilted Violet, Picked Raspberry, and Black Soot. I die-cut two grassy hills using the Slimline Nature Borders as well as the trees from Rustic Winter out of black cardstock to set my spooky scene.

Sunny Studio Stamps: Bewitching Rustic Winter Dies Fall Friends Halloween Card by Julia Englich


I adhered the background and the grassy hills and trees to an A2-sized card base and then I added all my cute little images! 

I absolutely love making Halloween cards, even though we don't really celebrate it here in Germany. I had so much fun on this one and I really hope you like it!

Thanks so much for stopping by today and have a wonderful day!!

----------------------------------------------------

Hi there! It's Franci here with you today, with some cute Halloween gift tags. This little witch cat is so cute with his potion cauldron and all the little bubbles blowing out of it, isn't he?!

Sunny Studio Stamps: Bewitching Scalloped Tag Dies Halloween Tag by Franci Vignoli

First of all I die cut the tags out of some white cardstock and patterned paper from the Subtle Grey Tones pack using the Scalloped Tag Square Dies set. I stamped all my images from the Bewitching set, colored with Copics and die cut them out. 

I stamped my sentiment onto the white tags, added a little heart and glued everything together, then added my images at the front with some foam adhesive. 

Sunny Studio Stamps: Bewitching Scalloped Tag Dies Halloween Tag by Franci Vignoli

Finally I added some bubbles with all my colorful Nuvo Drops and drew a few details with a white gel pen. I chose a lilac ribbon but green would have been so much fun as well or a classic black.

You could add these to your trick or treat bags or just to the sweets you will give away! Hope you like them as much as I do and thanks a lot for stopping by!

Sunny Studio Supplies Used:

Bewitching Stamps
Bewitching Stamps
Shop at:
Sunny Studio
Bewitching Dies
Bewitching Dies
Shop at:
Sunny Studio
Christmas Critters Stamps
Shop at:
Sunny Studio
Christmas Critters DIes
Shop at:
Sunny Studio
Fall Friends Stamps
Fall Friends Stamps
Shop at:
Sunny Studio
Fall Friends Dies
Fall Friends Dies
Shop at:
Sunny Studio
Rustic Winter Dies
Rustic Winter Dies
Shop at:
Sunny Studio
Subtle Grey Tones Paper
Shop at:
Sunny Studio
Scalloped Tags-Square
Shop at:
Sunny Studio
Slimline Nature Borders
Shop at:
Sunny Studio