Showing posts with label Picket Fence Border Dies. Show all posts

Friday, April 7, 2023

Wonderful Windows Cards with Vanessa and Tina

Hello to you! Vanessa here with a card using the Wonderful Windows Dies.


I trimmed a panel of cream cardstock slightly smaller than my card base and adhered it. Now I die-cut all the elements from various colors of cardstock, assembled the window and the flowers, added little accents to the grass (Picket Fence Border dies) with a marker, and adhered the pieces to the card.


Then I stamped the bike (Paris Afternoon), colored it with Copics, die-cut it with the matching die and adhered it.

I hope you are all having a lovely weekend! See you next week!

---------------------------------------

Hello crafty friends, it’s Tina with a sweet Easter card featuring the Wonderful Windows dies. These dies are so versatile as you will see in this project. Today, I am also mixing and matching several stamps, even one from a previous Christmas release. Always fun when you can stretch the use of your stash!


Let’s start by cutting the windows and curtains from a sheet of white cardstock. I used the large more solid window and adjusted the size to fit my design by removing the bottom part of the glass. I repeated this step and colored the window frames and curtains in shades of purple with Copics. I also cut two small white strips as windowsills. Two small panels were inked with a cloud stencil and Distress Oxide Picked Raspberry, they will go behind the window frames to create the ‘outside look’.

To decorate the windowsills, I cut two flower boxes using the die and adjusted them to the size I needed. You just cut the box once as is and pop the paper shape back into the die, shifting it to the correct measurement and die cut again.

Next, I selected several images to create the Easter scene, the cute little chicks and eggs (Chickie Baby), the sofa and cushions (Cozy Christmas) and finally the small flowers (Chubby Bunny). All the images were colored with Copics using Spring tones.

The combined sentiment comes from the Clucky Chickens set and was stamped onto a small white strip with Versafine Onyx Black ink. Can’t say enough good things about this ink! Love the dark crisp results you get each time!


To assemble the card, I started by creating the windows, gluing all the elements in place (curtains on the inside of the frame, then the cloud panel and lastly the windowsill with flower box).

For my background, I selected a beautiful flower design from the Spring Fever pack which looks like a gorgeous wallpaper. A dark purple strip was added as a baseboard, combined with a pink floor!

Now, I could adhere all the other elements in my scene, creating dimension where needed with foam tape. Finally, I glued the sentiment strip directly to the floor portion of the card. There was already so much color and cute images that I didn’t add any embellishments.

Wishing you lots of crafty fun making your own scene with these beautiful window dies! Thank you for joining me and happy crafting!

Sunny Studio Supplies Used:

Picket Fence Border Dies
Shop at:
Sunny Studio
Chubby Bunny Stamps
Chubby Bunny Stamps
Shop at:
Sunny Studio
Chubby Bunny Dies
Chubby Bunny Dies
Shop at:
Sunny Studio
Chickie Baby Stamps
Chickie Baby Stamps
Shop at:
Sunny Studio
Chickie Baby Dies
Chickie Baby Dies
Shop at:
Sunny Studio
Paris Afternoon Stamps
Shop at:
Sunny Studio
Paris Afternoon Dies
Shop at:
Sunny Studio
Cozy Christmas Stamps
Shop at:
Sunny Studio
Cozy Christmas Dies
Cozy Christmas Dies
Shop at:
Sunny Studio
Clucky Chickens Stamps
Shop at:
Sunny Studio
Wonderful Windows Dies
Shop at:
Sunny Studio
Spring Fever Paper
Spring Fever Paper
Shop at:
Sunny Studio

Friday, March 24, 2023

Build-A-Birdhouse Die Focused Cards with Vanessa and Tina

Hello to you! Vanessa here with a card using the adorable Build-a-Birdhouse Dies.

Sunny Studio Stamps: Build-A-Birdhouse Miss You Card by Vanessa Menhorn (featuring Big Bold Greetings)

I trimmed a panel from the cloud patterned paper from the Spring Fever Paper pad slightly smaller than my blue card base and adhered it. Now I die-cut all the pieces for my birdhouses and flowers using the Wonderful Window Dies, colored them with Copics, assembled the elements and adhered them to the card. 

Sunny Studio Stamps: Build-A-Birdhouse Miss You Card by Vanessa Menhorn (featuring Big Bold Greetings)

Then I stamped the sentiment from Big Bold Greetings, die-cut it with the matching die and adhered it. Finally, I added highlights with a white gel pen.

These dies are so cute and versatile. Love them! Enjoy your weekend and thanks for stopping by!

-------------------------------------------

Hello crafty friends, it’s Tina and today I am featuring the super cute Build-a-Birdhouse diesThis set is perfect for lots of occasions, and I decided to create two sweet mini cards for Easter.

Sunny Studio Stamps: Build-A-Birdhouse Easter Cards by Tina (featuring Mini Mat & Tag Dies, Out On A Limb Dies, Picket Fence Border Dies)

First, I die cut both panels from white Neenah cardstock with the Mini Mat & Tag 1 and Mini Mat & Tag 4 dies. Next, I transformed these panels into frames using a smaller rectangle from the Rectangle Infinity set

I wanted to create a little Spring scene using the Picket Fence Border Dies and Out on a Limb dies. Next, I cut the birdies and houses with the Build-a-Birdhouse dies.

The tree branches were colored with gray Copic markers, for all the other shapes and the background panels I blending Distress Oxides in the shades of Tumbled Glass, Prize Ribbon, Kitsch Flamingo, Picked Raspberry, Squeezed Lemonade and Fossilized Amber. I used a cloud stencil from my stash for the sky and added lots of splatters with a paintbrush for extra texture.

Sunny Studio Stamps: Build-A-Birdhouse Easter Cards by Tina (featuring Mini Mat & Tag Dies, Out On A Limb Dies, Picket Fence Border Dies)

I folded two white card bases and started assembling the scenes. I glued the branches and fence directly to the background with liquid glue. Next, I popped up the frames with foam tape and finished the cards with the leaves, birds, and cute houses.

For my sentiment I combined the ‘Happy Easter’ from the sets Clucky Chickens and Little Birdie. As a little embellishment, I added a few yellow stars from the Canary Sprinkletz pack.

I hope you will enjoy creating sweet birdhouses with this cute set too! Thank you for joining me and happy crafting!

Sunny Studio Supplies Used:

Picket Fence Border Dies
Shop at:
Sunny Studio
Little Birdie Stamps
Shop at:
Sunny Studio
Out on A Limb Dies
Out on A Limb Dies
Shop at:
Sunny Studio
Mini Mat & Tag 1 Dies
Shop at:
Sunny Studio
Mini Mat & Tag 4 Dies
Shop at:
Sunny Studio
Big Bold Greetings Stamps
Shop at:
Sunny Studio
Big Bold Greetings Dies
Shop at:
Sunny Studio
Clucky Chickens Stamps
Shop at:
Sunny Studio
Build-A-Birdhouse Dies
Shop at:
Sunny Studio
Wonderful Windows Dies
Shop at:
Sunny Studio
Spring Fever Paper
Spring Fever Paper
Shop at:
Sunny Studio

Wednesday, March 22, 2023

Wonderful Windows Die Focused Cards with Marie and Catherine

Hello Crafty Friends, Marie here! Thank Heavens, it's officially Spring! Out with the cold and in with the warmth! Spring brings about renewal, and rebirth within nature as well as within ourselves. Spring can also be a reminder to revive or nurture past friendships. In my case, Spring couldn't have come at a better time as I reconnect with a dear friend from my high school days! My card creation today is a friendship card I created for my friend to show her my gratitude for finally reconnecting after so many years. This card features the Wonderful Windows Dies from Sunny Studio Stamps' Spring 2023 collection. It sure is wonderful as it's one of my favorite dies from this release! I also paired this window scene with tiny, adorable bees from their Garden Critters Stamps.  

Sunny Studio Stamps: Wonderful Windows Die Focused Friendship Card by Marie Marco (featuring Garden Critters, Scalloped Fence Dies)

The first step to create this friendship card was to cut out two A2 sized card panels from Bristol Smooth Cardstock paper. This paper is super smooth and perfect for ink blending. Then taking the background panel, I used a brick stencil, and ink blended a light lavender color using Milled Lavender Distress Oxide Ink. To darken the edges, I went in with Shaded Lilac Distress Ink. For the bottom portion of the card, I inked it with some Mowed Lawn Distress ink and splattered some water droplets to create some texture.

For all my die cuts except the flowers, I used Bristol smooth cardstock because it takes Copic markers very well. Starting with my window frame, I colored it using copic markers in cool grey tones. I used the colors Cool Gray No.3 (C-3) , and Cool Gray No 1. (C-1). For the window curtains I used some beautiful yellow pattern paper from the Spring Fever Paper. For the inside window portion and the top triangle window pieces, I used Vintage Paper Distress Oxide to mimic the warmth of a softly lit room. I used some gold metallic paper for the curtain holders. And for the flower box, I used Copic Markers in the colors Chamois ( E35) and Sepia (E37) and to make it a terracotta color, I layered over top Rose Blush (PP4) from Spectrum Noir Illustrator Markers. All the dainty and adorable mini flower blooms were cut from various colors of red, and shades of pink cardstock. For all the tiny leaves, I used Yellow Green Copic marker in (YG03) and did some Mowed Lawn distress ink for shading on the base. For the cute fence, I used Sunny's Scalloped Fence Dies and colored it using Mauve Shadow (BV00) and Cool Grey No. (C-1) Copic Markers. I positioned all my die cut elements and adhered them to my card front panel with Bearly Art Precision Craft Glue. 

Sunny Studio Stamps: Wonderful Windows Die Focused Friendship Card by Marie Marco (featuring Garden Critters, Scalloped Fence Dies)

Next, I stamped out all the bee images onto watercolor paper.  I used Faber-Castell watercolor pencils to color all the images. I cut out the bees using their corresponding die from the Garden Critters Dies. I adhered the bees using repositionable double sided tape adhesive. For some detailing, I used a white Gelly Roll pen to create some flying bee trails. 

Moving on to the inside of my card, I did the same brick stenciling and ink blending as I did on the front to create continuity. I stamped out my Sentiment from the Garden Critters Stamp onto 110 lb. cardstock, and used some banner dies to cut them out. I also inked around the edges for some added interest with Vintage Photo Distress Oxide. Finally, I used some bee images on the inside, and voila all finished and ready to personalize!   

That's it for this week's spring time friendship card inspiration! Thank you so much for joining me today!  Until next time, Happy Cardmaking!  

------------------------------------------

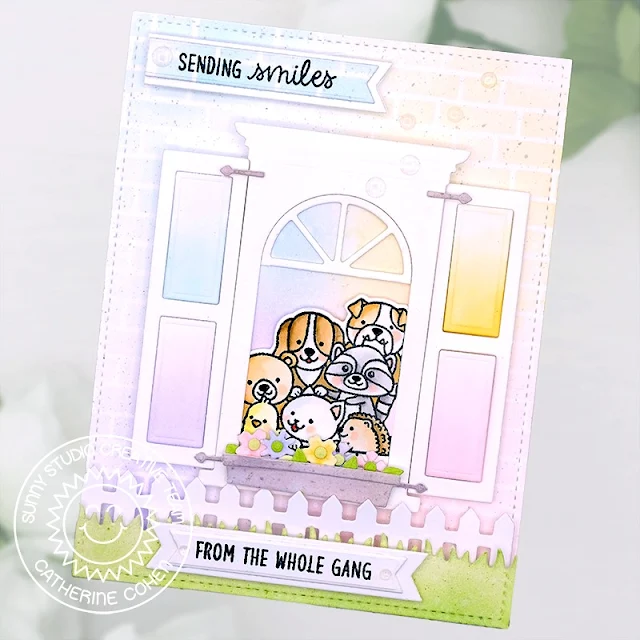
Hello Crafty Friends! Catherine here, and today I am sharing a card created with the Wonderful Windows Dies. This die set is so versatile, it comes with an arched radius frame, outer rectangular frame, curtains, flower box, and shutters which you can add to your design.  For my card, I used the arched radius frame, shutters, and flower box.

Sunny Studio Stamps: Wonderful Windows Die Focused Friendship Card by Catherine Cohen (featuring Cruising Critters, Picket Fence Border Dies)

For the background, I die cut A2 white cardstock with a stitched rectangle die.  I ink blended the background with Spun Sugar, Dried Marigold, Shaded Lilac, and Tumbled Glass Distress Oxides. I lightly splattered Hickory Smoke Distress Oxide mixed with water for added interest and set the background aside to dry.

Next, I die cut the outer rectangular frame, shutters, flower bed, flowers, hinges, and arched frame out of white cardstock. I ink blended the shutter panels and flowers with the same color combination as the background. I added a few leaves ink blended with Shabby Shutters Distress Oxide. I ink blended the flower bed and hinges with Hickory Smoke Distress Oxide.

Sunny Studio Stamps: Wonderful Windows Die Focused Friendship Card by Catherine Cohen (featuring Cruising Critters, Picket Fence Border Dies)

For the “gang,” I stamped the critters from Cruising Critters Stamps onto white cardstock. To fit as many of the critters into the frame as possible, I masked off the bunny with a post it note. I fussy cut the gang and colored the critters with Copic Markers listed in my blog link below. For the window background, I ink blended a piece of white cardstock trimmed to the same size as the arched frame and ink blended with the same color combination. I adhered the gang onto the window background and then onto the card background along with the remaining window pieces.

I added the flower bed along with some flowers. For the bottom of the card, I added a white fence and grass ink blended with Shabby Shutters and Twisted Citron Distress Oxide using the Picket Fence Border Die.

I finished off the card with sentiments from Holiday Express Stamps stamped onto white banners. I added some clear enamel dots for added details.

Thank you so much for stopping by today!  Please feel free to visit me at Crafti-Cat and have a wonderful week!

Sunny Studio Supplies Used:

Picket Fence Border Dies
Shop at:
Sunny Studio
Scalloped Fence Die
Scalloped Fence Die
Shop at:
Sunny Studio
Holiday Express Stamps
Shop at:
Sunny Studio
Cruising Critters Stamps
Shop at:
Sunny Studio
Cruising Critters Dies
Shop at:
Sunny Studio
Garden Critters Stamps
Shop at:
Sunny Studio
Garden Critters Dies
Shop at:
Sunny Studio
Wonderful Windows Dies
Shop at:
Sunny Studio
Spring Fever Paper
Spring Fever Paper
Shop at:
Sunny Studio

Saturday, March 18, 2023

Guest Designer Spotlight: Cards with Rachel Alvarado

Hello crafty friends! It's Rachel from RachelAlvaradoDesigns.com, and I'm excited to share two projects with you today using products from the latest Sunny Studio Stamps release. For my first project, I created an A6 sized box card that showcases the super cute Clucky Chicken Stamp Set. I paired this set with some images from the Seasonal Trees Stamp Set to create a fun 3D scene. 

Sunny Studio Stamps: Clucky Chickens Birthday Card by Rachel Alvarado (featuring Seasonal Trees)

When folded, my card measures at 4.5" x 6.25" and fits easily into a standard A6 (or even a 5x7) envelope for mailing. All of my images were stamped onto a sheet of Neenah Solar White 110lb Card Stock, colored with Copic Markers, and cut out with both the Clucky Chicken and Seasonal Trees Die Sets.

Copic Colors Used:

  • Reds: R35, R59, R89
  • White: 0, C00, C1, C3
  • Chicks/Hay: Y19, Y21, E34
  • Tree: YG23, YG25, YG67
  • Birdhouse: B12, B16, B18
Sunny Studio Stamps: Clucky Chickens Birthday Card by Rachel Alvarado (featuring Seasonal Trees)

I also added a cute little white picket fence around the perimeter using the
 Picket Fence Border Die Set. For my grass, I used both the grass die from the Picket Fence Die Set as well as the grass die from the Slimline Nature Border Dies along with some green card stock. For my background sky, I trimmed a piece of the sky/cloud patterned paper that comes in the new Spring Fever Paper Pad.

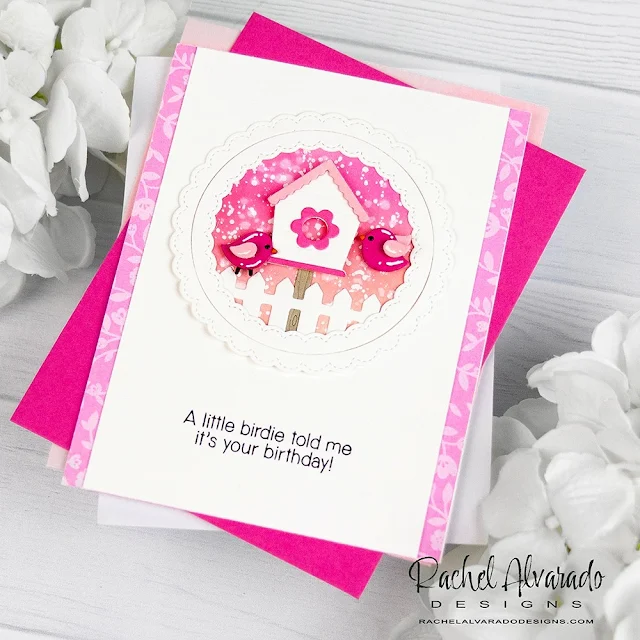
Sunny Studio Stamps: Build-A-Birdhouse Birthday Card by Rachel Alvarado (featuring Fancy Frame Circle Dies)

For my second project, I made a simple card using the adorable new Build-A-Birdhouse Die Set. I layered my card with some pink patterned paper from the same paper pad that I had used above. After stamping my sentiment from the A Bird's Life Stamp Set, I then die cut a basic circle and blended it with some Picked Raspberry, Worn Lipstick, and Tattered Rose Distress Oxide Inks. I added another piece of a white picket fence to this circular piece with some liquid adhesive and then trimmed off the edges of the fence so that it was flush with the edge of the circle. I then added this piece to the front of my card and framed it with some gorgeous white scalloped circles that I had die cut using the Fancy Frames Circles Die Set.

Sunny Studio Stamps: Build-A-Birdhouse Birthday Card by Rachel Alvarado (featuring Fancy Frame Circle Dies)

Lastly, I added my birds and bird house with some 3D Foam adhesive tape for some extra dimension. I love how sweet these birds are and how simple this set is to use.

I hope you enjoyed my cards today! Thanks so much for taking the time to stop by! If you liked these cards and want some more crafty inspiration, please feel free to check out my INSTAGRAM feed! Wishing you all a lovely day! 

Sunny Studio Supplies Used:

A Bird's Life Stamps
Shop at:
Sunny Studio
Picket Fence Border Dies
Shop at:
Sunny Studio
Fancy Frames-Circle Dies
Shop at:
Sunny Studio
Seasonal Trees Stamps
Shop at:
Sunny Studio
Seaonal Trees Dies
Seaonal Trees Dies
Shop at:
Sunny Studio
Slimline Nature Borders
Shop at:
Sunny Studio
Clucky Chickens Stamps
Shop at:
Sunny Studio
Clucky Chickens Dies
Shop at:
Sunny Studio
Build-A-Birdhouse Dies
Shop at:
Sunny Studio
Spring Fever Paper
Spring Fever Paper
Shop at:
Sunny Studio