Showing posts with label Forest Trees Stencils. Show all posts

Monday, November 7, 2022

Winter Wreaths Cards with Bobbi and Cathy

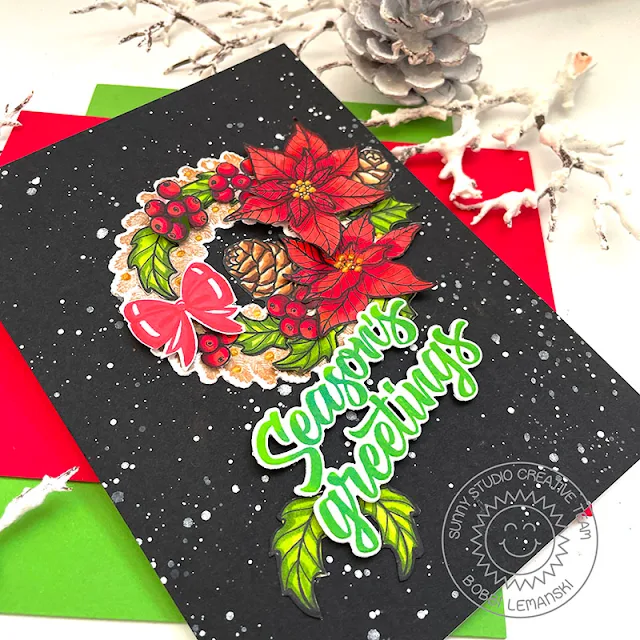
Hello Sunny friends. It’s Bobbi here with a holiday card featuring the Winter Wreaths stamps and dies. I’ve paired this wreath set with the Classy Christmas stamps and dies and the Holiday Greetings stamps and dies. 

Sunny Studio Stamps: Winter Wreaths Holiday Card by Bobbi Lemanski (featuring Classy Christmas, Holiday Greetings)

To make this 5″ X 7″ card, I splattered the card front panel with white paint on black cardstock. While the paint was drying, I stamped the evergreen wreath using a gold metallic ink on white cardstock and die cut the wreath using the coordinating die. I love that the center of the wreath is cut out with the die!

Sunny Studio Stamps: Winter Wreaths Holiday Card by Bobbi Lemanski (featuring Classy Christmas, Holiday Greetings)

I stamped two poinsettias, two pine cones, and a number of holly leaves and berries to decorate the wreath. I also added a bow from the wreath set. I colored the images using the following Copic colors:

Reds for berries and poinsettias: R89, R46, R24, R17, R14
Greens for leaves: YG67, YG63, YG03
Browns: E59, E57, E55, E53, E40


Sunny Studio Stamps: Winter Wreaths Holiday Card by Bobbi Lemanski (featuring Classy Christmas, Holiday Greetings)

The bow was stamped in two colors of red and the sentiment was stamped in green ink.  After cutting the images, I added gold metallic NUVO drops to the poinsettia centers and around the wreath. I also attached the one poinsettia, bow and the “Season’s Greetings” phrase using black foam tabs to make them stand out. I added more Nuvo metallic gold drops to the wreath to finish the card.


Thanks for stopping by today. If you want to see more ideas and inspiration from me, subscribe to my blog, BobbiHartDesign.com. I’ll send you updates on new posts! You can also find me on Instagram as @BobbiHartDesign and on Facebook as BobbiHartDesign. Bobbi Hartmann Lemanski, Bobbi Hart♥ Design, Adding h♥art into every design.


-------------------------------------------------


Hey friends! Cathy here today sharing a serene card for the Holiday season featuring the Winter Wreaths Stamps and coordinating dies. Just inking and die-cutting involved on this one which makes it fairly quick to make during these next few busy months.


Sunny Studio Stamps: Winter Wreaths Holiday Card by Cathy Chapdelaine (featuring Rustic Winter Dies, Holiday Greetings, Forest Tree Stencils)

I started with the background by inking a 4 1/4” x 5 1/2" piece of white cardstock with Tattered Rose Distress ink at the bottom followed by Speckled Egg, Salvaged Patina and Peacock Feathers. I placed a Forest Trees Stencil across the piece and inked it with Pumice Stone Distress ink. I adhered this piece to an A2 card base.


Next, I die-cut the Tropical Trees Backdrop from light gray cardstock and white cardstock. I adhered the gray frame portion to the card base and set the white snow (sand) portion aside. I just love how this die can also be used for winter scenes!


Before I adhered the snow, I die-cut 3 birch trees from white and dark gray cardstock using the Rustic Winter Dies. I adhered one tree to the right side of the card front and trimmed it along the top where it meets the gray frame. I then adhered the snow to the bottom and added the other 2 trees to the left side. I die-cut the deer from the Rustic Winter Dies from dark gray cardstock.


Sunny Studio Stamps: Winter Wreaths Holiday Card by Cathy Chapdelaine (featuring Rustic Winter Dies, Holiday Greetings, Forest Tree Stencils)

I stamped the wreath on white cardstock using Northern Pine Memento ink, the bow using Spun Sugar, Saltwater Taffy and Abandoned Coral Distress inks, the pine boughs using Peeled Paint Distress ink and the pinecones using Brushed Corduroy and Walnut Stain Distress inks. I die-cut all these elements using the coordinating dies.


To finish, I heat embossed the sentiment from the Holiday Greetings Stamps with pink embossing powder on white cardstock and inked over the top with Saltwater Taffy Distress ink. I then die-cut it using the coordinating dies.


I hope you enjoyed and thanks for stopping by today! For more inspiration, please visit my blog www.inkredibleadventures.com and you can also find me on Instagram as @cathy.chapdelaine.


Sunny Studio Supplies Used:

Rustic Winter Dies
Rustic Winter Dies
Shop at:
Sunny Studio
Classy Christmas Stamps
Shop at:
Sunny Studio
Classy Christmas Dies
Shop at:
Sunny Studio
Forest Trees Stencils
Shop at:
Sunny Studio
Tropical Trees Backdrop
Shop at:
Sunny Studio
Holiday Greetings Stamps
Shop at:
Sunny Studio
Holiday Greetings Dies
Shop at:
Sunny Studio
Winter Wreaths Stamps
Shop at:
Sunny Studio
Winter Wreaths Dies
Winter Wreaths Dies
Shop at:
Sunny Studio

Monday, October 31, 2022

Snowman Kisses Cards with Cathy and Bobbi

Hey friends! Cathy here today sharing a card today with my favorite non-traditional Holiday season colors. I love how well they worked with the Snowman Kisses Stamps giving it a playful, dreamy feel!

Sunny Studio Stamps: Snowman Kisses Winter Themed Holiday Card by Cathy Chapdelaine (featuring Holiday Greetings, Seasonal Trees, Slimline Dies)

I began inking the sky on a 4 1/4” x 5 1/2” piece of Neenah Classic Crest 80lb solar white cardstock using Saltwater Taffy, Speckled Egg and Evergreen Bough Distress inks. I splattered a little watered down white acrylic paint with a paintbrush and adhered this panel to an A2 card base. For the snow drifts, I cut 2 pieces of white cardstock (2” x 5 1/2" and 1 1/4" x 5 1/2") and die-cut the top edge of both pieces using a Slimline Nature Borders Die. I adhered these to the bottom of the card front.

Next, I heat embossed the Happy Holidays sentiment from the Holiday Greetings Stamps on white cardstock using Ranger Aqua Tinsel embossing powder and die-cut it using the coordinating dies. I also heat embossed snowflakes from the Snowman Kisses Stamps on Evergreen Bough inked cardstock, die-cut them with the coordinating dies and adhered them around the sky.

Sunny Studio Stamps: Snowman Kisses Winter Themed Holiday Card by Cathy Chapdelaine (featuring Holiday Greetings, Seasonal Trees, Slimline Dies)

I stamped all of the images on Neenah Classic Crest 80lb solar white cardstock and colored them with Copics. I used 2 trees from the Seasonal Trees Stamps and their coordinating dies in my scene and added ornaments to one tree from the Cozy Christmas Stamps and coordinating dies. After adding the happy adorable snowmen from the Snowman Kisses Stamps, I decided to include a few little birdie friends from the Seasonal Trees Stamps. They all look so full of joy!

I hope you enjoyed and thanks for stopping by today! For more inspiration, please visit my blog www.inkredibleadventures.com and you can also find me on Instagram as @cathy.chapdelaine.

--------------------------------------------------

Hi crafty friends! It’s Bobbi sharing a holiday card featuring the Snowman Kisses stamp set and coordinating diesThis stamp set just makes me happy. How cute are these snowmen?! I paired this set with the Scenic Route Stamps and coordinating dies and the Forest Trees Stencil set.

Sunny Studio Stamps: Snowman Kisses Winter Themed Holiday Card by Bobbi Lemanski (featuring Scenic Route, Forest Tree Stencils)

For this 5″ X 7″ card, I used a combination of pinks, lavenders and blue violets for this color story. I started with a card front panel and card base made from 80lb Neenah Solar White cardstock. I used the Forest Trees Stencil set to add trees to the background. Using a blending brush, I stenciled two layers of trees in Spun Sugar Distress Oxide Ink in the far background and Kitch Flamingo Distress Oxide Ink in the forest foreground. I ink blended Shaded Lilac and Broken China (very light touch) on the top of the front for the sky. I used my Gelly Roll white pen and my Copics to add white and blue-violet dots in the sky to make it look like snow is falling.

Sunny Studio Stamps: Snowman Kisses Winter Themed Holiday Card by Bobbi Lemanski (featuring Scenic Route, Forest Tree Stencils)

Next, I stamped the snowmen and the Scenic Route scene, including the string of lights on separate cardstock and die cut them using their coordinating dies. I colored them using pinks, lavenders, purples and blue violets using Copic Markers:

Red-Violets: RV09, RV55, RV02, RV0
Violets: V09, V04, V12
Blue-Violet: BV000,
Yellow-Green: YG67, YG03
Cool Grays: C3, C1, and Black 100

In keeping with the color combination, I used blue-violet markers for all the shading around the snowmen and trees and for the falling snowflakes. The only exception to the colors listed above is the string of lights. I used bright and festive colors to color in the tiny light bulbs including yellow, orange, teal, etc.

Sunny Studio Stamps: Snowman Kisses Winter Themed Holiday Card by Bobbi Lemanski (featuring Scenic Route, Forest Tree Stencils)

I attached the snowy hill image in the foreground and added the snowmen. Because my card is an A7 size versus A2, the string of lights do not reach from side to side on my card front.  To make them work, I hand drew some wood posts to attach the string lights to at the top to make it fit my wider card.  I placed the posts and lights in the scene and glued everything in place. I added white accents to the trees and more falling snow right on the snowmen and scene. Finally, I stamped the sentiment at the bottom to finish this holiday card.

Thanks for stopping by today. If you want to see more ideas and inspiration from me, subscribe to my blog, BobbiHartDesign.com. I’ll send you updates on new posts! You can also find me on Instagram as @BobbiHartDesign and on Facebook as BobbiHartDesign.

Sunny Studio Supplies Used:

Seasonal Trees Stamps
Shop at:
Sunny Studio
Seaonal Trees Dies
Seaonal Trees Dies
Shop at:
Sunny Studio
Scenic Route Stamps
Scenic Route Stamps
Shop at:
Sunny Studio
Scenic Route Dies
Scenic Route Dies
Shop at:
Sunny Studio
Slimline Nature Borders
Shop at:
Sunny Studio
Forest Trees Stencils
Shop at:
Sunny Studio
Cozy Christmas Stamps
Shop at:
Sunny Studio
Cozy Christmas Dies
Cozy Christmas Dies
Shop at:
Sunny Studio
Holiday Greetings Stamps
Shop at:
Sunny Studio
Holiday Greetings Dies
Shop at:
Sunny Studio
Snowman Kisses Stamps
Shop at:
Sunny Studio
Snowman Kisses Dies
Snowman Kisses Dies
Shop at:
Sunny Studio

Friday, October 28, 2022

Holiday Greetings Cards with Vanessa and Tina

Hello to you! Vanessa here with a pink holiday card using the Holiday Greetings set.

Sunny Studio Stamps: Holiday Greetings Winter Themed Holiday Card by Vanessa Menhorn (featuring Snowman Kisses, Forest Tree Stencils)

I started with a panel of white cardstock and masked off a hill on the bottom of the panel. Now I applied Kitsch Flamingo, Festive Berries and Picked Raspberries Distress Oxide Inks using the Forest Trees Stencils. After I had removed the mask, I adhered the panel to my card base. 

Sunny Studio Stamps: Holiday Greetings Winter Themed Holiday Card by Vanessa Menhorn (featuring Snowman Kisses, Forest Tree Stencils)

Then I stamped the snowmen from Snowman Kisses, colored the images with Copics, die-cut the pieces with the matching dies and adhered the elements to the card with foam tape. I stamped the sentiment, inking the stamp with red and pink inks, die-cut it and adhered it to the front. Finally, I added snow with a white gel pen.

Do you like pinks for holiday cards? Have a lovely weekend :)

------------------------------------------

Hello crafty friends, Tina here with a sweet mini slimline Christmas card featuring the new Holiday Greetings stamp and die set! I love the size and the beautiful font of these sentiments!

Sunny Studio Stamps: Holiday Greetings Winter Themed Holiday Card by Tina (featuring Country Scenes, Winter Scenes, Penguin Party)

Today we are creating an arctic scene for the cute penguins from the Penguin Pals set. First, I die cut two mini slimline rectangles out of Neenah Solar White cardstock. One of these was used to create two snowy hills for my front panel.

On the second rectangle I stamped a mountain range from Country Scenes. However, the mountains come with a pine border that I masked off since we are going for a South Pole look. To complete the scene I also stamped and die cut the igloo from Winter Scenes and three adorable penguins from the Penguin Pals set. All the images were colored with Copic markers, and I added tons of snowflakes with a white gel pen.

The sky of the card panel and the two snowy hills were inked with Distress Oxides, and covered with white snowflakes. To get a ‘frosty’ look, I added some white glitter and mica flakes to the mountain tops, igloo, snow banks and icy block.

Sunny Studio Stamps: Holiday Greetings Winter Themed Holiday Card by Tina (featuring Country Scenes, Winter Scenes, Penguin Party)

I stamped one of the sentiments from the Holiday Greetings stamp in pink and used the die set to cut it out. To create dimension, I cut two extra sentiment layers from with card stock and stacked them all together with liquid glue.

To assemble the card, I added the two snowy hills to the panel and adhered my images and sentiment. I glued my card panel to a white lacy rectangle and mounted it to a card base. As embellishment I added a few of the Pure White Jewels scattered around the sentiment.

And that finishes my artic scene card! Thanks so much for taking the time to stop by and happy crafting!

Sunny Studio Supplies Used:

Penguin Pals Stamps
Penguin Pals Stamps
Shop at:
Sunny Studio
Penguin Pals Dies
Penguin Pals Dies
Shop at:
Sunny Studio
Winter Scenes Stamps
Shop at:
Sunny Studio
Winter Scenes Dies
Winter Scenes Dies
Shop at:
Sunny Studio
Country Scenes Stamps
Shop at:
Sunny Studio
Country Scenes Dies
Country Scenes Dies
Shop at:
Sunny Studio
Forest Trees Stencils
Shop at:
Sunny Studio
Holiday Greetings Stamps
Shop at:
Sunny Studio
Holiday Greetings Dies
Shop at:
Sunny Studio
Snowman Kisses Stamps
Shop at:
Sunny Studio
Snowman Kisses Dies
Snowman Kisses Dies
Shop at:
Sunny Studio

Wednesday, July 20, 2022

Designer's Choice Cards with Gladys and Alma

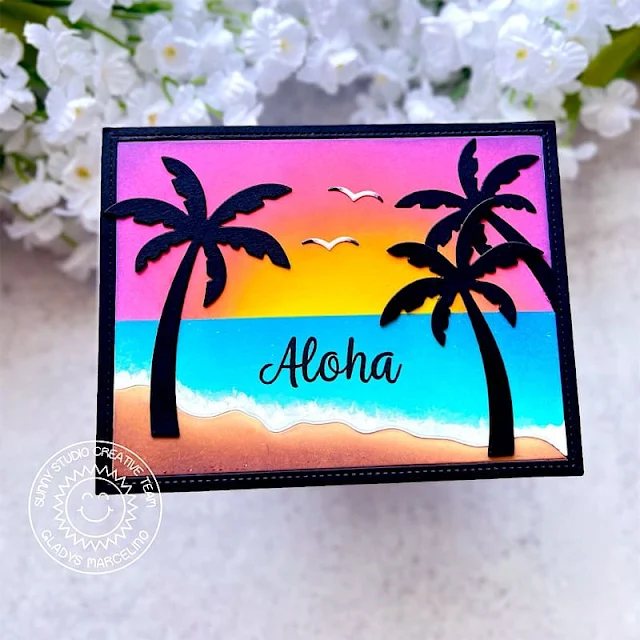
Hello friends! Gladys here and I'm back to share a beach theme card using the Tropical Trees Backdrop die. When I saw this die I knew I had to create a beach scene that reminds me of the many beautiful beaches and gorgeous sunsets in Hawaii.

Sunny Studio Stamps: Tropical Trees Backdrop Card by Gladys Marcelino

As you know I love creating scenes with cute critters but I also enjoy creating cards using mostly dies. This Tropical Trees Backdrop die is awesome because it has all the elements you need to create amazing scenes with. To start I used the die to cut from Bristol smooth cardstock. I masked the largest negative to create a horizon. For the ocean I used peacock feathers and prized ribbon distress oxide inks. I used a small paint brush with white paint for the shoreline. For the sky, from the center out I used mustard seed, riped persimmon, picked raspberry and villainous potion on the outer edges. For the sand I used vintage photo and antique linen.

Sunny Studio Stamps: Tropical Trees Backdrop Card by Gladys Marcelino

Next I die cut the palm trees and stitched frame from black cardstock. I die cut the two largest palm trees twice to give them dimension. I also used the seagull to cut from white cardstock. I colored the outer wings with copic markers. Next I adhered the frame onto a white card base and inlaid all the pieces. This is my favorite part because everything fits like a puzzle and then voila the scene comes together! Finally I stamped Aloha from the Tiki Time stamp set.

Thanks so much for joining me. Have a wonderful day!

------------------------------------------------

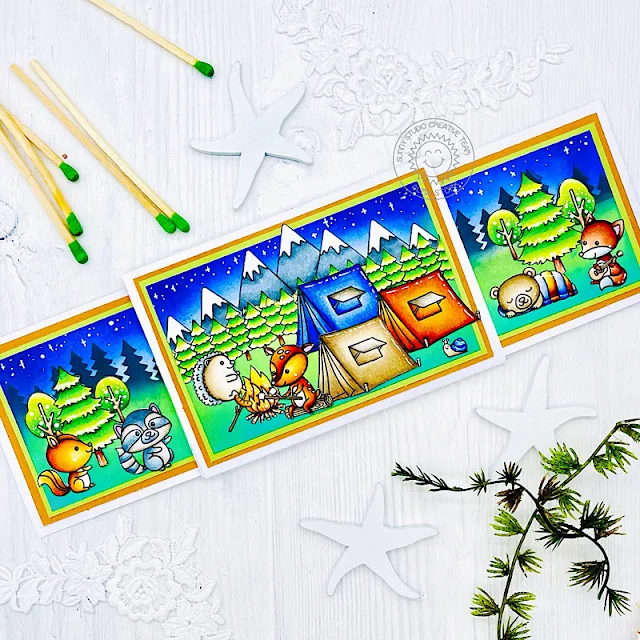
Hi, this is Alma and today I´d like to show you a double slider card. It´s an interactive design and it´s not difficult to create such a special card - You can find the tutorial on Youtube.


Sunny Studio Stamps: Critter Campout Card by Alma Störk (featuring Winter Scenes, Spring Scenes)


I used the amazing Critter Campout Stamps. I coloured all the cute critters with copics and cut them out. For my landscape I used the tree from the Seasonal Trees Stamps, the forest from the Winter Scene Stamps and the snowy mountains from the Spring Scenes Stamps. Then I cut them off, too. 


Sunny Studio Stamps: Critter Campout Card by Alma Störk (featuring Winter Scenes, Spring Scenes)


For the landscape in the background, I used the Forest Tree Stencil to wipe the background with the Distress Oxide Ink Black Soot. The Sky is coloured with the Distress Oxides Inks Chipped Saphire and Blueprint Sketch. Finally, I assembled all the individual parts! 


I wish you a happy summer with a lot of outdoor adventures!


Sunny Studio Supplies Used:

Tiki Time Stamps
Tiki Time Stamps
Shop at:
Sunny Studio
Tiki Time Dies
Tiki Time Dies
Shop at:
Sunny Studio
Critter Campout Stamps
Shop at:
Sunny Studio
Critter Campout Dies
Shop at:
Sunny Studio
Seasonal Trees Stamps
Shop at:
Sunny Studio
Seaonal Trees Dies
Seaonal Trees Dies
Shop at:
Sunny Studio
Spring Scenes Stamps
Shop at:
Sunny Studio
Spring Scenes Dies
Spring Scenes Dies
Shop at:
Sunny Studio
Winter Scenes Stamps
Shop at:
Sunny Studio
Winter Scenes Dies
Winter Scenes Dies
Shop at:
Sunny Studio
Forest Trees Stencils
Shop at:
Sunny Studio
Tropical Trees Backdrop
Shop at:
Sunny Studio

Wednesday, July 13, 2022

Inside Greetings Congrats Cards with Alma and Gladys

Hi, this is Alma and today I´d like to show you a happy spinner card.

Sunny Studio Stamps: Inside Greetings Congrats Card by Alma Störk (featuring Balloon Rides, Forest Tree Stencils, Scalloped Oval Mat Dies, Comic Strip Everyday Dies)

I used the cute Balloon Rides Stamps and first coloured the balloon, the bear, the houses and the trees. So that later the balloon can turn on both sides of the thread, you have to colour it twice. Then I punched them out with the matching Balloon Rides Dies.

Sunny Studio Stamps: Inside Greetings Congrats Card by Alma Störk (featuring Balloon Rides, Forest Tree Stencils, Scalloped Oval Mat Dies, Comic Strip Everyday Dies)

For the landscape, I used the Forest Tree Stencil to wipe the background with the Distress Oxides Moved Lawn and Twisted Citron. For the center of the card I punched a hole with the Scalloped Oval Mat I Dies to attach the thread. I also cut out the houses from the Comic Strip Everyday Dies. Then I put all the houses and trees together to form a landscape and attached the thread with the balloon in the middle of the card.

Finally, I stamped the texts from the Inside Greetings Congrats Stamps Set. Now the balloon can merrily spin and fly to new adventures!

----------------------------------------

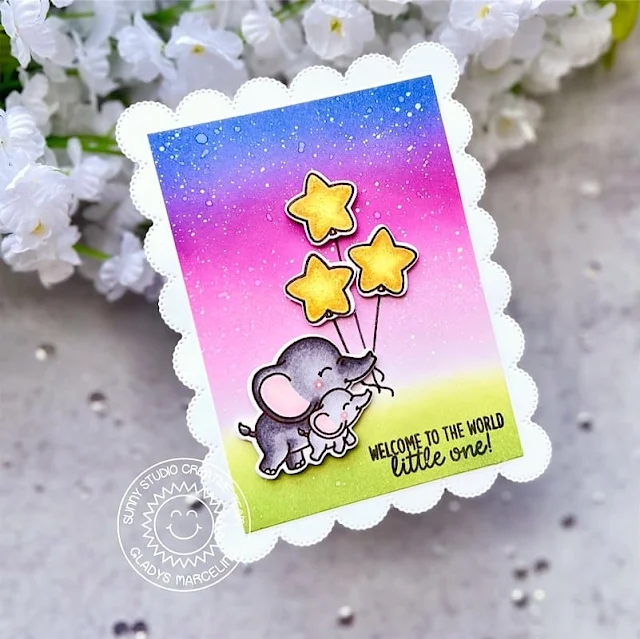
Hello friends! Gladys here with a cute baby card combining the Inside Greetings Congrats stamp set and Baby Elephants stamps and dies.

Sunny Studio Stamps: Inside Greetings Congrats Card by Gladys Marcelino (featuring Baby Elephants, Frilly Frame Dies)

To begin I used the Frilly Frame Eyelet Lace die to cut from Bristol Smooth cardstock. I masked off the edges so I don't add color to it but I end up cutting it down after realizing that my tape was not straight. Thank goodness it was an easy fix! I ink blended my background using distress oxide inks in the colors: mowed lawn, shabby shutters, milled lavender, kitsch flamingo, seedless preserves, and faded jeans. I used a small paint brush to splatter some white paint speckles and water droplets to add more interest.

Sunny Studio Stamps: Inside Greetings Congrats Card by Gladys Marcelino (featuring Baby Elephants, Frilly Frame Dies)

Next I colored the adorable mama and baby elephant from the set along with a few stars. I used the coordinating dies to cut them out. I stamped the balloon strings onto the inked panel and adhered the stars with foam tape. I also added foam tape on the elephants. I used the sentiment from Inside Greeting Congrats, there are lots of baby sentiments in this set and it pairs well with the Baby Elephant stamps. After I stamped the sentiment I adhered the panel onto the frame. For a finishing touch I added stardust stickles on the stars for a little bit of sparkle.

I hope you enjoy my card. Thanks so much for stopping by and have a wonderful day!

Sunny Studio Supplies Used:

Comic Strip Everyday Dies
Shop at:
Sunny Studio
Frilly Frames-Eyelet Lace
Shop at:
Sunny Studio
Balloon Rides Stamps
Shop at:
Sunny Studio
Balloon Rides Dies
Balloon Rides Dies
Shop at:
Sunny Studio
Scalloped Oval Mat 1 Dies
Shop at:
Sunny Studio
Forest Trees Stencils
Shop at:
Sunny Studio
Baby Elephants Stamps
Shop at:
Sunny Studio
Baby Elephants Dies
Baby Elephants Dies
Shop at:
Sunny Studio
Inside Greetings Congrats
Shop at:
Sunny Studio