Showing posts with label Chickie Baby. Show all posts

Friday, April 7, 2023

Wonderful Windows Cards with Vanessa and Tina

Hello to you! Vanessa here with a card using the Wonderful Windows Dies.


I trimmed a panel of cream cardstock slightly smaller than my card base and adhered it. Now I die-cut all the elements from various colors of cardstock, assembled the window and the flowers, added little accents to the grass (Picket Fence Border dies) with a marker, and adhered the pieces to the card.


Then I stamped the bike (Paris Afternoon), colored it with Copics, die-cut it with the matching die and adhered it.

I hope you are all having a lovely weekend! See you next week!

---------------------------------------

Hello crafty friends, it’s Tina with a sweet Easter card featuring the Wonderful Windows dies. These dies are so versatile as you will see in this project. Today, I am also mixing and matching several stamps, even one from a previous Christmas release. Always fun when you can stretch the use of your stash!


Let’s start by cutting the windows and curtains from a sheet of white cardstock. I used the large more solid window and adjusted the size to fit my design by removing the bottom part of the glass. I repeated this step and colored the window frames and curtains in shades of purple with Copics. I also cut two small white strips as windowsills. Two small panels were inked with a cloud stencil and Distress Oxide Picked Raspberry, they will go behind the window frames to create the ‘outside look’.

To decorate the windowsills, I cut two flower boxes using the die and adjusted them to the size I needed. You just cut the box once as is and pop the paper shape back into the die, shifting it to the correct measurement and die cut again.

Next, I selected several images to create the Easter scene, the cute little chicks and eggs (Chickie Baby), the sofa and cushions (Cozy Christmas) and finally the small flowers (Chubby Bunny). All the images were colored with Copics using Spring tones.

The combined sentiment comes from the Clucky Chickens set and was stamped onto a small white strip with Versafine Onyx Black ink. Can’t say enough good things about this ink! Love the dark crisp results you get each time!


To assemble the card, I started by creating the windows, gluing all the elements in place (curtains on the inside of the frame, then the cloud panel and lastly the windowsill with flower box).

For my background, I selected a beautiful flower design from the Spring Fever pack which looks like a gorgeous wallpaper. A dark purple strip was added as a baseboard, combined with a pink floor!

Now, I could adhere all the other elements in my scene, creating dimension where needed with foam tape. Finally, I glued the sentiment strip directly to the floor portion of the card. There was already so much color and cute images that I didn’t add any embellishments.

Wishing you lots of crafty fun making your own scene with these beautiful window dies! Thank you for joining me and happy crafting!

Sunny Studio Supplies Used:

Picket Fence Border Dies
Shop at:
Sunny Studio
Chubby Bunny Stamps
Chubby Bunny Stamps
Shop at:
Sunny Studio
Chubby Bunny Dies
Chubby Bunny Dies
Shop at:
Sunny Studio
Chickie Baby Stamps
Chickie Baby Stamps
Shop at:
Sunny Studio
Chickie Baby Dies
Chickie Baby Dies
Shop at:
Sunny Studio
Paris Afternoon Stamps
Shop at:
Sunny Studio
Paris Afternoon Dies
Shop at:
Sunny Studio
Cozy Christmas Stamps
Shop at:
Sunny Studio
Cozy Christmas Dies
Cozy Christmas Dies
Shop at:
Sunny Studio
Clucky Chickens Stamps
Shop at:
Sunny Studio
Wonderful Windows Dies
Shop at:
Sunny Studio
Spring Fever Paper
Spring Fever Paper
Shop at:
Sunny Studio

Thursday, March 23, 2023

Big Bold Greetings Cards with Marine and Waleska

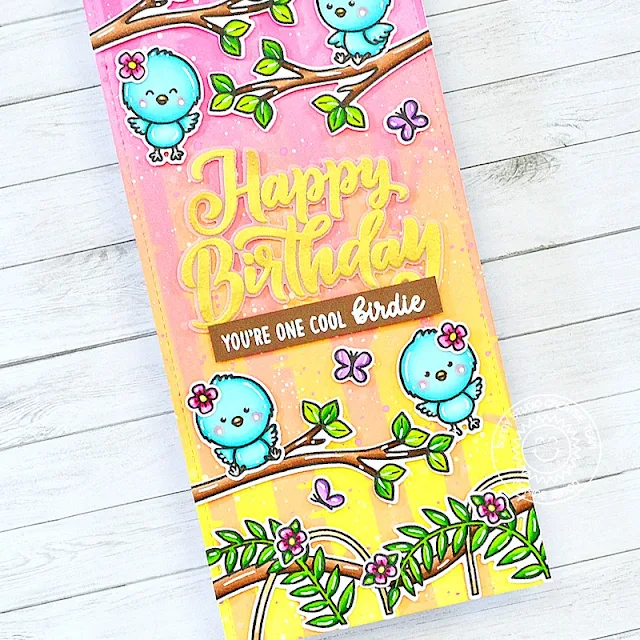
Hello crafty friends, Marine here with you today, back with this fun and bright birthday slimline card showcasing some chubby tropical birds, as well as the "Happy Birthday" sentiment from Big Bold Greetings.

Sunny Studio Stamps: Big Bold Greetings Birthday Card by Marine Simon (featuring Chickie Baby, Tropical Scenes, Little Birdie)

I started off by stamping my images on Transotype perfect coloring paper using an alcohol marker friendly black ink, I cut them all using the coordinating dies, and colored everything using my Spectrum Noir Illustrator markers and Graph'it Brush markers. And as very often I picked the stamps from different sets to create a cute mix & match on my card. The birds are from Chickie Baby and are supposed to be chicks, but I turned them into tropical birds using turquoise shades, the butterflies are from Bunnyville, the leafy border is from Tropical Scenes, and the branch is from Little Birdie.

Sunny Studio Stamps: Big Bold Greetings Birthday Card by Marine Simon (featuring Chickie Baby, Tropical Scenes, Little Birdie)

Next I created the background. I cut an 8,5 x 3,5 inches Strathmore bristol smooth panel, and used one of my favorite color combos: squeezed lemonade, dried marigold, kitsch flamingo and picked raspberry oxide inks. This combination is versatile and can be used on any card for any theme, but I think it fits the tropical vibe quite nicely.

Once the ink blending was done, I used a birch tree stencil from my stash and the same oxide inks to emphasize the jungle look I wanted to give to my card, and then I attached the images on the panel using 1mm foam squares and 3mm glue dots.

Sunny Studio Stamps: Big Bold Greetings Birthday Card by Marine Simon (featuring Chickie Baby, Tropical Scenes, Little Birdie)

I created my greeting in two parts, and attached them in the middle of my panel. I first gold heat embossed "Happy Birthday" from Big Bold Greetings on vellum, and cut those words using the coordinating die. And next I white heat embossed the phrase "You're one cool birdie" on a slim brown banner. The words "You're one cool" are from Chickie Baby, and the word "Birdie" is from Little Birdie.

Sunny Studio Stamps: Big Bold Greetings Birthday Card by Marine Simon (featuring Chickie Baby, Tropical Scenes, Little Birdie)

As always I finished the card with white highlights and details on the images, and that's it! I hope that you like this new cute and bright tropical card. Feel welcome to check the process video for more details (click on the image above). Thanks so much for stopping by, and see you next time!

----------------------------------------------

Hi friends, Waleska here! If you love Pandas and Rainbows this card is for you! For my card today I used the Panda Party Stamps, the Big Bold Greetings and lots of colors!

Sunny Studio Stamps: Big Bold Greetings Birthday Card by Waleska Galindo (featuring Comic Strip Everyday Dies, Panda Party)

I wanted to create a very colorful card having a contrasting color, in this case black, and to do that I used colorful backgrounds with black and white cute pandas. I started by cutting the Comic Strip Everyday Dies on white cardstock and coloring each of the panels with Oxide inks:Candied Apple, Spiced Marmalade, Mustard Seed, Salty Ocean and Wilted Violet, I almost always like to add more interest to my inked pieces with water and sparkle watercolor. I adhere this pieces to the comic strip inspired die. I stamped and color all of the pandas, cupcakes and banners with copic markers and hand cut them.  

Sunny Studio Stamps: Big Bold Greetings Birthday Card by Waleska Galindo (featuring Comic Strip Everyday Dies, Panda Party)

I stamped and cut with the coordinating die the sentiment Make a Wish from the Big Bold Greetings set and adhere all the cute pandas. I finally adhered this panel to a white card base and this card is done! Ready to wish happy birthday someone special. Thank you friends for stopping by today! I hope you feel inspired to create some birthday cards!

Sunny Studio Supplies Used:

Chickie Baby Stamps
Chickie Baby Stamps
Shop at:
Sunny Studio
Chickie Baby Dies
Chickie Baby Dies
Shop at:
Sunny Studio
Tropical Scenes Stamps
Shop at:
Sunny Studio
Tropical Scenes Dies
Shop at:
Sunny Studio
Bunnyville Stamps
Bunnyville Stamps
Shop at:
Sunny Studio
Bunnyville Dies
Bunnyville Dies
Shop at:
Sunny Studio
Little Birdie Stamps
Shop at:
Sunny Studio
Little Birdie Dies
Little Birdie Dies
Shop at:
Sunny Studio
Big Bold Greetings Stamps
Shop at:
Sunny Studio
Big Bold Greetings Dies
Shop at:
Sunny Studio
Panda Party Stamps
Panda Party Stamps
Shop at:
Sunny Studio
Panda Party Dies
Panda Party Dies
Shop at:
Sunny Studio

Friday, March 10, 2023

Slimline Ribbon & Lace Die Focused Cards with Vanessa and Tina

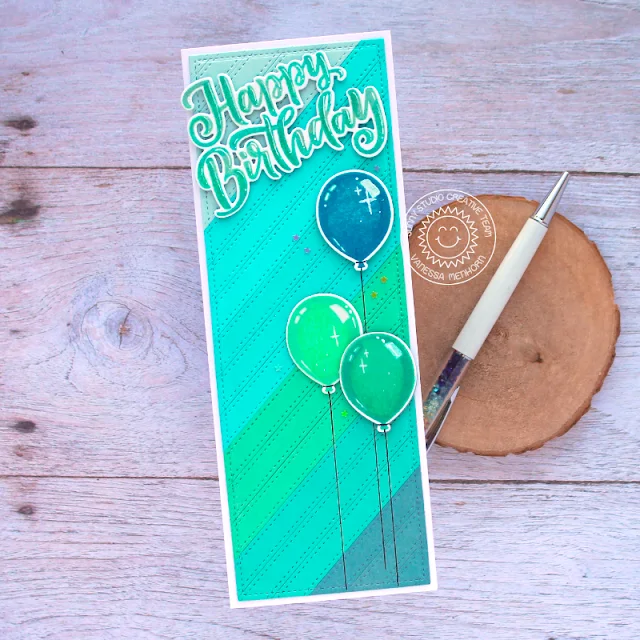
Hello to you! Vanessa here with a monochromatic birthday card using the Slimline Ribbon & Lace Borders.

Sunny Studio Stamps: Slimline Ribbon & Lace Die Focused Birthday Card by Vanessa Menhorn (featuring Birthday Balloons, Big Bold Greetings, Slimline Dies)

Do you own a box full of cardstock scraps? I do and I love to be able to find a good use for them. For this card, I die-cut strips from various hues of aqua/turquoise/petrol paper and adhered them to a piece of paper. Now I die-cut the rectangle using the Slimline Scalloped Frame Dies and adhered it to the card base. I stamped the balloons from Birthday Balloon Stamps, die-cut them with the matching die, drew strings with a black marker and adhered the balloons to the card with foam tape.

Sunny Studio Stamps: Slimline Ribbon & Lace Die Focused Birthday Card by Vanessa Menhorn (featuring Birthday Balloons, Big Bold Greetings, Slimline Dies)

Then I stamped the sentiment using the Big Bold Greetings set, die-cut it with the matching dies and adhered it with foam tape. Finally, I added tiny star sequins and added highlights with a white gel pen.

I hope to have you inspired to use those scraps! Have a lovely weekend!

---------------------------------------

Hello crafty friends, it’s Tina and today I am using the Slimline Ribbon & Lace dies to create an Easter basket from scratch!

Sunny Studio Stamps: Slimline Ribbon & Lace Die Focused Easter Card by Tina (featuring Chickie Baby, Fancy Frame Dies)

These new dies make it super easy to assemble custom shapes. First, I drew a simple basket outline onto a piece of white cardstock and cut it with my scissors. I wanted to fit four straight stitched edge strips and one scalloped one. That was the height of the basket, for width I opted to almost completely fill an A2 size panel.

I die cut the slimline edges using two sheets from the Spring Fever paper pad. Next, I stacked them onto the paper shape, trimmed the sides and I got myself a sweet basket! Chickie Baby is one of my Easter favorites, so I stamped and die cut three of the cute chicks. I colored them with my Copic makers and added some white highlights.

The basket needed to be filled with Easter eggs and at first, I was planning the use the eggs from that same stamp set. But with the basket being so colorful already, it just didn’t work. I had to keep the eggs plainer but in the same colors as the basket. For this, I used two different egg dies from my stash and papers in yellow, green, pink, and purple shades.

Sunny Studio Stamps: Slimline Ribbon & Lace Die Focused Easter Card by Tina (featuring Chickie Baby, Fancy Frame Dies)

My card panel was a white rectangle, and I used a stencil from my stash to add a fine purple line. I also cut a grassy border that I colored with two green Copic markers. Lastly, I created a white frame with the Fancy Frames Rectangle dies.

I was only going to use the top part of this frame, so I decided to embellish some of the plain eggs with the leftovers. Gluing them on in opposite directions for some variation. And that really gave them an instant make-over!

The ‘Happy Easter’ sentiment from Chickie Baby was stamped directly onto the background panel. I glued the panel to a white card base, added the top part of the frame and continued building the scene with the basket, eggs, grass and chicks. A few Pastel Jewels were all the bling this happy card needed. I hope this idea inspires you to create your own custom shapes with these fun Slimline Ribbon & Lace dies!

Thank you for joining me and happy crafting!

Sunny Studio Supplies Used:

Fancy Frames- Rectangles
Shop at:
Sunny Studio
Chickie Baby Stamps
Chickie Baby Stamps
Shop at:
Sunny Studio
Chickie Baby Dies
Chickie Baby Dies
Shop at:
Sunny Studio
Slimline Scalloped Frame
Shop at:
Sunny Studio
Big Bold Greetings Stamps
Shop at:
Sunny Studio
Big Bold Greetings Dies
Shop at:
Sunny Studio
Ribbon & Lace Dies
Ribbon & Lace Dies
Shop at:
Sunny Studio
Spring Fever Paper
Spring Fever Paper
Shop at:
Sunny Studio

Friday, February 24, 2023

Easter Cards with Tina and Vanessa

Hello crafty friends, it’s Tina with an Easter platform pop up card featuring one of my favorite stamps Bunnyville! Who doesn’t love all these cute rabbits and their sweet carrot house!

Sunny Studio Stamps: Bunnyville Easter Card by Tina

I selected a box die from my stash and three papers from Spring Fever. For the outside, I used a really, pretty flower pattern, the grass paper was perfect for the grassy borders and finally the sky panel from the pad became my background.

The box was easy to assemble, selecting which bunnies to add to the scene proved to be much harder, they were all adorable! I also stamped and colored the carrot house, some eggs from Chickie Baby and Chubby Bunny (as well as two little chicks from this set). 

Sunny Studio Stamps: Bunnyville Easter Card by Tina

Next, I could start building my scene, using glue dots. These dots give you the opportunity of moving images around without damaging the paper.

For my sentiment, I combined the big ‘Happy’ word from Color Me Happy with the ‘Easter’ from Clucky Chickens. I stamped both onto a white rectangle with Versafine Onyx Black ink and adhered this little panel to the front of the box with liquid glue. 

And that completes this happy little Easter box! Thank you for joining me and happy crafting!

-----------------------------------------

Hello to you! Vanessa here with a pastel card using Easter Wishes.

Sunny Studio Stamps: Easter Wishes Easter Card by Vanessa Menhorn

First, I covered my card base with striped patterned paper from the Dots & Stripes Pastels Paper. Now I die-cut the bushes using the cloud border from Slimline Nature Borders, the fence from Picket Fence Border Dies and the grass, adhered them to a piece of white cardstock and die-cut the stitched rectangle from it.

Sunny Studio Stamps: Easter Wishes Easter Card by Vanessa Menhorn

After I had adhered the rectangle, I stamped the images, colored them with Copics, die-cut them with the matching dies and adhered the elements to the card with foam tape. Finally, I die-cut the letters using the Haley Lowercase Alphabet dies, spelled "Happy Easter" in German and added highlights with a white gel pen.

Enjoy your weekend, see you next week!

Sunny Studio Supplies Used:

Easter Wishes Dies
Easter Wishes Dies
Shop at:
Sunny Studio
Easter Wishes Stamps
Shop at:
Sunny Studio
Color My World Stamps
Shop at:
Sunny Studio
Picket Fence Border Dies
Shop at:
Sunny Studio

Chubby Bunny Stamps
Chubby Bunny Stamps
Shop at:
Sunny Studio
Chubby Bunny Dies
Chubby Bunny Dies
Shop at:
Sunny Studio
Chickie Baby Stamps
Chickie Baby Stamps
Shop at:
Sunny Studio
Chickie Baby Dies
Chickie Baby Dies
Shop at:
Sunny Studio
Slimline Nature Borders
Shop at:
Sunny Studio
Bunnyville Stamps
Bunnyville Stamps
Shop at:
Sunny Studio
Bunnyville Dies
Bunnyville Dies
Shop at:
Sunny Studio
Clucky Chickens Stamps
Shop at:
Sunny Studio
Dots & Stripes Pastels 6x6 Paper
Shop at:
Sunny Studio
Hayley Lowercase Alphabet Dies
Shop at:
Sunny Studio
Spring Fever Paper
Spring Fever Paper
Shop at:
Sunny Studio