Showing posts with label Cheerful Daisies. Show all posts

Thursday, February 27, 2020

Cheerful Daisies Cards with Vanessa and Anja

Hello to you! Vanessa here with a new card using the gorgeous layering set Cheerful Daisies. It hasn't been much of a winter here, but I can't wait for spring with its beautiful flowers. Here comes my spring greeting for you:

Sunny Studio Stamps: Cheerful Daisies Spring Themed Card by Vanessa Menhorn

I started with a white cardstock panel and inked it using Picked Raspberry Distress Oxide Ink. Then I added water and ink droplets and let it dry. Now I stamped the sentiment with Versamark Ink, heat-embossed it with white embossing powder and adhered the panel to my white card base.

Sunny Studio Stamps: Cheerful Daisies Spring Themed Card by Vanessa Menhorn

I stamped the daisy and the leaves, die-cut the pieces with the matching dies and adhered everything to the card, raising the blossom with foam tape. Finally, I added Iridescent Pastel Confetti.

I hope your day is full of sunshine, thanks for stopping by!

--------------------------------------------------------

Hi everyone, Anja here today and I can't wait for Spring to finally arrive! I'm looking forward to all the blooms and fresh colors popping up everywhere. With this in mind, I created today's card featuring the Cheerful Daisies Stamps.

Sunny Studio Stamps: Cheerful Daisies Spring Themed Card by Anja Bytyqi

First, I created a watercolor background with Nuvo Shimmer Powders (yellow: Solar Flare, pink: Cherry Bomb). I let it dry completely and stamped the sentiment in VersaMark Ink. I heat embossed the word 'happy' with gold embossing powder and did the word 'Spring' in bright pink. I adhered the panel to a yellow A2 card base.

Sunny Studio Stamps: Cheerful Daisies Spring Themed Card by Anja Bytyqi

Next, I stamped the daisies in light grey (to make them look like they'd be white) and the centers in yellow. The leaves were stamped with three shades of green (find all the ink colors listed below). I used the coordinating dies to cut everything out. I adhered the leaves and large flower with liquid glue and popped up the two other daisies with foam tape. To finish off my card, I added some Rainbow Pearls.

Dye Inks used: Daisies: Simon Says Stamp Fog; Altenew Buttercream, Mango Smoothie and Warm Sunshine; Leaves: Altenew Bamboo, Parrot and Olive

Thank you so much for stopping by! Have a great day!

Sunny Studio Supplies Used:

Cheerful Daisies Stamps
Shop at:
Sunny Studio
Cheerful Daisies Dies
Shop at:
Sunny Studio

Tuesday, February 18, 2020

Blooming Frame Die Focused Cards with Angelica and Mindy

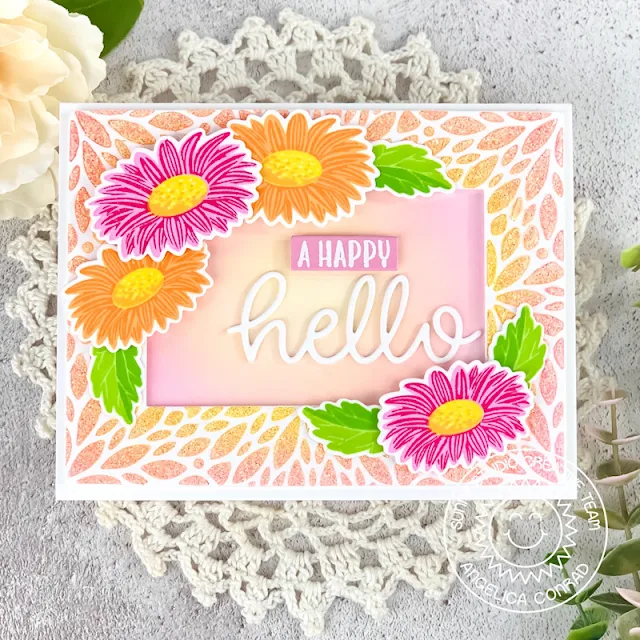
Hi friends! Angelica here, and I have a card to share with you today featuring the Blooming Frame Die.

Sunny Studio Stamps: Blooming Frame Dies Cheerful Daisies Hello Word Die Hello Card by Angelica Conrad

I die-cut a white card stock panel with the Blooming Frame Die, and used the panel as a stencil. I blended yellow and pink ink over the "stencil", finishing up with a thin layer of Gina K Designs White Glitter Gel. Once dry, I trimmed the glittery panel into a frame, and made coordinating Cheerful Daisies to decorate the frame. 

Sunny Studio Stamps: Blooming Frame Dies Cheerful Daisies Hello Word Die Hello Card by Angelica Conrad

I white heat-embossed a partial Cheerful Daisies sentiment onto pink card stock, trimmed it, and attached it to the card with foam squares. I finished the card with a die-cut Hello

Thanks so much for joining me today. I hope I have given you an idea or two on how to stretch your supplies!

---------------------------------------------------------

Hello! It’s Mindy from My Creative Scoop. Today I’m sharing a fun Birthday Card using the Blooming Frame Die and Prancing Pegasus Stamp and die set. I’m also using the new Spring Fling Paper behind my Blooming Frame Die

Sunny Studio Stamps: Blooming Frame Dies Prancing Pegasus Fancy Frame Dies Birthday Card by Mindy Baxter

I love how the white pattern pops against the rainbow paper. The Scalloped border around the ‘Happy Birthday’ is from the Fancy Frame Rectangle Dies. I actually cut 2 out in black and then one in white to give the frame a little bit of a shadow.

Sunny Studio Stamps: Blooming Frame Dies Prancing Pegasus Fancy Frame Dies Birthday Card by Mindy Baxter

I colored my Prancing Pegasus Stamp with my Copic Markers. Here’s a list of the colors I used. Body – N3, N1, N0, R32, R30. Rainbow hair and Wings – R32, Y35, Y02, YG13, B14, V12, N3.

Thank you so much stopping by. Have a great day!

Sunny Studio Supplies Used:

Fancy Frames- Rectangles
Shop at:
Sunny Studio
Hello Word Die
Hello Word Die
Shop at:
Sunny Studio
Cheerful Daisies Stamps
Shop at:
Sunny Studio
Cheerful Daisies Dies
Shop at:
Sunny Studio
Prancing Pegasus Stamps
Shop at:
Sunny Studio
Prancing Pegasus Dies
Shop at:
Sunny Studio
Blooming Frame Die
Blooming Frame Die
Shop at:
Sunny Studio
Spring Fling Paper
Spring Fling Paper
Shop at:
Sunny Studio

Tuesday, February 11, 2020

Cheerful Daisies Cards with Leanne and Mindy

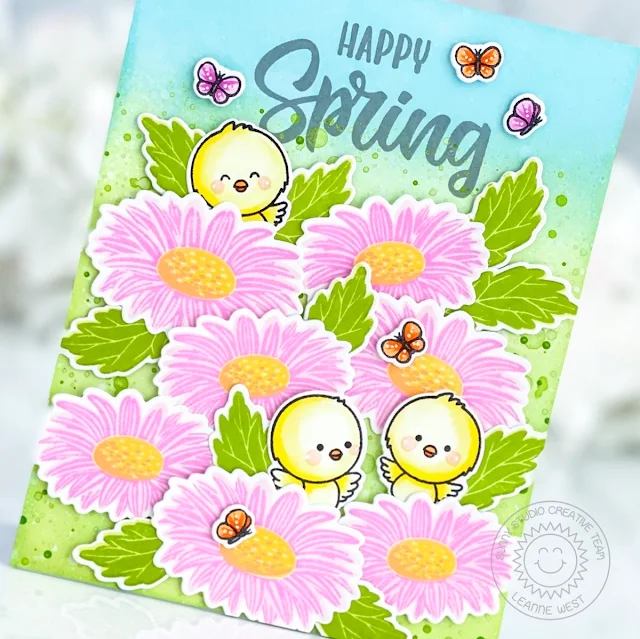
Hello crafty friends, Leanne here! I have a very springy card to share today. I think this combination of spring daisies and little chicks is sure to brighten anyone's day. 

Sunny Studio Stamps: Cheerful Daisies Chickie Baby Frilly Frame Dies Spring Showers Spring Themed Cards by Leanne West

This card is A2 size and I started with an ink blended background. I used some Distress Inks (Tumbled Glass, Twisted Citron, Bundled Sage) and blending brushes to create my two toned background. I then splatted the bottom 3/4's of the background with thinned green acrylic paint. I always use acrylic paint for splattering because I can control the opaqueness of the splatters by adding more or less water to the paint. 

Sunny Studio Stamps: Cheerful Daisies Chickie Baby Frilly Frame Dies Spring Showers Spring Themed Cards by Leanne West

I wanted to cover most of the card front with daisies. I stamped out seven daisies and ten leaves from the Cheerful Daisies set. (ink colors for petals, centers, and leaves listed below) I arranged the daisies and leaves closely together but left a little room to add the chicks which are from Chickie Baby. I Copic colored the chicks with Y0000, Y00, Y15 - my go to colors for yellow chicks. I stamped the greeting from Cheerful Daisies in dark grey ink towards the top of the card. I felt this design still needed a little something so I decided to add some butterflies. I used tiny butterfly images from Spring Showers.  

Altenew Ink colors used for daisies and leaves: Rose Quartz, Puffy Heart, Buttercream, Warm Sunshine, Caramel Toffee, Limeade, Fresh Leaf

---------------------------------------------------------

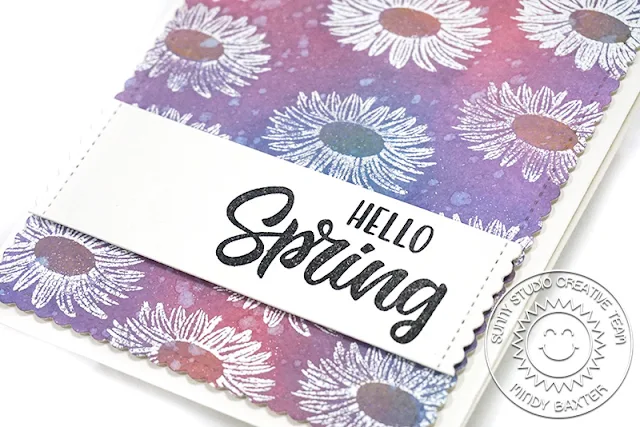
Hello! It’s Mindy from My Creative ScoopToday I’m sharing a 2 step stamping technique with the new Cheerful Daisies Stamp Set
Sunny Studio Stamps: Cheerful Daisies Frilly Frame Dies Spring Themed Card and Video Tutorial by Mindy Baxter

Instead of doing the traditional 2 step stamping with a lighter color and a darker color ink I’m using some water to stamp with my stamp and get the reaction from the Distress Oxide inks. I’m also using the Frilly Frames Striped die

Sunny Studio Stamps: Cheerful Daisies Frilly Frame Dies Spring Themed Card and Video Tutorial by Mindy Baxter

This is such a fun and simple card and a great way to practice blending backgrounds with your distress oxide inks. I wanted to use pinks and purples but wouldn’t this also look amazing in some orange and yellows?!

I’m using Shaded Lilac, Worn Lipstick, Peacock Feathers and a little Scattered Straw Distress Oxide inks in my video below!


Thank you so much stopping by. Have a great day!

Sunny Studio Supplies Used:

Frilly Frames Stripes Die
Shop at:
Sunny Studio
Cheerful Daisies Stamps
Shop at:
Sunny Studio
Cheerful Daisies Dies
Shop at:
Sunny Studio
Chickie Baby Stamps
Chickie Baby Stamps
Shop at:
Sunny Studio
Chickie Baby Dies
Chickie Baby Dies
Shop at:
Sunny Studio
Spring Showers Stamps
Shop at:
Sunny Studio
Spring Showers Dies
Spring Showers Dies
Shop at:
Sunny Studio

Friday, January 24, 2020

Cheerful Daisies Cards with Juliana and Candice

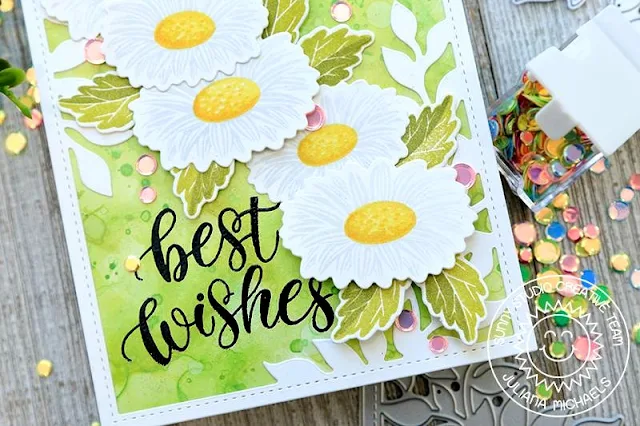
Hello crafty friends! It's Juliana here and today I'm excited to share a birthday card I created using the Cheerful Daises Stamp Set. As always, the Sunny Studio Stamps layering stamps are so much fun to create with.

Sunny Studio Stamps: Cheerful Daisies Botanical Backdrop Dies Spring Themed Best Wishes Card by Juliana Michaels

I began actually by creating the background for this card. I knew I wanted white daises, so I thought a green colored background would work nicely. I used a technique called Distress Oxide Glazing technique that Jennifer McGuire shared. I'm pretty sure it's my new favorite technique right now! You begin by stamping your Distress Oxide colors onto a craft mat. You then spritz the inks with water and drag and dab a piece of Ranger Alcohol Ink Cardstock through the inks. You dry it with a heat tool and then repeat process. You can even flick ink onto it with a paintbrush. Always drying in between each layer. Once you are happy with the design, grab some Distress Micro Glaze and a foam blending tool. This is where the magic happens. Dab the foam into the Glaze and then wipe it on to the cardstock. You will instantly see how the paper, colors and design are altered. They colors begin to pop and the layers are revealed. It's seriously magical! For this card I used a mix of green Distress Oxide to help avoid the colors from getting muddy.

Sunny Studio Stamps: Cheerful Daisies Botanical Backdrop Dies Spring Themed Best Wishes Card by Juliana Michaels

Once the background was complete, I die cut a piece of white cardstock using the Botanical Backdrop Die. Before I adhered this piece, I stamped Best Wishes from the Pink Peonies Stamp Set with Versafine Ink. I then sprinkled it with black embossing powder and heat set it with a heat gun.

Now onto those Cheerful Daisies! As I mentioned, I knew I wanted white daises. To achieve this, I skipped stamping the base image and only stamped the detailed image using Scrapbook.com Hybrid Ink in Rainy Day. I then used Lantern Light, Daffodil and Honeycomb to stamp the flower center. I repeated this for both flowers until I had five flowers stamped. I then die cut them with the coordinating dies. For the leaves, I again skipped stamping the base and stamped the other layers using Guacamole and Olive.

To complete the card, I added a touch of sparkle and shine using some of the pink confetti from the Iridescent Pastel Confetti.

Thanks so much for stopping by today!

--------------------------------------------------------

Hello! Candice with you today wishing you a fabulous crafty weekend! To get you inspired, I am sharing a bright card using the Cheerful Daisies stamp set from the new spring release! I used some new and older sets to create my card:

Sunny Studio Stamps: Cheerful Daisies Frilly Frame Dies Banner Basics Chubby Bunny Spring Themed Card by Candice Fisher

For the background, I first die cut the scalloped frame with the chevron from thick white cardstock and a second chevron from Bristol smooth that I had inked with mustard seed and squeezed lemonade oxide inks. I glued the frame down and added the yellow pieces in between.

Sunny Studio Stamps: Cheerful Daisies Frilly Frame Dies Banner Basics Chubby Bunny Spring Themed Card by Candice Fisher

Next, I stamped the daisies and leaves using the wonderful guides printed right on the stamp cover with colored inks and cut out using the coordinating dies. I then stamped the bunny and chick in light grey, using the no line coloring technique with copic markers and cut out with the coordinating dies.

I used the light grey ink to stamp the banner, cut out with the banner dies and stamped the sentiment in green. I used foam tape to adhere them to the card front and added some yellow and white pearls for shine.

Thank you so much for visiting and have a wonderful day!

Sunny Studio Supplies Used:

Chubby Bunny Stamps
Chubby Bunny Stamps
Shop at:
Sunny Studio
Chubby Bunny Dies
Chubby Bunny Dies
Shop at:
Sunny Studio
Botanical Backdrop Die
Shop at:
Sunny Studio
Frilly Frames Chevron Die
Shop at:
Sunny Studio
Frilly Frames Stripes Die
Shop at:
Sunny Studio
Banner Basics Stamps
Shop at:
Sunny Studio
Banner Basics Dies
Banner Basics Dies
Shop at:
Sunny Studio
Cheerful Daisies Stamps
Shop at:
Sunny Studio
Cheerful Daisies Dies
Shop at:
Sunny Studio
Pink Peonies Stamps
Pink Peonies Stamps
Shop at:
Sunny Studio

Wednesday, January 22, 2020

Frilly Frame Eyelet Dies Focused Cards with Franci and Ana

Hello there! Franci here with you today with a Happy Easter card, made with all Sunny Studio new goodies!

Sunny Studio Stamps: Frilly Frame Dies Chickie Baby Spring Showers Easter Card by Franci Vignoli

Awww look at these cool chicks! First of all I created my white card base, I trimmed another piece of white cardstock to size and I sponged it with the Twisted Citron Distress Oxide Ink. I let it dry completely, then glued it down to the front of my card.

I die cut this scalloped panel out of white cardstock using the new Frilly Frames Eyelet Lace set, stamped my sentiment using the Chickie Baby stamp setand masked the bottom. I lightly inked the top with Picked Raspberry Distress Ink and I glued the panel down to my card.

Sunny Studio Stamps: Frilly Frame Dies Chickie Baby Spring Showers Easter Card by Franci Vignoli

I stamped, colored with copics and die cut all my images from these different sets: Chickie Baby set coordinated dies and Spring Showers coordinated dies. I added some details with a white gel pen, created my little scene and glued everything down with a combo of liquid glue and foam adhesive. Finally I added some sparkling clear sequins by Pretty Pink Posh.

This card is so sweet, can't wait to mail it for Easter! Hope you like it and thank you so much for stopping by today!

-----------------------------------------------------

Hello friends! Ana here today with a birthday card featuring the gorgeous Frilly Frames Eyelet Lace dies and Cheerful Daisies stamps/dies.

Sunny Studio Stamps: Frilly Frame Dies Cheerful Daisies Blooming Frame Dies Birthday Card by Ana Anderson

I started with creating the background - I used Frilly Frames Eyelet Lace dies and white heavyweight cardstock to create the frame and the center eyelet panel. I backed the center panel with a piece of hot pink cardstock, then adhered the frame with foam tape.
For my flowers, I used only the second layering Cheerful Daisies stamps (ones that create the depth of the petals), dotted flower centers and the leaves. Once the images were stamped, I used coordinating dies to cut them out, and arranged them in top left and bottom right corners of the frame.

Sunny Studio Stamps: Frilly Frame Dies Cheerful Daisies Blooming Frame Dies Birthday Card by Ana Anderson

For the sentiment, I white heat embossed the word Happy (from Cheerful Daisies stamp set) on a piece of black cardstock and die cut the word Birthday (from Blooming Frame die) out of the same hot pink cardstock I backed the background panel with.

I adhered both sentiments to the background with foam tape, then added Wink of Stella for some shine and embellished with Arctic Breeze pearls. I really hope you like the card I shared today and got inspired!

Have a wonderful rest of your week and Happy Crafting!

Sunny Studio Supplies Used:

Cheerful Daisies Stamps
Shop at:
Sunny Studio
Cheerful Daisies Dies
Shop at:
Sunny Studio
Chickie Baby Stamps
Chickie Baby Stamps
Shop at:
Sunny Studio
Chickie Baby Dies
Chickie Baby Dies
Shop at:
Sunny Studio
Spring Showers Stamps
Shop at:
Sunny Studio
Spring Showers Dies
Spring Showers Dies
Shop at:
Sunny Studio
Blooming Frame Die
Blooming Frame Die
Shop at:
Sunny Studio
Frilly Frames-Eyelet Lace
Shop at:
Sunny Studio