Showing posts with label Build-A-Tag. Show all posts

Saturday, June 19, 2021

Color My World & Looking Sharp Cards with Mona

Hi crafty friends! It's Mona here and I am super excited to be a guest on the Sunny Studio Stamp blog. Today I have 2 cute projects for you with the Color my World and Looking Sharp sets.

Sunny Studio Stamps: Color My World Build-A-Tag Dies Bookmarks by Mona Toth

First, I have created 3 lovely bookmarks with adorable and colorful crayons. I made a bulk stamp layering for these cuties, and it was so much fun! I just mix and matched my inkpad colors and enjoyed the creating process.

Sunny Studio Stamps: Color My World Build-A-Tag Dies Bookmarks by Mona Toth

For the stamping I have used the Color my World stamp set with their coordinating dies. For some of them I didn’t stamp the crayon text, instead of that I stamped the cute faces from the Looking Sharp Set.

Sunny Studio Stamps: Color My World Build-A-Tag Dies Bookmarks by Mona Toth

The next step was the base of the bookmark which I have created with the Build-A-Tag 2 dies. These are shorter, so I cut the tag die-cut in a half, and adhered on it (to the front and the back) a patterned paper from the Dots and Stripes Pastels Paper Pack in size 2” by 4.25”.

In the end I embellished the bookmarks with white tag die-cuts. Put inside colorful eyelets and a handmade tassel as well. 

Sunny Studio Stamps: Looking Sharp Frilly Frame Dies Card by Mona Toth

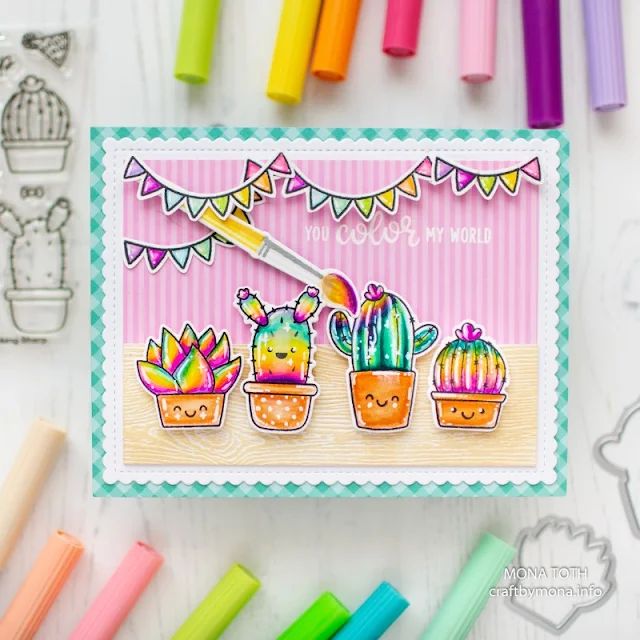
For my second project I have create a lovely and colorful card, which will brighten up someone’s day.  I have created a white scalloped frame from the Frilly Frames Chevron Dies which I adhered to a 5.5” by 4.25” card base created from Gingham Pastels Cardstock.

Next, I have created the card front with pink patterned paper from the Dots and Stripes Pastels Paper Pack. I stamped on it the sentiment with watermark ink, then I heat embossed it with white embossing powder. I also added a beige wooden card panel on the top of it as a table.

Sunny Studio Stamps: Looking Sharp Frilly Frame Dies Card by Mona Toth

The following step was the stamping and coloring. I stamped the images with black pigment ink from the Looking Sharp and the banner from the Balloon Rides Stamp Set. I have also made a stamp layered brush with the Color my World stamp set.

I colored the stamped images with Tombow Markers and I decided to turn them into rainbow cacti. Aren’t they cute?

Sunny Studio Stamps: Looking Sharp Frilly Frame Dies Card by Mona Toth

In the end I just put my card together with 3D foam adhesives, to add more dimension to my card. Thank you very much for reading through my post, I hope that you have enjoyed it and I have inspired you! If you want to see more colorful happy cards visit my Instagram

Sunny Studio Supplies Used:

Color My World Stamps
Shop at:
Sunny Studio
Color My World Dies
Color My World Dies
Shop at:
Sunny Studio
Looking Sharp Stamps
Shop at:
Sunny Studio
Looking Sharp Dies
Looking Sharp Dies
Shop at:
Sunny Studio
Build-A-Tag #2 Dies
Build-A-Tag #2 Dies
Shop at:
Sunny Studio
Gingham Pastels 6x6 Paper
Shop at:
Sunny Studio
Dots & Stripes Pastels 6x6 Paper
Shop at:
Sunny Studio
Frilly Frames Chevron Die
Shop at:
Sunny Studio
Balloon Rides Stamps
Shop at:
Sunny Studio
Balloon Rides Dies
Balloon Rides Dies
Shop at:
Sunny Studio

Saturday, March 13, 2021

Guest Designer Spotlight: Cards with Michelle Short

Hello there, Michelle Short here and I am delighted to be back guesting with Sunny Studio Stamps. Today I have projects to share with you using the Balloon Rides and Lovable Llama sets.

Sunny Studio Stamps: Balloon Rides Slimline Pennant Dies Build A Tag Dies Card and Tag by Michelle Short

My first card uses the adorable Balloon Rides stamp set and coordinating dies, along with the Slimline Pennants dies. I started off by die cutting a panel of white cardstock using the largest of the Slimline Pennants dies. I blended Mermaid Lagoon and Tumbled Glass Distress Oxide Inks on top to create the sky. The clouds, hot air balloon and bunny from the Balloon Rides stamp set were stamped on to white cardstock with black ink and coloured using Copic Markers. They were cut out using the coordinating dies.

Sunny Studio Stamps: Balloon Rides Slimline Pennant Dies Build A Tag Dies Card and Tag by Michelle Short

The background piece was adhered to an A2 white card base with foam tape and the clouds added on top with tape runner. The hot air balloon was added on top with foam tape and then I popped the bunny on top. Doesn’t he look cute flying in the air? I took the sentiment from the set and stamped it on to black cardstock with Versamark Ink. I applied white embossing powder, heat set and cut it in to a strip. This was added to the card with thin foam tape. To finish off, I added a few clear droplets.

Sunny Studio Stamps: Balloon Rides Slimline Pennant Dies Build A Tag Dies Card and Tag by Michelle Short

When I was making the card, I had stamped and coloured the sun from the set, plus additional clouds but I didn’t used them. I couldn’t let them go to waste, so I made a little tag with them. I die cut the Build A Tag 1 dies from white cardstock and blended on the same Distress Oxide Inks. The images were adhered on top with tape runner. I stamped the little bear from the set, along with the mortar board and popped them behind the stamped and embossed sentiment. I thought he looked cute peeking up from behind the sentiment!

Sunny Studio Stamps: Slimline Pennant Dies Build A Tag Dies Lovable Llama Card and Tag by Michelle Short

My second card uses the Loveable Llama set. This little guy is so cute! I stamped him, his hat and presents on to white cardstock with black ink. They were coloured using Copic Markers and die cut out with the coordinating dies. I then set them aside while I worked on my background. I took the next largest size of the Slimline Pennants dies and die cut a panel of white cardstock. Using blending brushes, I blended on Wilted Violet, Blueprint Sketch and Mermaid Lagoon Distress Oxide Inks.

Sunny Studio Stamps: Slimline Pennant Dies Build A Tag Dies Lovable Llama Card and Tag by Michelle Short

I took the panel and ran it through my die cutting machine with the Sunburst Embossing folder. The panel was adhered flat to an A2 white card base. I took the sentiment from the Magical Mermaids stamp set and stamped and embossed it on to black cardstock. It was cut out and added to the card with foam tape. The llama was popped behind with thin foam tape, followed by the presents with tape runner. The card felt a little off, so I stamped, coloured and die cut another present, this time cutting off the top present only. When it is popped behind the sentiment strip, you cannot see that it was cut apart from the others.

Sunny Studio Stamps: Slimline Pennant Dies Build A Tag Dies Lovable Llama Card and Tag by Michelle Short

I fell in love with this llama, he is indeed lovable! So I had to make a little tag with him too! I die cut the Build A Tag 1 die from white cardstock, blended the same Distress Oxides Inks on top and ran it through my die cutting machine with the Sunburst Embossing folder. I stamped another Loveable Llama, coloured him with Copics and die cut him out. I also die cut the bunting image from the Balloon Rides set, coloured it with Copics and die cut it out as well. The bunting was adhered to the top of the tag with tape runner and the llama added on top with foam tape. I left off a sentiment as I thought it could be added to a gift.

That’s it from me. A huge thank you to Mendi and her team for having me back to guest with them. It is always a pleasure! Have a wonderful day!

Sunny Studio Supplies Used: 

Magical Mermaid Stamps
Shop at:
Sunny Studio
Build-A-Tag #1 Dies
Build-A-Tag #1 Dies
Shop at:
Sunny Studio
Sunburst Embossing
Sunburst Embossing
Shop at:
Sunny Studio
Balloon Rides Stamps
Shop at:
Sunny Studio
Balloon Rides Dies
Balloon Rides Dies
Shop at:
Sunny Studio
Lovable Llama Stamps
Shop at:
Sunny Studio
Lovable Llama Dies
Lovable Llama Dies
Shop at:
Sunny Studio
Slimline Pennant Dies
Shop at:
Sunny Studio

Sunday, November 1, 2020

25 Days of Christmas Tags

25 Days of Christmas Tags 2020 Handmade Holiday Event

Hello there! The Sunny Studio team is so excited to be kicking off the first day of the 25 Days of Christmas Tags event this year!  I'm only sharing a tiny peek here today so make sure to visit Tracey's blog for loads more darling tag ideas using our products.

For my first set of tags I used a few of the many ornaments I had stamped earlier using our Retro Ornaments Stamps, together with the tree branch from our Classy Christmas Stamps.  I started by die-cutting my tags using our Build-a-Tag 1 dies, cutting them from a dot print found in our Holiday Cheer Paper pack.

I cut a second tag in the same print to give the backs of my tags a finished look and then stamped my "to" and "from" on the back. I finished the set by adhering a ribbon bow and adding little dots of stickles to give the look of twinkly lights. I love pulling out ribbon for tags because I don't need to send these through the mail so it doesn't matter how bulky they are.  Love that sense of freedom (and using up a tiny bit of my huge ribbon stash).

Sunny Studio Ornament Gift Tags (using Retro Ornament & Classy Christmas Stamps, Build-a-Tag 1 Dies, Holiday Cheer Paper)


Up next is a pair of tags using the adorable hedgehog from our mini Hedgey Holidays Stamps. I cut my tags from some red gingham paper from our Holiday Cheer Paper pack and then cut a stitched circle from a pink snowflake print from that same paper set. I popped up my hedgies using some foam pop dots and scattered some snowflakes around them using our Snowflake Circle Frame Dies. As a final finishing touch I pulled out some old school red We R Memory Keeper eyelets from my stash and threaded them with some pink twine.

Sunny Studio Hedgehog Christmas Gift Tags (using Hedgey Holidays Stamps, Holiday Cheer Paper, Scalloped Circle Tag & Snowflake Circle Frame Dies)

Here's a look at the back of my tags. While I'll often die-cut two tags and adhere them together back-to-back to make them sturdy and look beautiful on both sides, I thought the print on the back of my red gingham paper worked with my color scheme.  My tags also were already quite thick with the three layers of cardstock so I decided to just heat embossed my "to" and "love" onto the back using our Season's Greetings Stamps.

Sunny Studio Hedgehog Christmas Gift Tags (using Hedgey Holidays Stamps, Holiday Cheer Paper, Scalloped Circle Tag & Snowflake Circle Frame Dies)


For my last set of gift tags today I used Mr. & Mrs. Claus with a boy and girl elf from our North Pole Stamps and Dies. I pulled out my Build-a-Tag 2 dies and cut out the blue tone-on-tone Christmas print from our Very Merry Paper pack. 

I kept my tags fairly simple making sure to leave room to stamp my "to" and "love" using our Inside Greetings Holiday Stamps. I added a little snowy hill for them using our Slimline Nature Border dies and die-cut some hearts as an accent using the mini hearts from our Basic Mini Shape Dies 2 and some red striped paper from our Striped Silly Paper pack.

Sunny Studio: Santa, Mrs. Claus & Elf Christmas Gift Tags (using North Pole Stamps, Build-a-Tag 2 Dies, Slimline Nature Border dies & Holiday Cheer Paper)

Before I go, I just want to share that we have one of two ongoing discount codes you can use at checkout when shopping in our store.


In honor of the event we are giving away a $25 gift code to our store. Make sure you head over to Tracey's blog for additional details and to see loads more Sunny Studio gift tag ideas.

Here's a full look at all the company's participating in this year's event.

25 Days of Christmas Tags 2020 Holiday Sponsors

Sunny Studio Supplies:

Holiday Cheer 6x6 Paper
Shop at:
Sunny Studio
Build-A-Tag #1 Dies
Build-A-Tag #1 Dies
Shop at:
Sunny Studio
Build-A-Tag #2 Dies
Build-A-Tag #2 Dies
Shop at:
Sunny Studio
Snowflake Circle Frame
Shop at:
Sunny Studio


Slimline Nature Borders
Shop at:
Sunny Studio
Classy Christmas Stamps
Shop at:
Sunny Studio
Hedgey Holidays Stamps
Shop at:
Sunny Studio
Hedgey Holidays Dies
Shop at:
Sunny Studio
North Pole Stamps
North Pole Stamps
Shop at:
Sunny Studio
North Pole Dies
North Pole Dies
Shop at:
Sunny Studio
Retro Ornaments Stamps
Shop at:
Sunny Studio
Retro Ornaments Dies
Shop at:
Sunny Studio

Very Merry 6x6 Paper
Shop at:
Sunny Studio
Scalloped Tags-Circle
Shop at:
Sunny Studio
Hero Arts White Detail
Shop at:
Sunny Studio
VersaMark Watermark Ink
Shop at:
Sunny Studio

Thursday, May 21, 2020

Grad Cat Cards with Vanessa and Anja

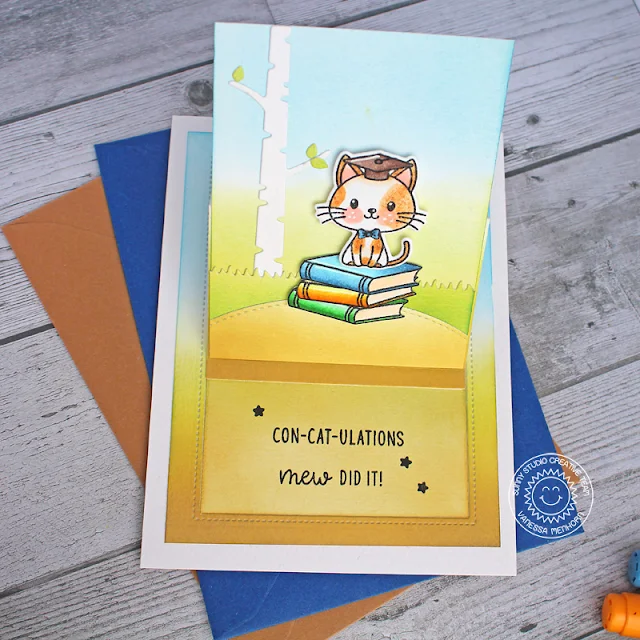
Hello to you! Vanessa here with a slider card using the adorable Grad Cat stamps set. I am sorry for the grads not being able to celebrate the usual way this year. I hope a card like this will brighten someone's day:

Sunny Studio Stamps: Grad Cat Sliding Window Dies Rustic Winter Dies Graduation Themed Card by Vanessa Menhorn

I first inked a panel of white cardstock with brown, green and blue Distress Oxide Inks and die-cut the Sliding Window Die from it. Now I trimmed a rectangle to fit the sliding window and inked this, too. I die-cut a little hill using the Stitched Oval Dies and grass using the Comic Strip Everyday Dies, inked those and adhered them to the panel. I added a birch tree from the Rustic Winter Dies and adhered the panel to the sliding part. Then I stamped the cat and the books, colored the images with Copics, fussy-cut the books and die-cut the cat and adhered the elements to the front.

Sunny Studio Stamps: Grad Cat Sliding Window Dies Rustic Winter Dies Graduation Themed Card by Vanessa Menhorn

For the inside, I trimmed a small rectangle to fit into the space, inked it and stamped the sentiment and stars before adhering the piece to the card.

Wishing you all a happy day, thanks for stopping by!

------------------------------------------------------

Hello everyone, Anja here and today's featured product is the cute Grad Cat Stamps mini set. Now and then, I like to create something different than cards, so I came up with this little backpack made with the Sweet Treat Bag Dies.

Sunny Studio Stamps: Grad Cat Sweet Treat Bag Dies Build-A-Tag Dies Graduation Themed Gift Bag Anja Bytyqi

I combined some patterned papers from the Dots & Stripes Pastels and the Surprise Party paper packs. For the small pocket, I used the Build-A-Tag #2 Dies. The straps and handle were made from navy ribbon and the bag is closed with a piece of Velcro underneath the flap. 

Sunny Studio Stamps: Grad Cat Sweet Treat Bag Dies Build-A-Tag Dies Graduation Themed Gift Bag Anja Bytyqi

Next, I stamped the cat and book in Memento Tuxedo Black Ink and colored them with Copic Markers. I cut out the images with the coordinating dies. The sentiment was stamped onto a white cardstock banner.

Thank you so much for stopping by! Wishing you a wonderful day!

Sunny Studio Supplies Used:

Comic Strip Everyday Dies
Shop at:
Sunny Studio
Sliding Window Dies
Sliding Window Dies
Shop at:
Sunny Studio
Build-A-Tag #2 Dies
Build-A-Tag #2 Dies
Shop at:
Sunny Studio
Rustic Winter Dies
Rustic Winter Dies
Shop at:
Sunny Studio
Stitched Oval Dies
Stitched Oval Dies
Shop at:
Sunny Studio
Dots & Stripes Pastels 6x6 Paper
Shop at:
Sunny Studio
Surprise Party 6x6 Paper
Shop at:
Sunny Studio
Sweet Treats Gift Bag
Shop at:
Sunny Studio
Grad Cat Stamps
Grad Cat Stamps
Shop at:
Sunny Studio
Grad Cat Dies
Grad Cat Dies
Shop at:
Sunny Studio