Showing posts with label Botanical Backdrop. Show all posts

Thursday, May 5, 2022

Inside Greetings Congrats Cards with Marieke and Marine

Hello Sunny Studio Friends. Marieke here, and for today's post I made two of the same cards only then slightly different. For both cards the process is the same except for the different colors and sentiments I used. 

Sunny Studio Stamps: Inside Greetings Congrats Card by Marieke Slaats (featuring Frilly Frame Eyelet Lace Dies, Baby Elephants)

Die cut the outer die from the Frilly Frames Eyelet Lace four times out of white cardstock and twice out of pattern paper. Scored two of the white die cut panels where the first scallop goes into the second and adhered the other white panel onto it above the score line so it becomes a top fold card base. Adhered the pattern paper on the front of the card.

Sunny Studio Stamps: Inside Greetings Congrats Card by Marieke Slaats (featuring Frilly Frame Eyelet Lace Dies, Baby Elephants)

Cut two white rectangles 3 1/4 x 4 1/2 inch and two white rectangles 3 x 4 1/4 inch. Ink Blended some clouds on the smallest rectangles and adhered them together. Stamped the sentiments from the Inside Greetings Congrats directly onto the card and added the panel to the card bases using foam tape.

Used Copic Colors:
Bright Yellow - Y17, Y15, Y13, Y11
Soft Yellow - Y04, Y02, Y00, Y000
Elephant - C5, C3, C1, C0, C00, 0 / W5, W3 / R20, R00, R000, R0000

Sunny Studio Stamps: Inside Greetings Congrats Card by Marieke Slaats (featuring Frilly Frame Eyelet Lace Dies, Baby Elephants)

Stamped the images out of the Baby Elephant stamp, colored them up using my Copic markers and die cut them using the Baby Elephant Dies. Adhered them onto the card using foam tape.

--------------------------------------------

Hi crafty friends, Marine here, super happy to be back on the blog with more Summer Release inspiration! Today I'm showcasing the Inside Greetings Congrats stamp set on my card, I picked two sentiments from that set and created a sweet and fun underwater baby card.

Sunny Studio Stamps: Inside Greetings Congrats Card by Marine Simon (featuring Botanical Backdrop Dies, Fintastic Friends, Sea You Soon)

The first thing I did was to stamp my cute shark family using an alcohol marker friendly black ink. The shark on the left is from Fintastic Friends, the one on the right and the baby are from Sea You Soon. I cut them using the coordinating dies and colored them using my alcohol markers. And to fit the blue background I had in mind, I picked blue grey shades to color the sharks.

Sunny Studio Stamps: Inside Greetings Congrats Card by Marine Simon (featuring Botanical Backdrop Dies, Fintastic Friends, Sea You Soon)

Next I cut a 5,5 x 4,25" bristol panel and used salvaged patina, peacock feathers and blueprint sketch oxide inks to create my underwater background.

I cut the Botanical Backdrop out of navy cardstock to create underwater foliage, and white heat embossed my two sentiments from Inside Greetings Congrats on my panel: one in the top left corner and one in the bottom right corner. I stuck the foliage frame on the panel, added highlights on the leaves using a white gel pen, and then attached the shark family in the middle of the card using foam squares.

Sunny Studio Stamps: Inside Greetings Congrats Card by Marine Simon (featuring Botanical Backdrop Dies, Fintastic Friends, Sea You Soon)

I added more highlights on the images, and finally I added a few clear droplets here and there to match the underwater theme and also fill up the empty spaces. And that's it! Love those sharks with their happy faces, and this small fish isn't supposed to be a shark but he definitely looks like their baby, right?

Sunny Studio Stamps: Inside Greetings Congrats Card by Marine Simon (featuring Botanical Backdrop Dies, Fintastic Friends, Sea You Soon)

I hope you like this sweet and cute underwater baby card. Feel welcome to check the process video for more details (click on the image above!). Thanks for stopping by, and see you next week!

Sunny Studio Supplies Used:

Botanical Backdrop Die
Shop at:
Sunny Studio
Frilly Frames-Eyelet Lace
Shop at:
Sunny Studio
Sea You Soon Stamps
Sea You Soon Stamps
Shop at:
Sunny Studio
Sea You Soon Dies
Sea You Soon Dies
Shop at:
Sunny Studio
Baby Elephants Stamps
Shop at:
Sunny Studio
Baby Elephants Dies
Baby Elephants Dies
Shop at:
Sunny Studio
Fintastic Friends Stamps
Shop at:
Sunny Studio
Fintastic Friends Dies
Shop at:
Sunny Studio
Inside Greetings Congrats
Shop at:
Sunny Studio

Tuesday, February 15, 2022

Spring Greenery Cards with Kavya and Isha

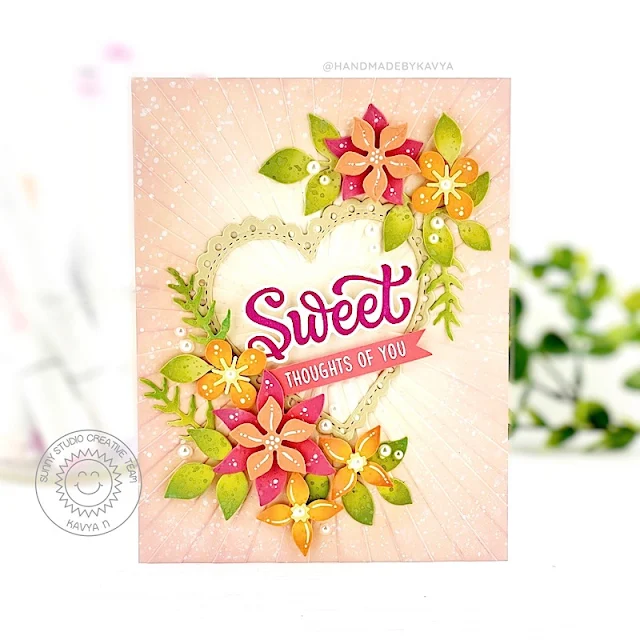
Hi folks, Kavya here. I am back on the blog with another fun project! It’s been a while since I have made a card with dies as the center of attention and this one was especially fun to create as it included florals! Before I got into stamping, I was into punch craft florals… talk about a Throwback Tuesday!

Sunny Studio Stamps: Spring Greenery Card by Kavya (featuring Scalloped Heart Dies, Stitched Heart Dies, Botanical Backdrop Dies, Window Quad Dies)

I first started off by ink blending the edges of cream cardstock with Tattered Rose distress oxide inks and embossed it using a Sunburst embossing folder. 

Sunny Studio Stamps: Spring Greenery Card by Kavya (featuring Scalloped Heart Dies, Stitched Heart Dies, Botanical Backdrop Dies, Window Quad Dies)

Then, I created a heart frame using the new Scalloped Heart and Stitched Heart 2  dies. Later, I die cut a bunch of florals and leaves from colored cardstock using Spring Greenery DiesBotanical Backdrop Die and Window Quad Circle Dies. To make them more realistic, I ink blended the edges using coordinating distress oxide inks and splattered some paint!!

Finally, I finished it off by using adding a sentiment from Candy Shoppe stamp and added some fun Ivory Lace Pearls.

That’s it! I hope you liked this fun project :) Happy Crafting!

--------------------------------------------

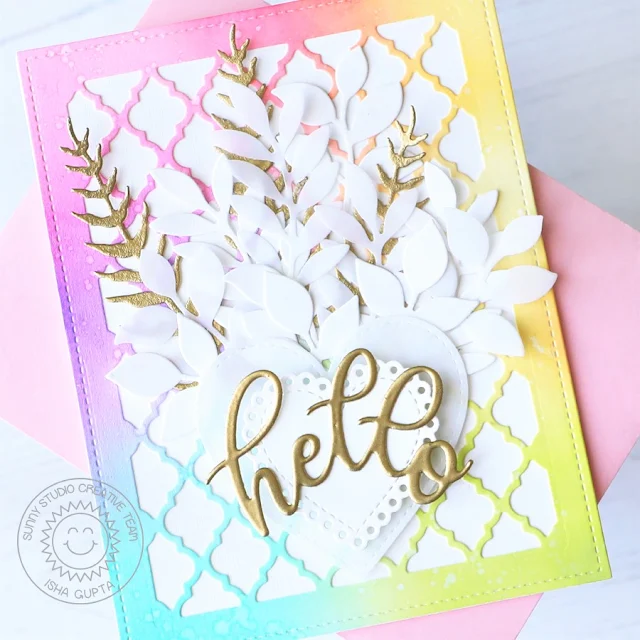
Hello everyone! Isha here back here with you with a rainbow colored card featuring the beautiful Spring Greenery dies. I went with a layered look again and some spring colours. Am I longing for spring or what...lol.

Sunny Studio Stamps: Spring Greenery Card by Isha Gupta (featuring Scalloped Heart Dies, Stitched Heart Dies, Frilly Frame Dies, Slimline Dies)

To start, I sponged a white card using wilted violet, wild honey, peacock feathers, twisted citron, picked raspberry distress inks. Flick water for some texture. Die-cut this piece using the Frilly Frames Quatrefoil plate. Adhere this to a white cardbase.

Die-cut a heart from white vellum using the Stitched Hearts 2 dies and a white Scalloped Heart dies. Die-cut some Spring Greenery using white card and vellum. Add versamark ink to the ferns, sprinkle WOW! gold embossing powder, heat emboss.

Sunny Studio Stamps: Spring Greenery Card by Isha Gupta (featuring Scalloped Heart Dies, Stitched Heart Dies, Frilly Frame Dies, Slimline Dies)

Die-cut HELLO from the Slimline Scalloped Frame die. Add versamark ink and emboss using gold embossing powder. Adhere the hearts to the card using 3d foam. Create a cluster of leaves as per your liking. Adhere to the card. To finish, adhere the sentiment. 

Thank you for dropping by. Have a nice day!

Sunny Studio Supplies Used:

Candy Shoppe Stamps
Candy Shoppe Stamps
Shop at:
Sunny Studio
Botanical Backdrop Die
Shop at:
Sunny Studio
Frilly Frames Quatrefoil
Shop at:
Sunny Studio
Slimline Scalloped Frame
Shop at:
Sunny Studio
Window Quad Circle Die
Shop at:
Sunny Studio
Scalloped Heart Dies
Shop at:
Sunny Studio
Stitched Heart 2 Dies
Shop at:
Sunny Studio
Spring Greenery Dies
Shop at:
Sunny Studio

Thursday, November 11, 2021

Lazy Christmas Cards with Marine and Anja

Hey crafty friends, Marine here, I'm so happy to share with you this new holiday shaker card showcasing the lovely Lazy Christmas stamp set that features two super cute sloths. I stamped those cuties as well as two branches on white cardstock using an alcohol marker friendly black ink, cut them using the coordinating dies and then used my alcohol markers to color them.

Sunny Studio Stamps: Lazy Christmas Botanical Backdrop Dies Christmas Card by Marine Simon

After the coloring I moved on to the background and started by creating a turquoise panel. I cut a 5,5 x 4,25" Strathmore bristol panel and applied salvaged patina oxide ink all over the panel and then peacock feathers oxide ink on the edges to bring more contrast.

As always I added lots of splatters on the panel to make it less flat and more interesting: water, peacock feathers + water, liquid stardust + water and copic opaque white ink + water.

To frame the card, and give the sloths a habitat, I cut a Botanical Backdrop out of a dark green cardstock, and added a little bit of white splatters on those leaves as well. And to make this jungle card even more festive, I cut another Botanical backdrop out of a silver glitter cardstock. I attached the dark green botanical frame on top of the silver glitter frame, but turned the dark green frame so that the leaves don't match.

Sunny Studio Stamps: Lazy Christmas Botanical Backdrop Dies Christmas Card by Marine Simon

I cut a 5,5 x 4,25" heat resistant acetate panel that I placed in my misti tool, placed some stamps right in the middle of the acetate to create my sentiment and picked them up with the door of the misti tool. I applied powder all over the acetate panel using my powder bag to make it antistatic, and then I stamped my sentiment using clear embossing ink. I sprinkled white embossing powder on the ink and used my heat gun to melt the powder.

I attached the acetate panel at the back of the botanical frame using liquid glue at the back of the frame on the four edges and foam squares at the back of some leaves to bring some dimension.

Sunny Studio Stamps: Lazy Christmas Botanical Backdrop Dies Christmas Card by Marine Simon

Stuck two layers of foam strips at the back of the frame on the four edges, and used my powder brush tool to apply a generous amount of powder all along the foam strips. This will keep the sequins away from the foam strips. I cleaned the acetate using a microfiber cloth, and poured a mix of sequins directly on the acetate, I carefully peeled the backing papers off the foam strips, and then I stuck my oxide panel on the foam strips to totally close the my shaker panel.

Next I attached the two little sloths and the branches. I used glue dots to stick the branches and foam squares to stick the sloths. And finally I added highlights and details on the images using a white gel pen.

Sunny Studio Stamps: Lazy Christmas Botanical Backdrop Dies Christmas Card by Marine Simon

And that's it, we have a super fun and festive shaker card that features the cutest little sloths, and I hope that you like it. Feel welcome to check the process video (click on the photo above), and I will see you next week with a new card!

----------------------------------------------------

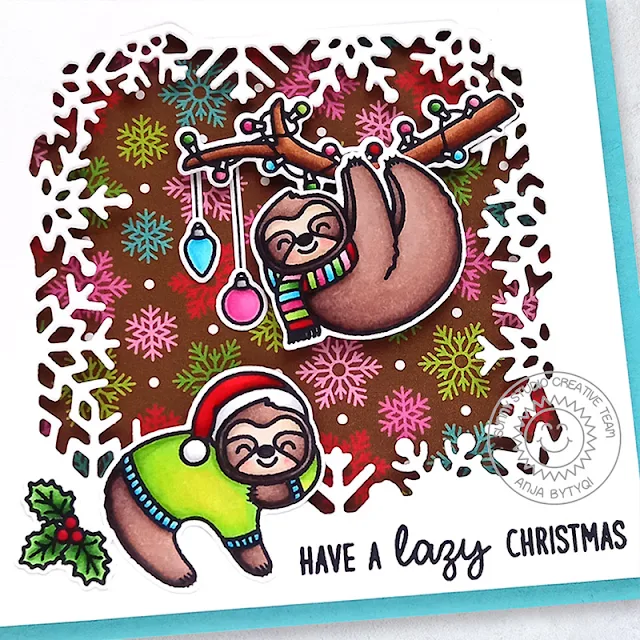
Hi everyone, Anja here and today I'm back with another holiday card showcasing the Lazy Christmas Stamps. These sloths are just the cutest!

Sunny Studio Stamps: Lazy Christmas Layered Snowflake Frame Dies Christmas Card by Anja Bytyqi

First, I started off with a 4 3/8" x 4 3/8" card base and trimmed down a piece of white cardstock to 4" x 4". I ran it through my die cutting machine with one of the Layered Snowflake Frame Dies. The patterned paper that went behind the opening is from the All Is Bright 6x6 Paper pack. The sentiment was stamped in VersaFine Onyx Black Ink. To create a bit of dimension, I adhered the snowflake frame with foam tape.

Sunny Studio Stamps: Lazy Christmas Layered Snowflake Frame Dies Christmas Card by Anja Bytyqi

Next, I stamped the images in Memento Tuxedo Black Ink and colored them with Copic Markers. I cut everything out with the coordinating dies. I used foam tape again to pop up my images. Only the Christmas baubles and the holly & berries were adhered flat with liquid glue.

Thank you so much for stopping by! Have a wonderful day!

Sunny Studio Supplies Used:

Lazy Christmas Stamps
Shop at:
Sunny Studio
Lazy Christmas Dies
Lazy Christmas Dies
Shop at:
Sunny Studio
Botanical Backdrop Die
Shop at:
Sunny Studio
Layered Snowflake Frame
Shop at:
Sunny Studio
All Is Bright Paper
All Is Bright Paper
Shop at:
Sunny Studio

Thursday, July 22, 2021

Cupcake Shaped Die Focused Cards with Anja and Vanessa

Hello everyone, Anja here today sharing a fun shaped birthday card made with the Cupcake Shape Dies. Who wouldn't want to receive a big yummy cupcake like this?!

Sunny Studio Stamps: Cupcake Shape Die Slimline Dies Woodsy Autumn Birthday Card by Anja Bytyqi

These dies are so easy to work with! First, I cut out the base from white cardstock. The cupcake pieces were cut from Bristol smooth cardstock, Kraft cardstock and Gingham patterned paper (Gingham Pastels 6x6 Paper).

I went with some sort of Vanilla frosting and blended on a bit of Antique Linen Distress Oxide Ink. I also added tiny ink splatters with a paint brush. Next, I inked the edges of the cake portion die-cut with Frayed Burlap and splattered on lots of ink to create texture. The die for the wrapper piece creates some fine lines which I enhanced with Copic Markers.

Sunny Studio Stamps: Cupcake Shape Die Slimline Dies Woodsy Autumn Birthday Card by Anja Bytyqi

To decorate the cupcake wrapper, I stamped the adorable baking fox from the Woodsy Autumn set in Memento Tuxedo Black Ink. I masked off the original pie and replaced it with a little cupcake included in the Party Pups set. I colored the image as well as the cherry die-cut with Copics. I fussy cut the fox and applied a thick layer of Glossy Accents to the red part of the cherry to make it look shiny and dimensional.

I die cut the word 'congrats' from the Slimline Scalloped Frame Dies set out of turquoise glitter cardstock and adhered it to the frosting. The birthday sentiment (Sealiously Sweet Stamps) was stamped in VersaMark Ink onto black cardstock strips and I heat embossed it in white. Finally, I popped up the fox with foam tape.

Thank you so much for stopping by! Wishing you a sweet day!

------------------------------------------------

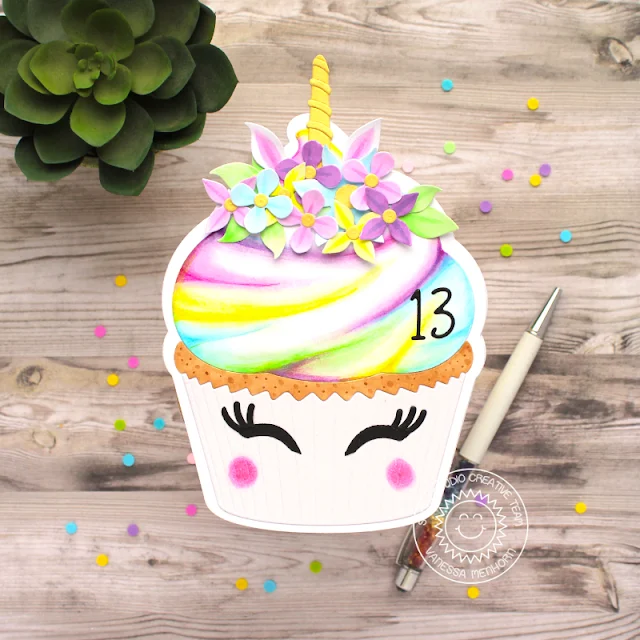
Hello to you! Vanessa here with a cute unicorn card using the Cupcake Shape Dies. I can't tell you how much I love this die! Here I created a card for my girl's birthday, no stamping included this time:

Sunny Studio Stamps: Cupcake Shape Die Loopy Letter Dies Botanical Backdrop Dies Birthday Card by Vanessa Menhorn

First, I created a card base from two large cupcake silhouettes. Now I die-cut the cupcake shapes from white cardstock, colored them with Copic markers and adhered them to the card. I die-cut the candle from gold cardstock, rounded the bottom and adhered it upside down for the horn. Then I die-cut the flowers and leaves from Botanical Backdrop Die from white cardstock, colored them with Copics and adhered the pieces to the cupcake, popping-up some elements with foam tape.

Supplies:
Cupcake Shape Dies
Botanical Backdrop Die
Loopy Letters Dies

Sunny Studio Stamps: Cupcake Shape Die Loopy Letter Dies Botanical Backdrop Dies Birthday Card by Vanessa Menhorn

The ears of my unicorn are made with the leaves dies and simply colored differently. Finally, I die-cut the 13, the eyes (made with the leaves die again) and the lashes (the stripes from the candle) from black cardstock and adhered everything.

I love how this turned out, exactly what I had in mind! I hope this inspires you to take a closer look at your supplies and see what you can make of them :) Thanks for stopping by!

Sunny Studio Supplies Used:

Cupcake Shape Dies
Cupcake Shape Dies
Shop at:
Sunny Studio
Party Pups Stamps
Party Pups Stamps
Shop at:
Sunny Studio
Party Pups Dies
Party Pups Dies
Shop at:
Sunny Studio
Loopy Letters Dies
Loopy Letters Dies
Shop at:
Sunny Studio
Gingham Pastels 6x6 Paper
Shop at:
Sunny Studio
Botanical Backdrop Die
Shop at:
Sunny Studio
Woodsy Autumn Stamps
Shop at:
Sunny Studio
Woodsy Autumn Dies
Woodsy Autumn Dies
Shop at:
Sunny Studio
Sealiously Sweet Stamps
Shop at:
Sunny Studio
Slimline Scalloped Frame
Shop at:
Sunny Studio

Friday, February 19, 2021

Country Scenes Cards with Candice and Tammy

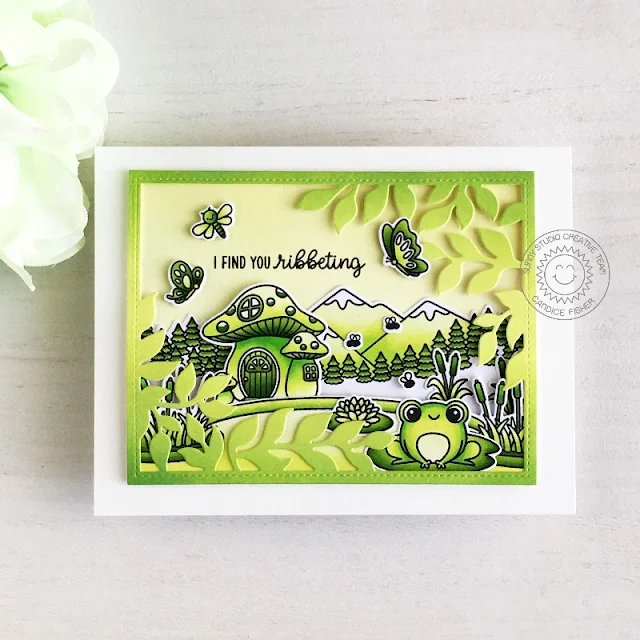
Hi my crafty friends! Candice with you today with a fun green monochromatic card using the fun new Country Scenes stamp set!

Sunny Studio Stamps: Country Scenes Feeling Froggy Garden Fairy Botanical Dies Everyday Card by Candice Fisher

I used these 
Sunny Studio products for my card:

For my background, I began by inking a piece of Bristol Smooth cardstock with mowed lawn, twisted citron and shabby shutters and cut it out with the Botanical Backdrop die. I then trimmed another piece of Bristol Smooth cardstock to fit behind the frame and inked it lightly with shabby shutters.

Sunny Studio Stamps: Country Scenes Feeling Froggy Garden Fairy Botanical Dies Everyday Card by Candice Fisher

Next, I stamped the pond, the mountains with pine trees, mushroom house, frog, butterflies and flies from the stamp sets listed above, colored them with green Copic markers (listed at the end of my post) and used the coordinating dies to cut them out. To put the card together, I glued the frog and lily pond to the pond and adhered this to back of the frame. I lined up the mountains and glued that to the inked panel and used foam tape to add the frame over this. I then used glue or foam tape to tuck the other images in giving the scene lots of dimension! I finished by stamping the sentiment with Versafine black ink!

Green Copic Markers used: YG17, YG25,YG05, YG03, YG01, YG00 & YG0000

If you haven't tried a monochromatic card, you should pick your favorite color and give it a go, it is fun to see the results! Thank you for visiting today!

------------------------------------------------

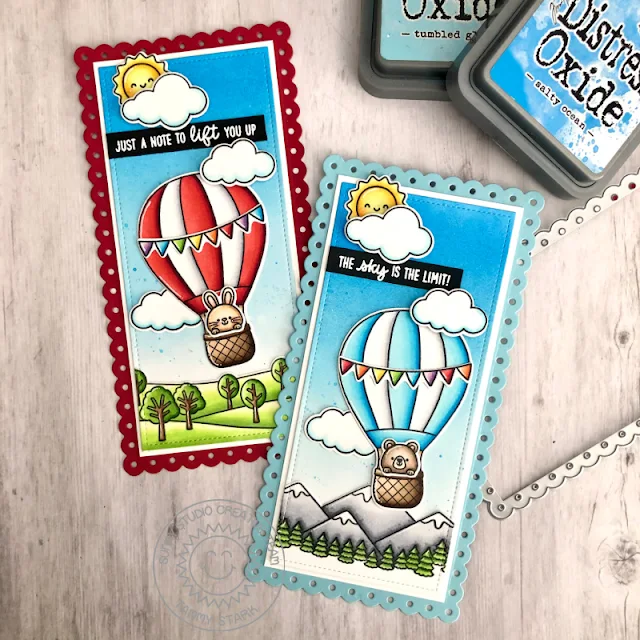
Hi friends! Tammy with you today sharing these fun Mini Slimline cards, featuring the Country Scenes stamp set. Of course I had to add the adorable set, Balloon Rides to compliment these sweet little country scene cards!

Sunny Studio Stamps: Country Scenes Balloon Rides Slimline Dies Everyday Cards by Tammy Stark

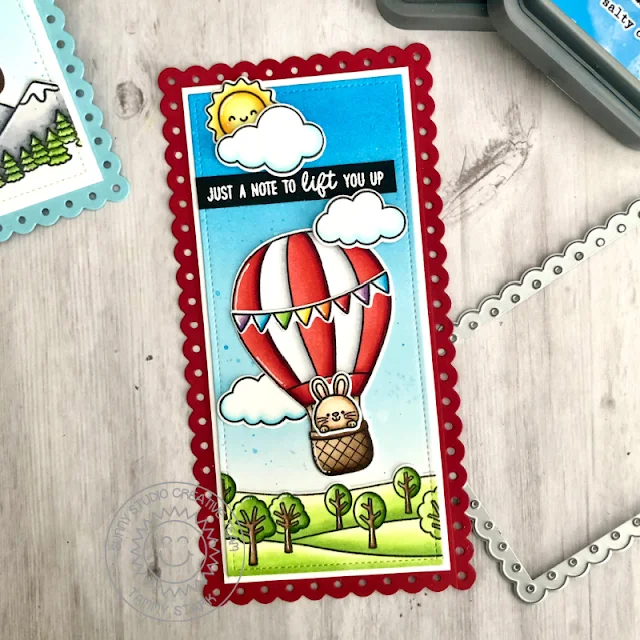
To begin, I cut red and blue cardstock using the Slimline Scalloped Frame Dies. To create the mini slimline size, I repositioned the slimline scallop die onto the die cut rectangles and ran it through my die cutting machine to give me a finished size of approximately 3 1/2 X 6 1/2". Next, using Bristol smooth cardstock, I cut the smaller rectangle the same way, repositioning the die and cutting again using the Slimline Die. I inked the backgrounds with Salty Ocean and Tumbled Glass Distress Oxide inks and matted onto white cardstock before attaching to the scalloped rectangles.

Sunny Studio Stamps: Country Scenes Balloon Rides Slimline Dies Everyday Cards by Tammy Stark

Next, I stamped, colored with Copic markers, and die cut images from the following sets:
Country Scenes StampsCoordinating Dies
Balloon Rides StampsCoordinating Dies

I die cut the Country Scenes with the smaller rectangle from the Slimline Scalloped Frame Dies to fit perfectly onto my background. Next, I attached the stamped images to my cards, using foam tape on some for dimension.

Sunny Studio Stamps: Country Scenes Balloon Rides Slimline Dies Everyday Cards by Tammy Stark

Lastly, I white heat embossed the sentiments onto a strip of black cardstock and attached my card fronts to a white 3 1/2 X 6 1/2" card base to complete my cards.

I hope you enjoyed my mini cards today and you are inspired to make a mini slimline card, they are so much fun!! Thanks so much for stopping by!

Sunny Studio Supplies Used:

Botanical Backdrop Die
Shop at:
Sunny Studio
Slimline Scalloped Frame
Shop at:
Sunny Studio
Balloon Rides Stamps
Shop at:
Sunny Studio
Balloon Rides Dies
Balloon Rides Dies
Shop at:
Sunny Studio
Country Scenes Stamps
Shop at:
Sunny Studio
Country Scenes Dies
Country Scenes Dies
Shop at:
Sunny Studio
Feeling Froggy Stamps
Shop at:
Sunny Studio
Feeling Froggy Dies
Feeling Froggy Dies
Shop at:
Sunny Studio
Garden Fairy Stamps
Garden Fairy Stamps
Shop at:
Sunny Studio
Garden Fairy Dies
Garden Fairy Dies
Shop at:
Sunny Studio