Showing posts with label Blooming Frame Die. Show all posts

Tuesday, June 9, 2020

Sealiously Sweet Cards with Leanne and Mindy

Hello everyone, Leanne here! With our spring days getting warmer and warmer, this has me dreaming of all things summer. One of my favorite summer treats is fresh watermelon. When I saw the little seal with a slice of watermelon in Sealiously Sweet, I knew I had to make a card centered around a watermelon theme. 

Sunny Studio Stamps: Sealiously Sweet Sweet Word Die Blooming Frame Dies Botanical Backdrop Dies Everyday Card by Leanne West

I started with an A2 size card base. I used some watermelon patterned paper from the Summer Splash pad to cover the card front. I trimmed a white card stock panel to 5" tall by 3.75" wide and die cut a 3" circle out of it. 

I backed the circle opening with an ink blended background panel. I used three shades of Distress Oxide ink - Festive Berries, Worn Lipstick, and Twisted Citron. Copics used: YG11, YG13,YG17, C00, C1, C3, C5, RV13, RV21, RV25, R00.

Sunny Studio Stamps: Sealiously Sweet Sweet Word Die Blooming Frame Dies Botanical Backdrop Dies Everyday Card by Leanne West

I Copic colored the seals and watermelon from Sealiously Sweet. I added them to the center of the circle and then stamped part of the greeting right above them. To complete the greeting I used the Sweet Word Die. To accent the scene, I added some die cut flowers and leaves. The flower is from the Blooming Frame die set. The leaf is from Botanical Backdrop. One last thing I did to complete this card design, is add the striped border which is a piece of patterned paper from Striped Silly.  

--------------------------------------------------------

Hello! It’s Mindy from My Creative Scoop. Today I‘m sharing a card made with these adorable seals from the Sealiously Sweet Stamp Set.

Sunny Studio Stamps: Sealiously Stitched Semi-Circle Dies Birthday Card by Mindy Baxter

I used my Tim Holtz Distress Oxide Inks, Peacock Feathers and Salty Ocean to create my water. I also used the Stitched Semi-Circle Dies to create the shape of my water. I just took a card-front piece of cardstock and then left out the corner of the cardstock so it wasn’t being cut by the die.

I stamped my images in Memento Black ink onto my Copic Xpress it Blending Card.
Here’s a list of Copics I used: Seals – N1, N3, N5, R32, R30; Inter-tubes – R32, R30, Y02, Y000, YG13, YG17, BV02, BV000, BG13, BG11, YR12, YR00.

Sunny Studio Stamps: Sealiously Stitched Semi-Circle Dies Birthday Card by Mindy Baxter

Check out my Video Tutorial below on coloring and how I made this little seal float!!


I hope you enjoyed my card and video tutorial. Thanks for stopping by!

Sunny Studio Supplies Used:

Sweet Word Die
Sweet Word Die
Shop at:
Sunny Studio
Striped Silly 6x6 Paper
Shop at:
Sunny Studio
Botanical Backdrop Die
Shop at:
Sunny Studio
Summer Splash 6x6 Paper
Shop at:
Sunny Studio
Blooming Frame Die
Blooming Frame Die
Shop at:
Sunny Studio
Sealiously Sweet Stamps
Shop at:
Sunny Studio
Sealiously Sweet Dies
Shop at:
Sunny Studio
Stitched Semi-Circle Dies
Shop at:
Sunny Studio

Monday, June 1, 2020

Tea-riffic Cards with Lynn and Ashley

Hello there! It’s Lynn here and today I'm sharing a card I created featuring the sweet new Tea-rrific stamp set and coordinating dies.

Sunny Studio Stamps: Tea-riffic Spring Scenes Frilly Frame Dies Friendship Card by Lynn Put

To create my card, I started out by stamping several of the images from the Tea-rrific stamp set then coloring them using Copic markers and die cutting them out using the coordinating dies. For each of the tea cups and the tea pot, I added a flower, for the tea cups I used a flower from the Spring Scenes stamp set and coordinating dies and for the tea pot I used a flower from the Chickie Baby stamp set and coordinating dies

Sunny Studio Stamps: Tea-riffic Spring Scenes Frilly Frame Dies Friendship Card by Lynn Put

Next I die cut and stitched rectangle, stamped my sentiment along the top and adhered my images, popping up the blue and yellow tea cups with foam tape. For my background, I used the Frilly Frames Polka-Dot die and die cut it from white cardstock then trimmed down a piece of Classic Gingham yellow paper and adhered it on top. I added foam tape to the backside of my Frilly Frames piece and adhered it to my card base then added the rectangle with my images.

Thanks so much for stopping by!

------------------------------------------------------------

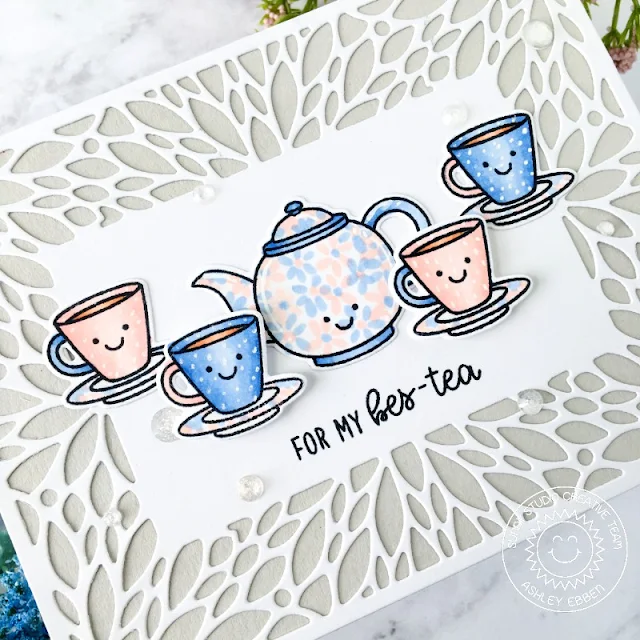
Hello everyone! It's Ashley with a cute friendship card featuring the new Tea-riffic mini set! This card looks fancy thanks to that beautiful Blooming Frame, but it actually comes together pretty quickly!

Sunny Studio Stamps: Tea-riffic Blooming Frame Dies Friendship Card by Ashley Ebben

I started by die cutting a piece of white cardstock using the Blooming Frame die. I used a shim and ran it through my machine a couple times to be sure I cut all those spaces out. I placed the frame on light grey cardstock for a nice neutral background for my images.

I stamped the images from Tea-riffic using Memento Tuxedo Black ink and colored with Copics. I made a floral petal pattern on the teapot to try to mimic the pattern in the Blooming Frame. I added some cute smiley faces and white gel pen accents before die cutting the images with the Tea-riffic dies.

Sunny Studio Stamps: Tea-riffic Blooming Frame Dies Friendship Card by Ashley Ebben

I added the images to the card, popping the front two cups up with foam squares. I used a sentiment from Summer Sweets to make this a friendship card and finished with a few Studio Katia Icy Sparkle crystals.

Thank you so much for stopping by! Have a wonderful day!

Sunny Studio Supplies Used:

Classic Gingham 6x6 Paper
Shop at:
Sunny Studio
Frilly Frames Polka-Dot
Shop at:
Sunny Studio
Chickie Baby Stamps
Chickie Baby Stamps
Shop at:
Sunny Studio
Chickie Baby Dies
Chickie Baby Dies
Shop at:
Sunny Studio
Spring Scenes Stamps
Shop at:
Sunny Studio
Spring Scenes Dies
Spring Scenes Dies
Shop at:
Sunny Studio
Blooming Frame Die
Blooming Frame Die
Shop at:
Sunny Studio
Summer Sweets Stamps
Shop at:
Sunny Studio
Tea-riffic Stamps
Tea-riffic Stamps
Shop at:
Sunny Studio
Tea-riffic Dies
Tea-riffic Dies
Shop at:
Sunny Studio

Saturday, April 4, 2020

Guest Designer Spotlight: Cards with Tatiana Trafimovich

Hi everyone, it's Tatiana Trafimovich here and I'm excited to be guest designing for Sunny Studio Stamps.

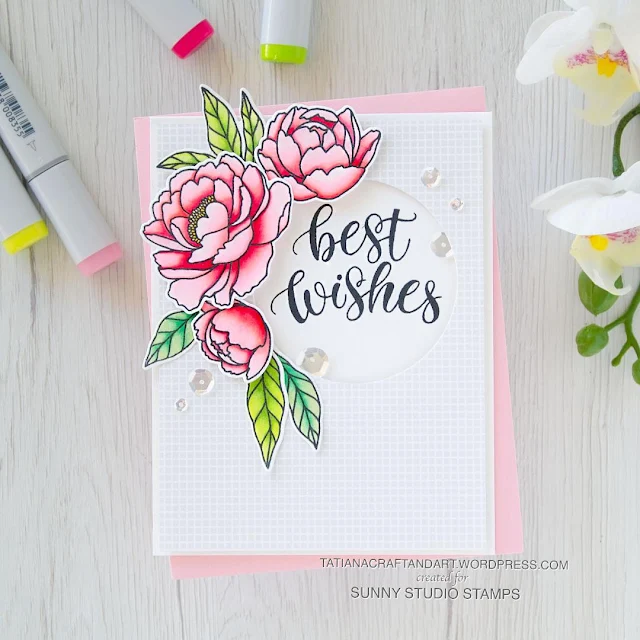
Sunny Studio Stamps: Pink Peonies Best Wishes Cards by Tatiana Trafimovich

My first card features beautiful Pink Peonies stamp and die sets. I decided for a clean and simple design since I wanted to keep the main focus on beautiful flowers and coloring. To start, I die cut three flowers and some leaves from Neenah Solar White paper using the coordinating dies. I saved the negative parts of all the dies and used them into my stamping positioning tool for a perfect alignment while I was stamping the open images from Pink Peonies stamp set with Memento Tuxedo Black ink since it's Copic friendly. 

Next I colored all the elements with Copic markers. In case you're wondering, here's the complete list of all the colors used on this project. Copics: RV0000-RV00-RV21-RV23-RV25-RV29; YG00-YG01-YG23-YG25; G02-G05-G40.

Sunny Studio Stamps: Pink Peonies Best Wishes Cards by Tatiana Trafimovich

Assembling all the elements together, I prepared an extended A2 size white card base (5 1/2" x 4 1/4") and a slightly smaller rectangle of a light grey patterned paper from Subtle Grey Tones paper pad where was cut out a circle window large enough to stamp "Best Wishes" sentiment inside. I popped all the piece on a foam tape for a fun dimensional look and finished with a few clear sparkling sequins and a coat of a clear shimmer pen.

Sunny Studio Stamps: Pink Peonies Best Wishes Cards by Tatiana Trafimovich

Working on my second project, I switched to watercolors. The easiest way to use this color media and achieve a great effect is to pair it with heat embossing. In fact, the heat embossing makes the stamp lines raised above the paper surface and keeps separate every single area avoiding the contamination of colors. This time I picked together all the flowers and leaves from Pink Peonies stamp set on my compact stamp press, inked them with VersaMark clear sticky ink, stamped on a piece of watercolor paper, sprinkled with a fine white embossing powder and zapped with the heat gun. I die cut all the heat embossed shaped using the coordinating dies and proceeded with coloring using some regular watercolors from my stash.

Sunny Studio Stamps: Pink Peonies Best Wishes Cards by Tatiana Trafimovich

Once finished with flowers and leaves, I decided to created a matching watercolor background and a heat embossed sentiment that was fussy with a pair of harp small scissors and then glued directly to the card base. The flowers were popped on a foam tape just for some little extra finish touch along with a few clear drops.

Sunny Studio Stamps: Blooming Frame Dies Best Wishes Cards by Tatiana Trafimovich

Next comes a card featuring die cutting technique and a wonderful Blooming Frame Die. To start, I trimmed and scored an extended A2 size green card base (5 1/2" x 4 1/4"). I die cut and glued on top of the card front the amazing Blooming Frame. Then I made more die cutting, working with a small flower die that comes as a part of Blooming Frame Die set. I grabbed some scraps of the colorful cardstock from my stash and created a bunch of colorful flowers and the same amount of white flower centers. 

Sunny Studio Stamps: Blooming Frame Dies Best Wishes Cards by Tatiana Trafimovich

I arranged all the die cut elements on the card front adhering some of them directly to the card base and popping the others on a foam tape. Finally I added a metallic gold sentiment from Pink Peonies stamp set that was heat embossed on a piece of vellum and fussy cut with scissors. As a final touch I added some tiny shimmer gold spots here and there to tie the sentiment with the rest of the card.

Sunny Studio Supplies Used:

Subtle Grey Tones Paper
Shop at:
Sunny Studio
Pink Peonies Stamps
Pink Peonies Stamps
Shop at:
Sunny Studio
Pink Peonies Dies
Pink Peonies Dies
Shop at:
Sunny Studio
Blooming Frame Die
Blooming Frame Die
Shop at:
Sunny Studio

Tuesday, March 31, 2020

Floating By Cards with Angelica and Mindy

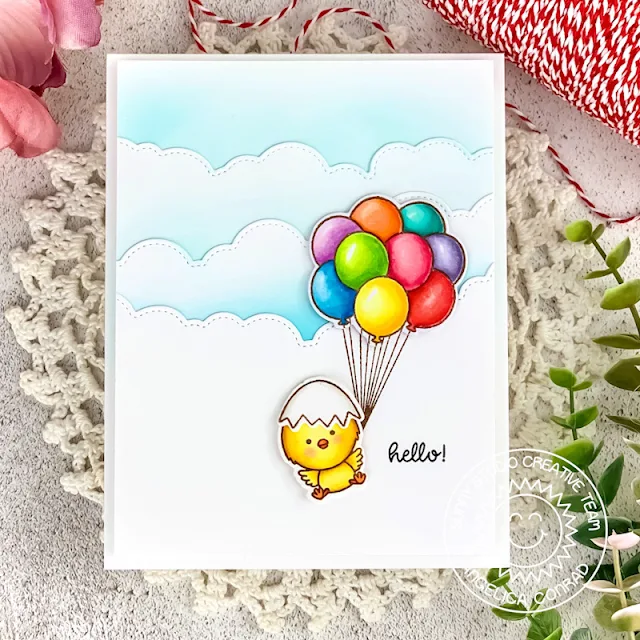
Hello friends! This is Angelica, and I have a sweet Hello card to share with you today. Dropping a quick card in the mail right now can really bring a smile to a loved one's face, and lift their spirits. This card is one I made for a dear friend.

Sunny Studio Stamps: Floating By Chickie Baby Fluffy Cloud Border Dies Everyday Card by Angelica Conrad

I used the balloons from Floating By stamp set to lift this cute chick up into the sky. The chick is from Chickie Babies stamp set. I colored the images with Comic markers. The background I made with Fluffy Clouds Border Dies

Sunny Studio Stamps: Floating By Chickie Baby Fluffy Cloud Border Dies Everyday Card by Angelica Conrad

I blended Sno Cone ink onto the clouds before adhering them together. I stamped Hello from Floating by onto the panel, and attached it to card base. I attached the die-cut Balloons and Chick to the card with thin foam squares.

That's all that I have for today! I hope you all are staying safe. Happy Crafting!

------------------------------------------------------------

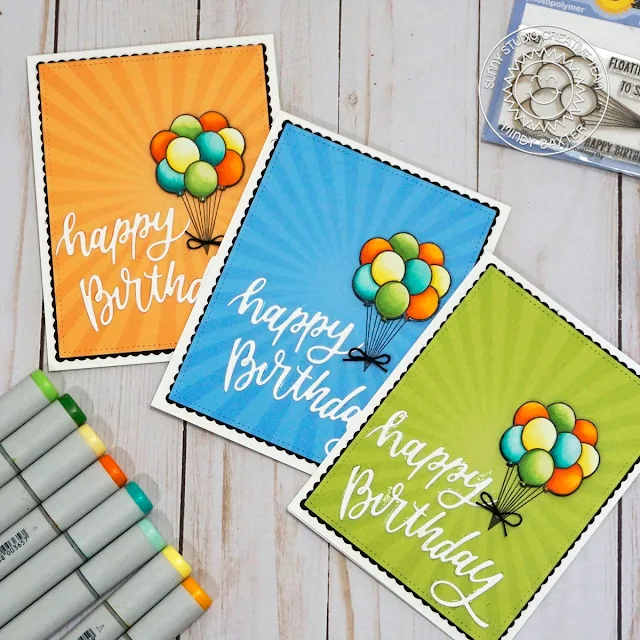
Hello! It’s Mindy from My Creative Scoop. Today I have a masculine Happy Birthday card to share. I really struggle with making masculine cards so I wanted to show you all how simple one can be to make.

Sunny Studio Stamps: Floating By Blooming Frame Die Frilly Frame Dies Birthday Card by Mindy Baxter

All you need is some patterned paper – this Spring Sunburst paper pad is perfect, a "Happy Birthday sentiment from the from the Blooming Frame Die and this Floating By stamp set. Since this card is a simple one I decided to break out the border dies and add a little extra detail. I used the Frilly Frame Striped Die (just the scalloped border) for the black border – which really makes it pop! I also used the Frilly Frame Retro Petal Die Border to cut out my patterned paper.

Sunny Studio Stamps: Floating By Blooming Frame Die Frilly Frame Dies Birthday Card by Mindy Baxter

I stamped my balloon image in Memento Black ink onto my Copic Xpress it Blending Card.
Here’s a list of Copics I used: Orange Balloon – YR09, YR07, YR04, Y17; Yellow Balloon – Y02, Y11, Y000, Y17; Teal Balloon – BG18, BG13, BG11, BG10; Green Balloon – YG17, YG13, G20

I stamped my balloons on the patterned paper and then fussy cut the colored balloons and then attached them to my patterned paper using some foam dots for some extra dimension.

Check out the video below on how I created my card.


Sunny Studio Supplies Used:

Spring Sunburst 6x6 Paper
Shop at:
Sunny Studio
Frilly Frames Stripes Die
Shop at:
Sunny Studio
Fluffy Clouds Border Dies
Shop at:
Sunny Studio
Frilly Frames Retro Petals Dies
Shop at:
Sunny Studio
Chickie Baby Stamps
Chickie Baby Stamps
Shop at:
Sunny Studio
Chickie Baby Dies
Chickie Baby Dies
Shop at:
Sunny Studio
Floating By Stamps
Floating By Stamps
Shop at:
Sunny Studio
Floating By Dies
Floating By Dies
Shop at:
Sunny Studio
Blooming Frame Die
Blooming Frame Die
Shop at:
Sunny Studio

Monday, March 23, 2020

Blooming Frame Cards with Lynn and Ashley

Hello there! It’s Lynn here and today I'm sharing a floral Easter card I created featuring the pretty Blooming Frame die.

Sunny Studio Stamps: Blooming Frame Dies Cheerful Daisies Easter Card by Lynn Put

The detail in the Blooming Frame die is beautiful and can be used in so many different ways to create a new look each time. For my card I wanted to create an Easter card using the Happy Easter sentiment from the Chickie Baby stamp set which I thought would look nice stamped in a die cut circle. So even though the Blooming Frames die, once it’s die cut, leaves a rectangle of card stock in the center, I decided to camouflage that with the flowers from the Cheerful Daisies stamp set.

To create my card, I started out with a white card base then added a panel of pale blue card stock. Next I used the Blooming Frame die and die cut it from a piece of white card stock and adhered it to my card front. After that I stamped my Happy Easter sentiment onto a white die cut circle and added that in the center of my card. 

Sunny Studio Stamps: Blooming Frame Dies Cheerful Daisies Easter Card by Lynn Put

Once that was done, I die cut several of the daisies from the Cheerful Daisies stamp set and stamped them in Daffodil Delight, Summer Sun, Pumpkin Pie, Hibiscus Burst, Raspberry Fizz ink, and Limeade Ice and New Leaf ink for the leaves. I added all of my stamped flowers and leaves around my circle sentiment popping up the largest yellow daisy with foam tape. To add a little sparkle, I glued on a few of the Iridescent Pastel Confetti and my card was complete.

Thanks so much for stopping by and have a great day!

-----------------------------------------------------------

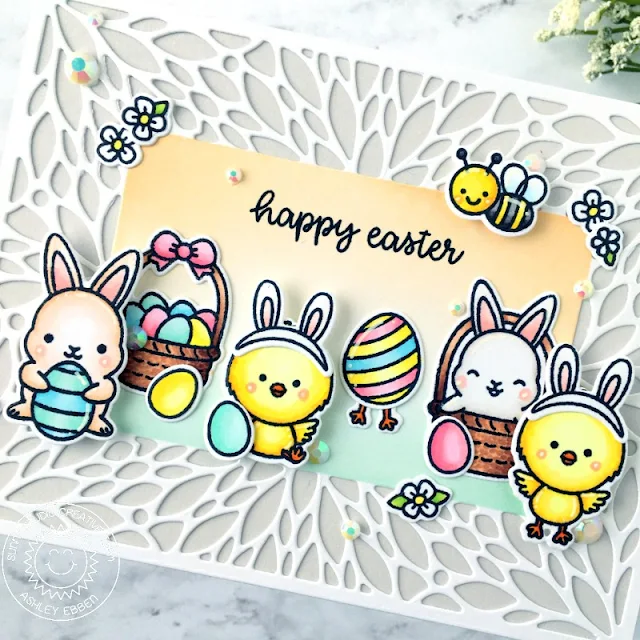
Hello friends! It's Ashley with a sweet Easter card featuring the Blooming Frame die and leftover images from my Chickie Baby card! I really love the extra interest this frame brings to the card. It is just so lovely!

Sunny Studio Stamps: Blooming Frame Dies Chickie Baby Chubby Bunny Just Bee-cause Easter Card by Ashley Ebben

I started by die cutting the Blooming Frame from white cardstock. I highly recommend using a shim for this die. I don't have anything fancy - just a could pieces of scrap cardstock does the trick! I didn't use the shim at first, so I had a few fuzzy edges on some of my openings from multiple pass through in the machine. 

I grabbed a stiff toothbrush and scrubbed them all away from the back - works like a charm! I masked off the frame so only the middle was left open. I blended a bit of Lawn Fawn Peach Fuzz and Minty Fresh inks before removing the tape and adding the frame to a piece of light grey cardstock.


Sunny Studio Stamps: Blooming Frame Dies Chickie Baby Chubby Bunny Just Bee-cause Easter Card by Ashley Ebben

I had a bunch of images leftover from my Chickie Baby card, so I decided to put them to good use here! When I make a scene card, I always stamp more images than I need and they usually go to waste so I was super happy to have a place for these ones. The images are from Chickie BabyChubby Bunny, and Just Bee-cause. I stamped them in Lawn Fawn Jet Black ink and colored with Copics before cutting them out with the matching dies. I finished the card with a "Happy Easter" sentiment from Happy Thoughts and a scattering of white jewels.

Thank you so much for stopping by! I hope you are all staying safe and well! Have a wonderful day.

Sunny Studio Supplies Used:


Happy Thoughts Stamps
Shop at:
Sunny Studio
Chubby Bunny Stamps
Chubby Bunny Stamps
Shop at:
Sunny Studio
Chubby Bunny Dies
Chubby Bunny Dies
Shop at:
Sunny Studio
Just Bee-cause Stamps
Shop at:
Sunny Studio
Just Bee-cause Dies
Just Bee-cause Dies
Shop at:
Sunny Studio
Cheerful Daisies Stamps
Shop at:
Sunny Studio
Cheerful Daisies Dies
Shop at:
Sunny Studio
Chickie Baby Stamps
Chickie Baby Stamps
Shop at:
Sunny Studio
Chickie Baby Dies
Chickie Baby Dies
Shop at:
Sunny Studio
Blooming Frame Die
Blooming Frame Die
Shop at:
Sunny Studio