Showing posts with label Birthday Smiles. Show all posts

Saturday, November 14, 2015

Sunny Saturday Share: School Time & Birthday Smiles Cards by Yainea


Hello there!  Today for our Sunny Saturday Share we have a special guest designer which I'm sure many of you know well.  Cristina "Yainea" Nunez is joining us!!!  I am such a huge fan so I was delighted when she agreed to squeeze us into her busy schedule and create some cute cards with a couple of our stamp sets.  :)


Her first card uses our School Time stamps.  I just adore the fun chalkboard treatment she gave her background and how realistic her apple looks with her beautiful shading!


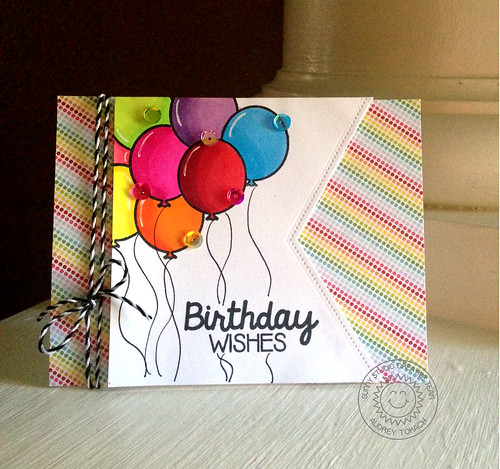
Up next is a card using our Birthday smiles stamps.  For this card, Yainea started by stamping the images in white pigment ink and then when it was fully dry she stamped over the images again in bright colors of dye ink.


I love how the colors pop against the kraft paper with this fun technique!  :)


Thank you Yainea for sharing your talents with us.  You're the best!  :)

Saturday, November 7, 2015

Sunny Saturday Share: Turkeys, Penguins & Ice Cream, Oh My!


Hello there!  It's time for another Sunny Saturday Share (although I think it's going to have to be more of a sunny state of mind since it is pouring cats and dogs right now in my neck of the woods).  ;)

I thought I would share some fun ideas I came across on the web this week using our stamps.  Up first we have three darling cards created by Becki Adams that she featured over on the Scrapbook Expo blog earlier this week.  Make sure to hop over there to see all oh her cards up close.  I love how she paper-pieced them all using our Happy Home and Harvest Happiness stamps!  So cute!


When I was surfing around Pinterest this week I also came across this darling card using our Snow Kissed stamps.  You can see more of her beautiful cards on her Pinterest board titled Cards by Nicola.


The last card was shared with us on our Flickr group by Graciellie Design.  Isn't it so yummy?!  I adore the sweet colors she chose, but most of all I love the texture she added to her ice cream scoops from our Birthday Smiles set!  So fun!  To see a tutorial on how she created this happy card, make sure to visit her blog HERE.  :)


I can't fully express how happy it makes me to stumble across your beautiful creations on the web.  I hope you will join these talented ladies and upload your projects to our flickr group, share them with us on our Facebook page or share them on instagram using the hashtag #sunnystudiostamps.

Thanks so much for visiting today.  I hope you enjoy the rest of your weekend!  :)

Big Hugs!

Friday, October 30, 2015

Birthday Smiles Hugs Card and Fishtail Banners Love Card with Marion

Hello, it's Marion here. I hope you have been enjoying all of the inspiration from the design team this week on the blog. Today I have two more cards to share with you.

The first card uses the Birthday Smiles stamp set. Who wouldn't love a huge ice cream like this? It's hard to tell from the photo, but the ice creams are covered with some Wink of Stella clear glitter brush pen, so they are really shimmery. I white heat embossed the images onto some water colour paper and then used Distress inks to colour them.


The sentiment is from the Furever Friends die set. I die cut 5 'hugs' words and adhered them together to form a thicker sentiment.


For my second card, I have used the Fishtail Banner dies to create a modern and graphic design. I ran the banner die cut through my machine several times to create smaller arrow shapes of varying thicknesses. I adhered these to a white piece of card stock leaving random spaced gaps between the arrows. Once again the sentiment and hearts are from the Furever Friends die set.


The hearts are are covered with a layer of black Ranger Enamel Accents for some shine and dimension.


Supplies used:
Thanks for visiting today,

Marion

Thursday, October 29, 2015

Birthday Smiles Banner Card & Cupcake Gift Tag with Elise

Hi everyone! It's Elise here to share a cute banner card featuring the Birthday Smiles stamp set. I think the banners that are included in the Birthday Smiles set are adorable, so I used a bunch of them to create a banner on a birthday card!


I stamped the banner onto different colors of patterned paper, cut out each banner, and attached it to my card with either foam tape or glue. The close up shows some of the different layers from the foam tape.


I also added a bunch of hearts onto each of the banners in different colors, and finished it by adding some twine bows to the end of the banner! So easy and cute!

I also made a birthday tag by using the Fishtail Banner Dies!


The top tag is cut from white card stock with the scalloped edge banner die, and the bottom layer is cut from patterned paper with the dotted edge banner die. I added the cupcake and heart, stamped the sentiment, and drew a border around the edge to finish the tag!

Thanks for stopping by and come back tomorrow for some more design team inspiration!! :)

Wednesday, October 28, 2015

Bright Birthday Smiles Balloon Card with Audrey

Hello there!  Audrey here with a bright and happy birthday card using the Birthday Smiles stamp set and the  Fishtail Banners dies!  

                      
I started off by die-cutting a piece of white cardstock with the Fishtail banners dies and chose to use the little dotted edge die from the set.  Then on that same panel, I stamped the open line balloon image, masked it off and stamped again, repeating this process until I was happy with how my bunch looked.  

I colored the balloons with my Copic markers and used a white gel pen to add highlights to each balloon.  I stamped the sentiment near the bottom right of the banner and then hand drew balloon strings with a black marker (but there is a string image in the stamp set if you prefer).  I cut a landscape orientated card base and added some brightly colored patterned paper to coordinate with my balloons, popping the panel up on the card base.  I added some twine and tied a bow on the left side of the card base, adding a fun scattering of sequins to finish things off.


Sunny Studio Birthday Wishes


That's all for me today!  I hope you enjoyed my bright birthday card!  Be sure to stop back again tomorrow for lots more inspiration from the design team! :)

Tuesday, October 27, 2015

Birthday Smiles Watercolor Ice Cream & Cherry Cards with Heidi

Hello everybody, Heidi here! This week we are introducing the "Birthday Smiles" stamp set, so I created this birthday card which was very simple to make, so I hope you will give it a try!
Let me show you the card and tell you a little bit more about it.


I created a watercolor wash for the background  using similar colors as those that I used for the scoops of ice cream.  I stamped the sentiment on to the left bottom corner of the right--These nice and bold sentiments can be stamped directly on the card panel (I love that).  I stamped and colored the cone and the scoops of ice cream using Copic Markers. I fussy cut the images and I popped them up on the right side of the card, on top of the watercolor wash. 

To finish the card I added a cherry from the "Birthday smiles" stamp set and some random sequins, picking up the colors of the card.

While I had my supplies out on my desk I created another quick card using the same cherry stamp from the set along with the fishtail banner dies to create a pennant for my heat embossed sentiment.


The adorable stamp set used for both of today's cards is available at the Sunny Studio Stamps shop, and it's a most have to create cute and fun card for birthdays or just to simply send a happy message.

Thanks so much for stopping by.  Don't forget to tag your projects on social media using the #SunnyStudioStamps so you can be featured on our Sunny Saturday Share.

Have a lovely day!

Monday, October 26, 2015

Snow Kissed Penguin Winter Birthday Card with Melissa

Hi everyone Melissa here. Today I have a card to share with you using the Birthday Smiles stamp set and the Fishtail Banner dies. I think the Birthday smiles set is so versatile and fun, I especially love the balloons and the ice-cream (I will have to be sure to use that in a future card!). 


To create this card I first marked out a rectangle on a piece of card, this would be the area for my scene. I die-cut a piece of masking paper and laid it where I wanted the snowy hill to be. I then stamped the little hearts and dots from the Birthday Smiles set onto the background with Versamark ink also adding some smaller dots with the Versamarker. I added white embossing powder and heat embossed those onto the background. 

After I had done that I added the inky sky. I did this by blending Faded Jeans, Chipped Sapphire and a Black Soot Distress Inks. I then stamped the balloon and the little penguin from Snow Kissed onto some white card, colored them with Copic markers and fussy cut them. I stuck the balloon and the penguin onto the card and added a string to have the penguin holding the balloon. 


I stuck the background panel onto a card with some patterned paper and then laid over top a piece of card with a rectangle die cut out of the middle.  I like creating scenes this way because I think it adds some dimension to the card. To finish it off I cut a strip of white card and die cut both ends using one of the fishtail banner dies. I then added the sentiment in silver embossing power. 

That finishes up the card for today. I hope you enjoyed it! Thanks for stopping by!

Supplies:


Monday, October 19, 2015

Furever Friends Purrfect Birthday Cat Card with Melissa

Hello Everyone, Melissa here. Today I have a card to share with you featuring the Furever Friends stamp set. I think this set is so cute! It is super hard to find cute cat stamps so these are amazing! 


I decided to make a simple and fun little scene by combining the Forever Friends set with the Birthday Smiles set. To create this card I first started with a strip of white card, this panel is one layer so I laid out the stamps how I wanted and proceeded to stamp and mask them until complete. I then colored the images using Copic markers. 

To finish the card I mounted it onto of some black card and then on top of some patterned paper. I think this card is super fun and easy to make and would be a great Birthday card for any cat lover!


I hope you like it.  Be sure to check back this week for more inspiration using Furvever Friends! Thanks for stopping by!

Supply List:

Monday, September 21, 2015

Birthday Smiles Kraft vs. White Ice Cream Cone Birthday Cards

How was your weekend?  They always go by way too fast, don't they?  Today I'm wrapping up the Birthday Smiles stamp set with a fun little crafty experiment.  I wanted to play with the ice cream cone image for a card that would be super easy to mail and I couldn't decide if I preferred kraft or white cardstock for my background so I decided to try both!  :)


For the kraft card I stamped the ice cream images with Hero Arts Latte Chalk Ink and lightly shaded the image with E42 Copic Sketch marker.


For my card in white I stamped the cones in the background using Hero Arts Soft Sand shadow ink which I traced with an E41 Copic Sketch marker.  I then colored in the pink portion on the ice cream and hearts with a RV52 Copic marker which was blurred a bit with the colorless blender pen.


For both of the focal point ice cream cones I stamped them onto Neenah Solar White cardstock using Hero Arts Passion Flower ink (which is actually a pale pink despite what the case shows) and Bubblegum shadow inks for the ice cream and Hero Arts Soft Sand and Latte Ink for the cone.

To give my ice cream a bit of a shaded look, I used the solid ice cream image which I added a bit of bubblegum ink to the bottom and one side before stamping it again over the top of the first stamped image in Passion Flower.  I finished them off with a bit of glossy accents added to the hearts on top.


So which version is your favorite?  My personal favorite is the kraft, but my family prefers the white.  I would love to hear what you think.  ;)

Friday, September 18, 2015

Birthday Smiles: Smiley Face Balloon Birthday Card

Happy Friday!  I'm back today with another card using the Birthday Smiles Stamp set.

My background is mostly one layer which I created by stamping the balloons on masking material and moving the masks around as I stamped the balloons in back.  I like how this looks, but it would have been equally easy to stamp & color them on cardstock and layer them afterwards.


When I had my card nearly completed I realized my white background was a bit too stark so I lined up those masks again and came in with some light color using my Copic airbrush (the Tim Holtz Distress Marker Spritzer tool also works great).

I finished my card by popping up one smiley face balloon with foam tape and adding a matching sentiment on a piece of scratch cardstock which I inked up with Mustard Seed and Fossilized Amber distress ink.


You may have noticed there's a little tiny curved "sprinkle" in the Birthday Smiles stamp set.  That was added as an extra stamp to layer over the balloon tie to make the appearance the dangling string is tied on.  ;)

Thanks again for stopping by!  I hope you have a nice and relaxing weekend!  :)

Thursday, September 17, 2015

Birthday Smiles Girly Birthday Card Ideas

Today I have a couple of girly birthday cards to share using some more of the Birthday Smiles stamp set.

My first card uses a snippet of everything offered from this set:  Cupcakes, Balloons and Banners, oh my!  I colored my stamped images with Copic Markers.  The background was lightly watercolored using Tumbled Glass Distress Reinker and the sentiment strip was inked up by sponging on Mustard Seed and Wild Honey Distress inks.


I will admit that once I had all of the images adhered to the card, it felt like I had space everything too far apart, leaving a huge gap in the center.  Crystal Reflections sequins from Simon Says Stamp came to my rescue and saved my card.  I love the colors in this mix!  They're so pretty!


My second card uses most of the remaining images in the set, focusing on the ice cream cone.  Once again I colored the images with Copic markers and then matched them to distress inks for the background strips.


This was a fairly quick and easy card to create and yet it's one of my favorites.  Because I knew I would be fussy cutting the simple ice cream images out, I didn't worry about coloring within the lines which made coloring and blending so fun and carefree.  I finished off my card with some straight machine stitching using coordinating colors of thread.


With some simple changes to the color scheme (and switching the sequins to paint splats or epoxy dots) I think these would also look great with a masculine spin.  I'd love to see your take on these stamps.  As your orders start to arrive, don't forget to share your creations on our new Flickr group.  ;)

Wednesday, September 16, 2015

Birthday Smiles & Fishtail Banners Birthday Scrapbook Layout

I'm super excited to officially share a scrapbook layout using the Birthday Smiles stamp set along with the new Fishtail Banners dies!


I still had a few photos to scrapbook from an ice cream party my daughter had a number of years ago so when it came time to play with these stamps, I immediately knew the project I wanted to use them on!  I love how they look stamped out in matching inks with Doodlebug's Petite Prints Collection.


Here's an close-up view of how I used the fishtail banners on this layout.  I love how they look layered with one another and cut from different widths of patterned paper!  


To add a fun detail to the ice cream cones and cupcake, I dressed them up with Doodlebug Sprinkles.


Here's another look at the dies.  The little cutout tick marks make it easy to line up your paper strips no matter what the width.  They can create pennants and banners up to 4-1/4 inches wide from any basic strip of paper.  For those that missed it, I shared a video last week on how these dies work on our YouTube channel HERE.  :)
 

I hope I've inspired you to try stamping on your scrapbook layouts.  Thanks so much for stopping by!  :)


Monday, August 31, 2015

Birthday Smiles: Sending A Smile Your Way Banner Card

Hi there!  For today's card I thought I would share how versatile the Birthday Smiles stamp set is and how well it works for everyday cards.

This card focuses on the little banner and pennant images which I colored with my Copic markers.  Since I knew I would be fussy cutting these out, I had a blast really coloring outside the lines (big time) and focusing my efforts on quickly blending the colors instead.  With the straight lines I had them colored and cut out in a matter of minutes which was awesome.


For my background, I finally experimented with my new Zig Clean Color Real Brush Markers.  I added a bunch of water to my Ranger watercolor cardstock panel and then just went to town layering the ink from the Zig markers.  I have much to learn and I must admit that I don't know if my perfectionist personality is well suited for watercolors, but after a little patting with a paper towel I was satisfied with it.

I have another confession... That little sentiment on the cloud punch was my way of rescuing this card from the trash bin.  I sadly made a mess of stamping it directly on my background with the textured surface.  It still feels a bit out of place to me, but I'm happy I was able to find a way to make it work.  ;)


Here's a look at the full Birthday Smiles stamp set used for today's card (available for purchase on September 8th):


Thanks so much for stopping by.  I hope you have a happy Monday!  :)