Thursday, August 10, 2023

Color My World Card with Marine

Hey crafty friends, Marine here, I'm thrilled to be back on the blog today with this super colorful 3D card featuring crayons that I created using stamps from Color My World

Sunny Studio Stamps: Color My World Card by Marine Simon

Even before figuring out which design I wanted to make for my card, I knew that I wanted to have my crayons in rainbow order. So I pulled out all my Lawn Fawn premium dye inks, and stamped a bunch of crayons. I used the first three layers to build the colorful parts of the crayons, and then added the black details. Here are the inks I used for each crayon:

- Red: peachy keen + wild rose + guava
- Orange: peach fuzz + carrot + fate tan
- Yellow: butter + lemonade + sunflower
- Green: celery stick + freshly cut grass + jalapeno
- Aqua: kiddie pool + mermaid + peacock
- Blue: moonstone + forget me not + blue jay
- Purple: fresh lavender + grape soda + grape jelly
- Pink: ballet slippers + bubblegum + plastic flamingo
- Black details: black licorice

Sunny Studio Stamps: Color My World Card by Marine Simon

I cut all the crayons using the coordinating die, and then moved on to the 3D card base. I decided to use the same color combo as the real Crayola boxes, meaning that I cut all the card base pieces out of dark yellow cardstock, and the decorative pieces out of a green gingham paper from the Joyful Holiday paper pack. I built the whole card base, and then white heat embossed my "You color my world" greeting from Color My World on the front of the card.

Sunny Studio Stamps: Color My World Card by Marine Simon

Next step was to stick all the crayons inside the card. And to make that part quick and easy, I cut three acetate strips as wide as the card, and attached nine crayons on each strip in a rainbow order using liquid glue. And once I had my three rows of crayons attached on the acetate strips, I stuck each acetate strip inside the card using glue dots. 

And that's it! I hope that you like this bright and colorful 3D rainbow crayons card! Thanks so much for stopping by, and see you next week!

Sunny Studio Supplies Used:

Color My World Stamps
Shop at:
Sunny Studio
Color My World Dies
Color My World Dies
Shop at:
Sunny Studio
Joyful Holiday Paper
Shop at:
Sunny Studio

Wednesday, August 9, 2023

Barnyard Buddies Card with Catherine

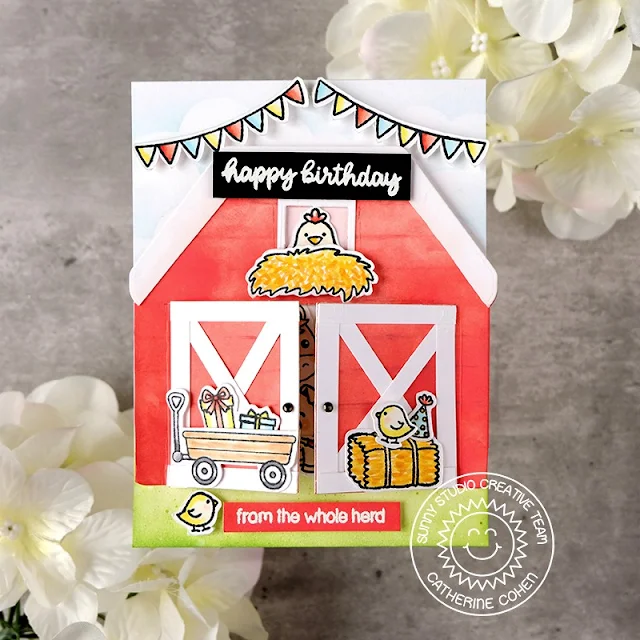
Hello Crafty Friends! Catherine here! Today, I am sharing a peek-a-boo birthday card created with the adorable Barnyard Buddies Stamps!

Sunny Studio Stamps: Barnyard Buddies Card by Catherine Cohen (featuring Gingerbread House Dies, Fluffy Cloud Dies, Inside Greetings)

To start, I masked off 3” from the bottom of A2 white cardstock. I ink blended the unmasked part with Tumbled Glass Distress Oxide using a cloud stencil made with Fluffy Clouds Border Dies. Next, I removed the mask and I lightly ink blended the bottom of the background panel up to 1 ½” with Mowed Grass Distress Oxide. I splattered the grass with some green watercolour for interest.

To make the barn, I used the gingerbread house shadow die in Gingerbread House Dies. I die cut two shadows out of white cardstock and I trimmed one shadow for the roof (B).  To make the barn doors, I used a craft knife and cut the openings as shown in the solid lines (A). I scored the door hinges (dotted lines).

For the barn door braces (C), I trimmed white cardstock to the following sizes:
Vertical Strips: ¼” W x 2” H (total 4 pieces- 2 per door)
Horizontal Strips: ¼”W x 1 ¾”H (total 4 pieces- 2 per door)
Crosses: ¼” W x 1 ¾”H ( total 4 pieces- 2 per door)

I added a barn window with a small 7/8”W x 1” H die that I had in my stash.

Using a scoreboard, I made horizontal lines across the barn (A) for a wood effect. I then, ink blended the barn with Barn Door Distress Oxide. I adhered all the pieces of the barn together.

Sunny Studio Stamps: Barnyard Buddies Card by Catherine Cohen (featuring Gingerbread House Dies, Fluffy Cloud Dies, Inside Greetings)

Next, I stamped and die cut the images from Barnyard Buddies Stamps. I added a wagon from Harvest Mice Stamps, hay from Farm Fresh Stamps, presents from Holiday Express Stamps and Cozy Christmas Stamps, and a party hat from Purrfect Birthday Stamps. I colored the images with Copic Markers listed in my blog link below.

I adhered the animals onto the background panel and then I adhered the barn onto the panel with foam tape. I adhered the wagon, presents, party hat, chick, and hay onto the barn. I finished off the card with some bunting from Balloon Rides Stamps and White Heat Embossed sentiments from Inside Greetings Birthday Stamps and Barnyard Buddies Stamps.

Thanks so much for joining me today! For a list of Copic Markers used, please feel free to visit me at Crafti-Cat. Have a wonderful week!

Sunny Studio Supplies Used:

Holiday Express Stamps
Shop at:
Sunny Studio
Holiday Express Dies
Shop at:
Sunny Studio
Gingerbread House Dies
Shop at:
Sunny Studio
Barnyard Buddies Dies
Shop at:
Sunny Studio
Barnyard Buddies Stamps
Shop at:
Sunny Studio
Purrfect Birthday Stamps
Shop at:
Sunny Studio
Purrfect Birthday Dies
Shop at:
Sunny Studio
Fluffy Clouds Border Dies
Shop at:
Sunny Studio
Farm Fresh Stamps
Farm Fresh Stamps
Shop at:
Sunny Studio
Farm Fresh Dies
Farm Fresh Dies
Shop at:
Sunny Studio
Harvest Mice Stamps
Harvest Mice Stamps
Shop at:
Sunny Studio
Harvest Mice Dies
Harvest Mice Dies
Shop at:
Sunny Studio
Balloon Rides Stamps
Shop at:
Sunny Studio
Balloon Rides Dies
Balloon Rides Dies
Shop at:
Sunny Studio
Inside Greetings Birthday
Shop at:
Sunny Studio
Cozy Christmas Stamps
Shop at:
Sunny Studio
Cozy Christmas Dies
Cozy Christmas Dies
Shop at:
Sunny Studio

Tuesday, August 8, 2023

Purrfect Birthday Card with Isha

Hello everyone, I am Isha with a clean and simple card featuring the adorable cat image from the Purrfect Birthday stamp set. Even if this is a birthday stamp, I decided to create a fun and happy non-birthday card for a friend just to let her know that she makes me happy :)

Sunny Studio Stamps: Purrfect Birthday Card by Isha Gupta (featuring Slimline Dies, Home Sweet Gnome, Lovey Dovey, Garden Fairy)

I started by sponging a white card for the sky using kitsch flamingo, wilted violet and scattered straw distress oxide inks. Flick some water for some texture. Die-cut the front panel using the cloud die from the Slimline Nature Border dies. Adhere both the pieces to a white card base. Stamp the sentiment from the Lovey Dovey stamp using grey inks by Altenew to give an ombrè effect. 

Sponge the grass area by masking it using a post-it. Stamp the images, color using copic markers and die-cut using the coordinating dies. Adhere to the card using 3d foam and liquid glue.

Sunny Studio Stamps: Purrfect Birthday Card by Isha Gupta (featuring Slimline Dies, Home Sweet Gnome, Lovey Dovey, Garden Fairy)

Cat - Purrfect Birthday stamp and dies
Heart - Lovey Dovey stamp
Mushroom house - Garden Fairy stamps and dies
Mushroom - Home Sweet Gnome stamp and dies

To finish I added some Nuvo drops onto the mushroom. Thank you for dropping by and have a nice day!

Sunny Studio Supplies Used:

Purrfect Birthday Stamps
Shop at:
Sunny Studio
Purrfect Birthday Dies
Shop at:
Sunny Studio
Home Sweet Gnome Stamps
Shop at:
Sunny Studio
Home Sweet Gnome Dies
Shop at:
Sunny Studio
Slimline Nature Borders
Shop at:
Sunny Studio
Garden Fairy Stamps
Garden Fairy Stamps
Shop at:
Sunny Studio
Garden Fairy Dies
Garden Fairy Dies
Shop at:
Sunny Studio
Lovey Dovey Stamps
Lovey Dovey Stamps
Shop at:
Sunny Studio

Monday, August 7, 2023

City Streets Card with Bobbi

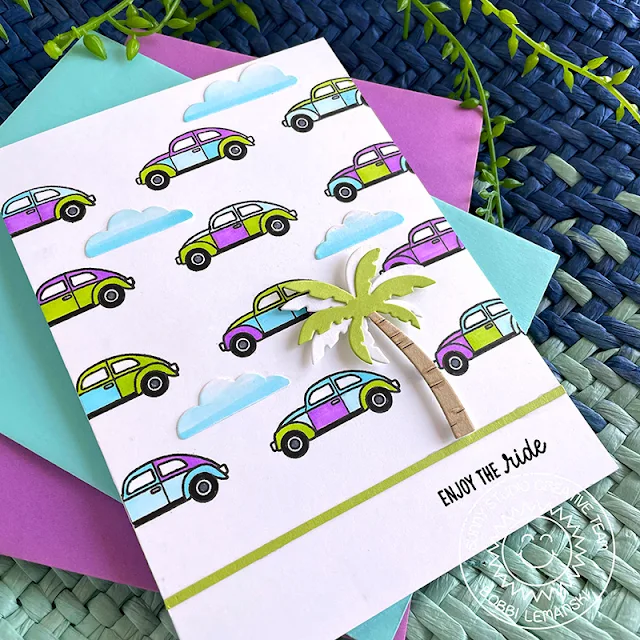
Hello Sunny friends, Bobbi here! Today I’m sharing a fun card using just one image from the City Streets stamp setI love the look of a retro VW bug or van. I have never owned one, but I just think they are interesting and scream summer-fun vibes! Whenever I see one in a stamp set, I’m immediately drawn to that particular image. No surprise, it happened again. I focused right in on the car included in this city-inspired set and made this card. It’s okay not to use every image in a set every time. Sometimes a card can be fun using just one design.

Sunny Studio Stamps: City Streets card by Bobbi Lemanski (featuring Tropical Trees Backdrop Dies, Inside Greetings)

For this card, I’m using the following products:

City Street stamp set (There is also a coordinating die set available for this set that I did not use.)

Tropical Trees background set

Country Carnival stamp set for the front panel sentiment (There is also a coordinating die set available for this set that I did not use.)

Inside Greetings Congrats stamp set for the inside sentiment


Sunny Studio Stamps: City Streets card by Bobbi Lemanski (featuring Tropical Trees Backdrop Dies, Inside Greetings)


To make this 5″ X 7″ card, I stamped the 
automobile repeatedly over a 5″ X  7″ front panel cut from white cardstock. I used my MISTI stamping tool to line up the bottom of the image to ensure a clean grid of cars. I kept some space at the bottom of the card front for a sentiment.  I colored the cars using four Copic colors: B01, B00, V04, YG23. I color-blocked the cars to make each one different. How cute are these cars?! This was a new color combo for me, too.

Using the Tropical Trees background set, I die cut a palm tree and four clouds in varying sizes. I used the two shades of blue to color the clouds and cut the tree from colored cardstock. The elements were added to the front panel. I used foam dots to attach the palm tree so that it stood out from the background. A thin green 1/8″ strip of cardstock was glued right under the tree to ground it. I stamped the sentiment, “enjoy the ride” underneath the strip.

Sunny Studio Stamps: City Streets card by Bobbi Lemanski (featuring Tropical Trees Backdrop Dies, Inside Greetings)

Inside the card, I stamped a phrase from the set, Inside Greetings Congrats stamp set. This card could be used for  many life changing adventures such as a retirement, change of job, graduation, wedding, and/or travel adventure. It’s just a fun summer card with a little unexpected twist! I’m gonna say it…. “Way to go, Bobbi!” Haha!

Thanks for stopping by today. If you want to see more ideas and inspiration from me, subscribe to my blog, BobbiHartDesign.com. I’ll send you updates on new posts! You can also find me on Instagram as @BobbiHartDesign and on Facebook as BobbiHartDesign.

Sunny Studio Supplies Used:

City Streets Dies
City Streets Dies
Shop at:
Sunny Studio
City Streets Stamps
City Streets Stamps
Shop at:
Sunny Studio
Country Carnival Stamps
Shop at:
Sunny Studio
Inside Greetings Congrats
Shop at:
Sunny Studio
Tropical Trees Backdrop
Shop at:
Sunny Studio

Sunday, August 6, 2023

Hawaiian Hibiscus Card with Cathy

Hey friends! Cathy here today sharing a card that has me dreaming of a tropical vacation featuring the gorgeous Hawaiian Hibiscus Stamps!

Sunny Studio Stamps: Hawaiian Hibiscus Card by Cathy Chapdelaine (featuring Summery Greenery Dies, Stitched Rectangle Dies, Radiant Plumeria)

I started this A2 card by using a fun technique with die-cuts to create an embossed look for the background panel. While I have a bunch of embossing folders and use them all the time in crafting, I love to use this tone-on-tone technique with dies to create unique patterns. I first cut a piece of kraft cardstock 4 1/4" x 5 1/2" and die-cut 10 fronds from kraft cardstock using the Summer Greenery Dies. I adhered these along the outside edges of the cardstock and then die-cut the cardstock piece with a Stitched Rectangle Die. I love the subtle tropical embossed look this gave it! I matted it on black cardstock and adhered it to a peach card front.

For my tropical scene, I cut a piece of white cardstock 2 1/4" x 3 1/2" and cut masks from post-it notes for the sand and horizon. I also punched a circle from Eclipse masking tape for the sun. The Distress inks I used are Brushed Corduroy for the sand, Dried Marigold and Speckled Egg for the ocean/sky and Scattered Straw for the sun. I stamped small palm trees in dark green ink using stamps from the Beach Babies Stamps and the Surfing Santa Stamps. I heat embossed the sentiment from the Tiki Time Stamps with black embossing powder.

Sunny Studio Stamps: Hawaiian Hibiscus Card by Cathy Chapdelaine (featuring Summery Greenery Dies, Stitched Rectangle Dies, Radiant Plumeria)

Next, I die-cut a piece of black cardstock using the smallest Stitched Rectangle Die as a mat for the tropical scene and adhered the combined piece to the card front. I also die-cut a photo corner from brown cardstock using the Notebook Photo Corners Dies to give it a photo or postcard look.

To finish, I stamped the hibiscus and leaves from the Hawaiian Hibiscus Stamps and die-cut them using the coordinating dies. I also heat embossed a flower from the Radiant Plumeria Stamps with white embossing powder, water colored a bit of the center with yellow ink and die-cut it using the coordinating dies.

I hope you enjoyed and thanks for stopping by! For more inspiration, please visit my blog www.inkredibleadventures.com and you can also find me on Instagram as @cathy.chapdelaine.

Sunny Studio Supplies Used:

Tiki Time Stamps
Tiki Time Stamps
Shop at:
Sunny Studio
Stitched Rectangle Dies
Shop at:
Sunny Studio
Beach Babies Stamps
Beach Babies Stamps
Shop at:
Sunny Studio
Hawaiian Hibiscus Stamps
Shop at:
Sunny Studio
Hawaiian Hibiscus  Dies
Hawaiian Hibiscus Dies
Shop at:
Sunny Studio
Radiant Plumeria Stamps
Shop at:
Sunny Studio
Radiant Plumeria Dies
Shop at:
Sunny Studio
Surfing Santa Stamps
Shop at:
Sunny Studio
Summer Greenery Die
Summer Greenery Die
Shop at:
Sunny Studio
Notebook Photo Corners Dies
Shop at:
Sunny Studio