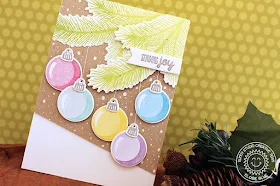
So to begin my card today I stamped out all of my ornaments and branches onto some white cardstock in various colours of pigment inks. I used my MISTI to help stamp them all out, these are pretty easy to line up, but the branches I wanted some variation in colour to them, so re stamping the branches was a lot easier with the MISTI tool.
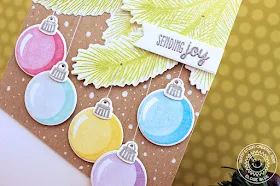
Once I stamped them all out, I used the matching dies to cut all my pieces out. I then applied liquid adhesive to the branch in the back and stuck that down to a kraft panel. I then used foam adhesive and places that on the back of the rest of the pieces and adhered it down into place too. Once I had my layout sorted out, I was going to draw some lines on for the strings, but I didn't want to ruin my card if I didn't like them, so I pulled out some grey thread and decided to thread on the ornaments to the branches, to give a little more texture and I really love how it turned out! I could have tied a bow at the top of each of them, but since the card was quite busy already I didn't want to go over board.
Before stamping the sentiment, I decided to go ahead and add some white dots to the background, so I used a white gel pen and added some in the background, fading down to the bottom of the card. I then needed to stamp my sentiment. As mentioned before after 4 attempts I finally liked something. For my first attempt, I stamped the sentiment crooked in the bottom left hand corner, so then I tried to cover it up with a strip, but the strip had to be too thick and the large strip just looked too awkward. Then I decided to cut the kraft piece at an angle, to cut off the failed sentiment and then at this point I embossed the sentiment directly on the white card base and adhered the kraft piece on top, but again I didn't like it so I pulled off the panel, ditched the card base and decided to go with a small sentiment from the Gleeful Reindeer set and heat embossed 'Sending Joy' on a white banner with some silver embossing powder and adhered that in the top right hand corner and I liked that a lot better!
To finish up the card, I then added some Wink of Stella onto the ornaments to make them sparkle and shine!
Thanks for stopping by today I hope you got inspired. Make sure you stop by the blog the rest of the week for more inspiration!
- Eloise
Sunny Studio Supplies Used:


Lovely. I have seen such nice cards with this set. So glad I got it along with the dies. TFS.
ReplyDeleteSo pretty! I love that you used pastels for a softer look!
ReplyDeleteGorgeous card! I love the light colors against the kraft and the snow falling! Beautiful!
ReplyDeleteHappy Holidays!
Hugs,
Jo