Hi crafty friends, Marine here with a tunnel shaker card featuring three super cute penguins having fun and dancing to celebrate the holidays. They are from Penguin Pals as well as the fishes, postcards and candy canes, and I also picked the tree from Feeling Frosty. I stamped those images on white cardstock using an alcohol marker friendly black ink, and colored them using my alcohol markers.
Next I created the tunnel panels. I cut four 5,5 x 4,25" panels out of grey, white glitter and white cardstock as well as a grey pattern paper from the Subtle Grey Tones paper pack. I set the pattern paper panel aside and kept the three others. And using dies from Stitched Oval 2, I cut a large oval window out of the grey panel, a medium oval window out of the white glitter panel, and a small oval window out of the white panel.
I wanted this tunnel card to be a shaker card as well, so I kept
the white panel and attached a piece of acetate at the back of it using liquid
glue. I added foam tape at the back of each tunnel panel.
And on the white panel, I also added foam tape all around the
window to create room for the sequins. I applied powder all along the inside
edges of the foam around the window (the powder makes the edges of the foam non
sticky and this way the sequins don't stick to it), I cleaned the acetate,
and then I added a mix of white sequins, snowflakes, Pure white jewels and Crystal clear jewels into the window
section. I peeled the backing off the foam tape and attached the pattern
paper panel to totally close the shaker. And then I stuck the two other tunnel
panel on top of this shaker panel: the white glitter one first and then the
grey one on top.
To finish this tunnel nicely, I created a frame. I first used the largest die from Scalloped Oval Mat 1 to cut a white woodgrain panel, and then I used the largest die from Stitched Oval 2 to cut a window out of this woodgrain element and this way create an oval frame that I attached on the tunnel panel.
I also cut and glued a white wavy border at the bottom of the panel, and then I attached the images using liquid glue, foam squares and glue dots. Finally I white heat embossed my sentiment "It's penguining to look a lot like Christmas" from Penguin Pals on a slim blue banner that I attached at the top of the tunnel using liquid glue.
And that's it. Feel welcome to check the process video (click on the photo above) to see how easy this tunnel technique is. I hope that you will give it a try! See you next week with a new card and video!
---------------------------------------------
Hello
everyone, Anja here and today
I'm sharing another holiday card where I mixed and matched several fun
products. The Scalloped Oval Mat 1 Dies and
the Stitched Oval 2 Dies set
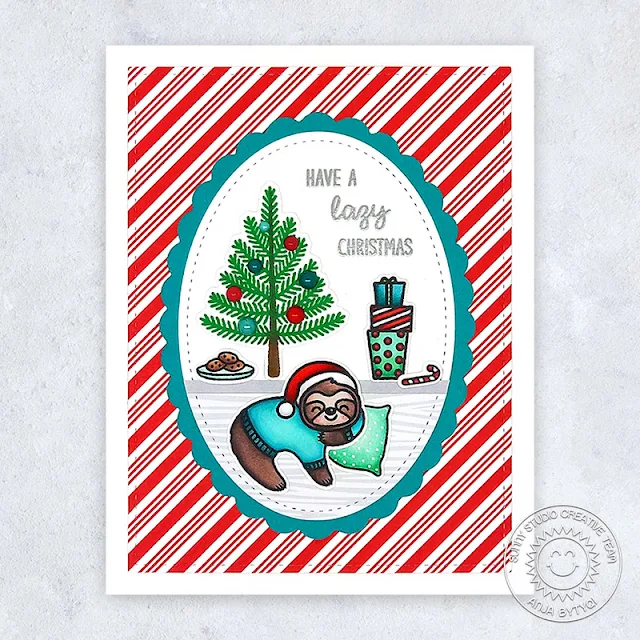
the scene for the sweet Lazy Christmas sloth.
First, I created an A2 card base from white heavyweight cardstock. I die cut the peppermint stripes paper from the All Is Bright 6x6 Paper pack with the largest of the Stitched Rectangle Dies. The scalloped oval was cut from teal cardstock. I die cut the stitched oval from white cardstock as well as from Subtle Grey Tones woodgrain paper. I trimmed the patterned paper and adhered it to the bottom. I stamped the sentiment in VersaMark Ink and heat embossed them with silver embossing powder.
Stamp sets and dies used:
Sloth: Lazy Christmas Stamps + Dies
Cookie plate: North Pole Stamps + Dies
Stack of gifts: Lovable Llama Stamps + Dies
Candy Cane, tree, sack (used as a pillow): Santa Claus Lane Stamps + Dies
Next, I stamped the images from several sets (find them listed below) in Memento Tuxedo Black Ink and colored them with Copic Markers. I cut everything out with the coordinating dies. The fir tree was stamped in green and brown ink and I added Rainbow Pearls in matching colors as ornaments. Finally, I assembled my card by adhering everything with liquid glue.
Thank you so much for stopping by! Have a cozy day!
Sunny Studio Supplies Used:
 Stitched Rectangle Dies Shop at: Sunny Studio |
 Lazy Christmas Stamps Shop at: Sunny Studio |
 Lazy Christmas Dies Shop at: Sunny Studio |
 Subtle Grey Tones Paper Shop at: Sunny Studio |
 Santa Claus Lane Stamps Shop at: Sunny Studio |
 Santa Claus Lane Dies Shop at: Sunny Studio |
 Feeling Frosty Stamps Shop at: Sunny Studio |
 Feeling Frosty Dies Shop at: Sunny Studio |
 North Pole Stamps Shop at: Sunny Studio | |
 North Pole Dies Shop at: Sunny Studio |
 Penguin Pals Stamps Shop at: Sunny Studio |
 Penguin Pals Dies Shop at: Sunny Studio |
 Lovable Llama Stamps Shop at: Sunny Studio | |
 Lovable Llama Dies Shop at: Sunny Studio |
 Scalloped Oval Mat 1 Dies Shop at: Sunny Studio |
 Stitched Oval 2 Dies Shop at: Sunny Studio |
 All Is Bright Paper Shop at: Sunny Studio | |


