Friday, April 26, 2019

Surprise Party Patterned Paper Cards with Lexa and Rachel

Hello everyone! Lexa here today with a project highlighting the Surprise Party Paper which is a bright and cheerful patterned paper that is perfect for any of your birthday projects. I will try one of most interesting thing from the release, Wrap Around Box Dies. Let's get started!

Sunny Studio Stamps: Surprise Party Paper Pack Wrap Around Box Dies Silly Sloths Fancy Frames Birthday Box Birthday Card by Lexa Levana and Rachel Alvarado

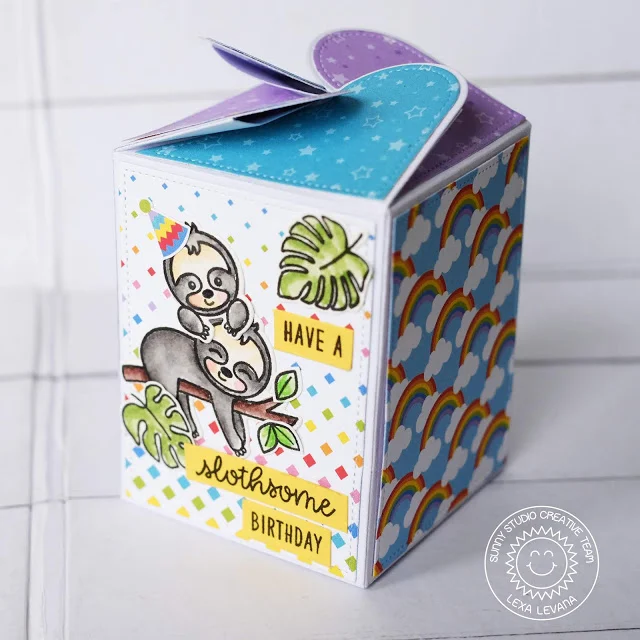
First, I die cut the box dies four times on white cardstock. It's so easy to build. You just need to fold the box along with the fine lines away from you, except for the diagonal lines you need to fold them towards you. It might sounds confusing, but when you get them in your hands you'll get it right away.

Sunny Studio Stamps: Surprise Party Paper Pack Wrap Around Box Dies Silly Sloths Fancy Frames Birthday Box Birthday Card by Lexa Levana and Rachel Alvarado

I use the decorating dies from the same set to cut the rectangles for the panels and also for top part of the box. I use Surprise Party Paper to decorate it. I pick two different patterned papers, one with rainbows and other one is with rainbow color diamonds on it. They are so pretty! I use the other sides of patterned papers in blue and purple for top of the box.

Sunny Studio Stamps: Surprise Party Paper Pack Wrap Around Box Dies Silly Sloths Fancy Frames Birthday Box Birthday Card by Lexa Levana and Rachel Alvarado

To add more cuteness, I use Silly Sloth Stamps and Fabulous Flamingoes Stamp for decorating. The images are stamped with Versafine black ink and watercolor them with Distress Markers. After I finished the coloring I used the coordinating die to cut them all together. 

Sunny Studio Stamps: Surprise Party Paper Pack Wrap Around Box Dies Silly Sloths Fancy Frames Birthday Box Birthday Card by Lexa Levana and Rachel Alvarado

I stamped the sentiments on a piece of yellow cardstock and adhere them on the box as blocks. I add party hats by fussy cutting them from one of the patterned paper from Surprise Party Paper and adhere them on the adorable sloths. Here's a closer look of it.

Thank you so much for stopping by today. I hope you like today's post as much as I do. Have a wonderful day everyone!
-------------------------------------------------------

Hello everyone! It's Rachel here and I am sharing a card with you today that features the new Surprise Party Paper Pack. I just adore all of the gorgeous paper pads from Sunny Studio Stamps. If you're familiar with my style, you know that I love to use lots of bold and vivid colors.

Sunny Studio Stamps: Surprise Party Paper Pack Wrap Around Box Dies Silly Sloths Fancy Frames Birthday Box Birthday Card by Lexa Levana and Rachel Alvarado

The Surprise Party Paper Pad is filled with colorful and gorgeous sheets of patterned paper. I used two different sheets of patterned paper in my card today. I also combined this paper pad with the new Silly Sloths Stamp Set and coordinating dies.

Sunny Studio Stamps: Surprise Party Paper Pack Wrap Around Box Dies Silly Sloths Fancy Frames Birthday Box Birthday Card by Lexa Levana and Rachel Alvarado

To start, I first stamped all of my images with Memento Tuxedo Black Ink onto a sheet of Neenah Solar White 110lb Card Stock. I then used Copics to color everything.

Copic Colors Used - Greens: YG0000, YG01, YG06, YG17, YG67; Sloth Body: E30, E31, E33, E39, E29; Sloth Face and Belly: E50, E51, E53, E55; Red Party Hat: R14, R26, R59

Sunny Studio Stamps: Surprise Party Paper Pack Wrap Around Box Dies Silly Sloths Fancy Frames Birthday Box Birthday Card by Lexa Levana and Rachel Alvarado

I then die cut a circle out of my center yellow patterned piece of paper and placed behind it a bold blue sky made with Distress Oxide Inks (Tumbled Glass and Salty Ocean). I splattered this ink blended piece with some Opaque White Paint and Black Watercolor Paint for some added interest. I added my scalloped frame using the Fancy Frame Circle Dies with White Card Stock.

I then stamped my sentiment with Black Ink (and heat embossed the word "slothsome") prior to piecing my card together. Lastly, I used 3D Foam Adhesive Squares to add my images, giving them some dimension.

Thanks so much for dropping by today! Hugs!

Sunny Studio Supplies Used:

Fancy Frames-Circle Dies
Shop at:
Sunny Studio
Wrap Around Box Die
Wrap Around Box Die
Shop at:
Sunny Studio
Fabulous Flamingos Stamps
Shop at:
Sunny Studio
Fabulous Flamingos Dies
Shop at:
Sunny Studio
Silly Sloths Stamps
Silly Sloths Stamps
Shop at:
Sunny Studio
Silly Sloths Dies
Silly Sloths Dies
Shop at:
Sunny Studio
Surprise Party 6x6 Paper
Shop at:
Sunny Studio

Thursday, April 25, 2019

Catch A Wave Cards with Vanessa and Anja

Hi everyone! Vanessa here with an underwater card using Catch a Wave Dies and the Best Fishes set. I love the new dies! They are so versatile, I almost couldn't decide how to use them first. Here is what I came up with for today.

Sunny Studio Stamps: Best Fishes Catch A Wave Dies Magical Mermaids Summer Themed Cards by Vanessa Menhorn and Anja Bytyqi

I first die-cut the waves from blue vellum and adhered the three layers to the card. Now I stamped the images from Best Fishes onto white cardstock, colored them with Copics, die-cut the elements with the matching dies and adhered them, creating dimension with foam tape. Finally, I stamped the sentiment to the top of the card.

Sunny Studio Stamps: Best Fishes Catch A Wave Dies Magical Mermaids Summer Themed Cards by Vanessa Menhorn and Anja Bytyqi

Vellum makes great water, I still love using it for my underwater scenes! 

Thank you for stopping by today, see you next week!

-------------------------------------------------------

Hi everyone, Anja here and today I'm back with a new summer project featuring the Catch A Wave Dies.

Sunny Studio Stamps: Best Fishes Catch A Wave Dies Magical Mermaids Summer Themed Cards by Vanessa Menhorn and Anja Bytyqi

This time I created a circle card and combined the wave die-cuts with the Magical Mermaid Stamps. First, I die cut the waves from several aqua and blue shades of cardstock and layered them on top of each other. I also die cut a stitched frame from navy cardstock.

Sunny Studio Stamps: Best Fishes Catch A Wave Dies Magical Mermaids Summer Themed Cards by Vanessa Menhorn and Anja Bytyqi

Next, I stamped the images in Memento Tuxedo Black Ink and colored them with Copic Markers. The sentiment is from the Miss Moo set and I white heat embossed it. To embellish my card I added two beautiful pearls which matches the mermaid's tail perfectly.

Thank you so much for stopping by! Have a wonderful day!

Sunny Studio Supplies Used:

Magical Mermaid Dies
Shop at:
Sunny Studio
Magical Mermaid Stamps
Shop at:
Sunny Studio
Miss Moo Stamps
Miss Moo Stamps
Shop at:
Sunny Studio
Catch A Wave Dies
Catch A Wave Dies
Shop at:
Sunny Studio
Best Fishes Stamps
Best Fishes Stamps
Shop at:
Sunny Studio
Best Fishes Dies
Best Fishes Dies
Shop at:
Sunny Studio

Wednesday, April 24, 2019

Frilly Frames Cards with Franci and Mona

Hi there and happy Wednesday! Franci here with you today with a "Best fishes" card showcasing lots of the new items from the latest release! I'm in love with this card, these critters are adorable and have such happy faces, everything on this project make me smile!

Sunny Studio Stamps: Frilly Frames Stripes Dies Catch A Wave Dies Sending Sunshine Slice Of Summer Summer Themed Cards by Franci Vignoli and Mona Toth

I started by die cutting the new Frilly Frames Stripes Dies out of some white cardstock and I backed it up with a yellow decorated paper from the Flirty Flowers Paper pack. Then I mounted everything on to my white card base. I stamped lots of images from these new sets: Best FishesSending Sunshine and Seasonal Trees. I colored them with Copics and die cut them all out with coordinated dies.

I also die cut 2 little clouds using the new Fluffy Clouds dies. I love this set because 2 clouds are meant to be die cut and the other one leaves beautiful stitched cloudy details on to the cardstock. I can't wait to use these to create beautiful dry embossed details on to another project soon!

Sunny Studio Stamps: Frilly Frames Stripes Dies Catch A Wave Dies Sending Sunshine Slice Of Summer Summer Themed Cards by Franci Vignoli and Mona Toth

I die cut another Frilly Frame without the inside piece out of white cardstock and I created a wavy border with the Catch a Wave dies set, plus I die cut the largest oval from the Stitched Ovals dies set.

I sponged some light blue ink on to my wave and some brown shades on to my oval to create the ocean and the desert island elements for my scene. I added also some details to my brown hill to create a sand effect: just mark little circles with multiples brown colors of Copics, add some little splatters with the same ink u used for ink blending and finally add some more little dots with a white gel pen. 

Sunny Studio Stamps: Frilly Frames Stripes Dies Catch A Wave Dies Sending Sunshine Slice Of Summer Summer Themed Cards by Franci Vignoli and Mona Toth

I glued everything down with a combo of liquid glue and foam adhesive and I stamped my sentiment at the bottom of the card. Finally I added some white embellishments to mimic some bubbles. I love, love, love that cute hammerhead shark, I think it's my favorite ocean themed critter ever!

Hope you like my card and thank you so much for stopping by today!

---------------------------------------------------

Hi crafty friends! It's Mona here, today I am showing you an another yummy card featuring the Slice of Summer stamp set with the new Frilly Frames Stripes dies.

Sunny Studio Stamps: Frilly Frames Stripes Dies Catch A Wave Dies Sending Sunshine Slice Of Summer Summer Themed Cards by Franci Vignoli and Mona Toth

I started the card making with stamp layering. For the stamping I used Hybrid Inks from Scrapbook.com. For the lemon I used the Yellow Group and for the watermelon I used the Rose and Green groups. When the stamp layering was done I die-cut the images with the coordinating dies.

Sunny Studio Stamps: Frilly Frames Stripes Dies Catch A Wave Dies Sending Sunshine Slice Of Summer Summer Themed Cards by Franci Vignoli and Mona Toth

When it was done I created the background with the new Frilly Frames Stripes dies. I absolutely love that the inside of this die is removable so you can play with the variations.

Sunny Studio Stamps: Frilly Frames Stripes Dies Catch A Wave Dies Sending Sunshine Slice Of Summer Summer Themed Cards by Franci Vignoli and Mona Toth

Next I heat embossed the sentiments to a pink and dark green cardstock.

Sunny Studio Stamps: Frilly Frames Stripes Dies Catch A Wave Dies Sending Sunshine Slice Of Summer Summer Themed Cards by Franci Vignoli and Mona Toth

In the end I styled my card and adhered the tasty images to my card base, embellished the card and it was done. Thank you very much for reading through my post, I hope that you have enjoyed it and I have inspired you! If you like my creations let's be friends on Instagram. :)

Sunny Studio Supplies Used:

Stitched Oval Dies
Stitched Oval Dies
Shop at:
Sunny Studio
Frilly Frames Stripes Die
Shop at:
Sunny Studio
Fluffy Clouds Dies
Fluffy Clouds Dies
Shop at:
Sunny Studio
Catch A Wave Dies
Catch A Wave Dies
Shop at:
Sunny Studio
Best Fishes Stamps
Best Fishes Stamps
Shop at:
Sunny Studio
Best Fishes Dies
Best Fishes Dies
Shop at:
Sunny Studio
Seasonal Trees Stamps
Shop at:
Sunny Studio
Seaonal Trees Dies
Seaonal Trees Dies
Shop at:
Sunny Studio
Sending Sunshine Stamps
Shop at:
Sunny Studio
Sending Sunshine Dies
Shop at:
Sunny Studio
Slice of Summer Stamps
Shop at:
Sunny Studio
Slice of Summer Dies
Shop at:
Sunny Studio

Tuesday, April 23, 2019

Hawaiian Hibiscus Cards with Juliana and Angelica

Hello Friends! It's Juliana here today to share a card I created using the Hawaiian Hibiscus Stamp Set! To give it a little extra sparkle, I've paired it with another fun new product by Therm O Web. Keep reading to check out all the details!

Sunny Studio Stamps: Hawaiian Hibiscus Frilly Frame Dies Fancy Frames Dies Hello Word Die Hello Card Aloha Card by Juliana Michaels and Angelica Conrad

As always, I started with some stamping. I stamped the various layers of the hibiscus using the gorgeous Premium Hybrid Inks by Scrapbook.com. For the flowers I used the Pink Group which consists of Ballet Slipper, Pink Lemonade, Carnival Pink, Havana Red and for the center I used Daffodil. When using layering stamps, I sometimes find it easier to line up the layers if I stamp the smallest piece first. With these flowers, I stamped the stamen first and then started with the largest flower image and the lightest ink color and progressed through the flower. When I do it this way, I always seem to get things to line up better. To finish off the stamping, I used Pear, Guacamole and Olive for the leaves. Once all the stamping was complete, I die cut the images using the Hawaiian Hibiscus Dies.

Sunny Studio Stamps: Hawaiian Hibiscus Frilly Frame Dies Fancy Frames Dies Hello Word Die Hello Card Aloha Card by Juliana Michaels and Angelica Conrad

Now it's time to add the extra sparkle I mentioned. I die cut a piece of the white cardstock using the inside die from the Frilly Frames Striped Die to create a mask. I placed this on top of another piece of white cardstock and held it in place with Therm O Web Purple Tape. Using the using the Deco Foil Stencil Pal I applied a layer of Therm O Web Glitz Glitter Gel in Turquoise Sea. I then lifted up the mask and allowed the gel to dry. While it was drying I die cut another piece of white cardstock, this time using the outside die from the Frilly Frames Striped Die. Once the gel was dry, I adhered these piece together and then adhered both of them to a piece of green cardstock.

Sunny Studio Stamps: Hawaiian Hibiscus Frilly Frame Dies Fancy Frames Dies Hello Word Die Hello Card Aloha Card by Juliana Michaels and Angelica Conrad

With the background finished, I then created a cluster design with the Hawaiian Hibiscus images. I used double sided foam tape to adhere them to the card front. To complete the card, I stamped Aloha using the Havana Red Ink onto a banner die cut using the Fancy Frames Rectangle Dies.

Thanks so much for stopping by today. I hope you enjoyed this bit of inspiration using the Hawaiian Hibiscus Stamp Set. See you next time!

---------------------------------------------------------

Hi friends! Angelica here with a new card to share today. I have always loved Sunny Studio Stamps layered stamps, and the new Hawaiian Hibiscus stamp set is no different. The details in this set are amazing! 

Sunny Studio Stamps: Hawaiian Hibiscus Frilly Frame Dies Fancy Frames Dies Hello Word Die Hello Card Aloha Card by Juliana Michaels and Angelica Conrad

I started off with the stamping process. I used a stamp platform so I could make several flowers and leaves quickly. Each flower has four layers to stamp, and a small Style stamp (the yellow pollen stem in the middle), and the leaves have three layers. After I finished stamping, I used the coordinating dies to cut them out. 

Sunny Studio Stamps: Hawaiian Hibiscus Frilly Frame Dies Fancy Frames Dies Hello Word Die Hello Card Aloha Card by Juliana Michaels and Angelica Conrad

For a simple background, I die cut yellow card stock with the scalloped Rectangle from the Frilly Frames Stripes Dies, and embossed white card stock with the Sunburst Embossing folder. I added the panels to an A2 size card base with double-sided adhesive. I picked out a few flowers and leaves for my bouquet, and attached them to the card with adhesive foam squares. I used the Hello Word die to die-cut my sentiment. My final touch was adding Crystal Glaze to the word after attaching it to the card. 

Sunny Studio Stamps: Hawaiian Hibiscus Frilly Frame Dies Fancy Frames Dies Hello Word Die Hello Card Aloha Card by Juliana Michaels and Angelica Conrad

I love how this card turned out. It’s so simple, yet the colors are so vibrant! I hope I have given you ideas on how to use this stamp set. That’s all I have for today. Thanks for stopping by!

Sunny Studio Supplies Used:

Fancy Frames- Rectangles
Shop at:
Sunny Studio
Hello Word Die
Hello Word Die
Shop at:
Sunny Studio
Sunburst Embossing
Sunburst Embossing
Shop at:
Sunny Studio
Frilly Frames Stripes Die
Shop at:
Sunny Studio
Hawaiian Hibiscus Stamps
Shop at:
Sunny Studio
Hawaiian Hibiscus  Dies
Hawaiian Hibiscus Dies
Shop at:
Sunny Studio